Troubleshooting MikroTik VPN Debugging Connection Issues
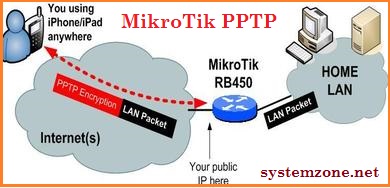
I recently came across a fantastic configuration guide for setting up a VPN server using MikroTik routers! The guide shows how to configure a VPN server using PPTP, allowing remote clients to securely connect to your network. The guide is incredibly detailed and provides step-by-step instructions on how to configure your MikroTik router for VPN use.
If you're interested in setting up a VPN server using MikroTik, then please read on!

What is a VPN and Why Do You Need One?
A VPN, or Virtual Private Network, allows you to securely connect to a remote network over the public internet. This is useful for many reasons, such as accessing files on a remote server or accessing websites that are blocked in your region.
A VPN is also useful for remote workers or businesses with multiple offices spread across the globe. By connecting to a VPN, remote workers can access company resources from anywhere in the world as if they were physically on-premises. Businesses with multiple offices can also use VPN technology to connect all of their offices into a single network, allowing for seamless data exchange between them.
Setting up a VPN Server using MikroTik
So, let's get started with setting up a VPN server using MikroTik! The guide we'll be using is specifically for PPTP configuration, but MikroTik routers also have support for other VPN protocols such as IPSec and L2TP.
Step 1: Enable PPTP Server
The first step is to enable the PPTP server on your MikroTik router. To do this, follow these steps:
- Open the Winbox utility and connect to your MikroTik router.
- Click on the "IP" menu on the left-hand side of the Winbox window and select "Pools".
- Click on the "Add New" button to add a new IP pool.
- Enter a name for the pool and define the range of IP addresses that will be used for VPN clients.
- Click on the "PPP" menu on the left-hand side of the Winbox window and select "Profiles".
- Click on the "Add New" button to add a new PPP profile.
- Enter a name for the profile and select "pptp" as the "Local Address" type.
- Under the "Remote Address" section, select the IP pool you created earlier.
- Click on the "Secrets" tab and add a new user account with a username and password.
- Click "OK" to close the "PPP Profile" window.
- Click on the "PPP" menu again and select "PPTP Server".
- Check the "Enabled" checkbox to enable PPTP server.
- Under the "Server Interfaces" section, select the interface that will be used for the VPN server (e.g. ether1).
- Under the "Authentication" section, select the PPP profile you created earlier.
- Click "OK" to close the "PPTP Server" window.
Step 2: Create Firewall Rules
In order for VPN connections to work, you'll need to create firewall rules that allow traffic to pass through the VPN interface. To create these rules, follow these steps:
- Click on the "IP" menu on the left-hand side of the Winbox window and select "Firewall".
- Click on the "Filter Rules" tab and click the "Add New" button.
- Under the "General" tab, select "pptp" as the "Chain" option and "input" as the "In. Interface" option.
- Under the "Action" tab, select "accept" as the "Action" and leave the "Dst. Address" field as "0.0.0.0/0".
- Click "OK" to close the "Filter Rules" window.
- Repeat steps 2-5 for the "forward" chain and the "out. interface" option.
Step 3: Configure Client Settings
Now that your VPN server is configured, you'll need to configure your client devices to use the VPN. To do this, follow these steps:
- Open the "Network and Sharing Center" on your Windows device.
- Click on "Set up a new connection or network".
- Select "Connect to a workplace" and click "Next".
- Click "Use my Internet connection (VPN)".
- Enter the WAN IP address of your MikroTik router and a name for the connection.
- Click "Next" and enter the username and password you created earlier.
- Click "Connect".
That's it! You should now be securely connected to your MikroTik VPN server.
Conclusion
Setting up a VPN server using MikroTik routers is an incredibly useful tool for remote workers and businesses with multiple offices. With the use of PPTP, setting up a VPN server is easy and can be done by following the steps outlined in our guide above.
If you have any questions or need further assistance in setting up your MikroTik VPN server, please don't hesitate to reach out to us.


Post a Comment for "Troubleshooting MikroTik VPN Debugging Connection Issues"