MikroTik Router Configuration Site-to-Site VPN Setup
If you're looking to create a secure and reliable network between two MikroTik RouterOS devices, then the Site-to-Site Secure Socket Tunneling Protocol (SSTP) VPN configuration is an ideal solution.
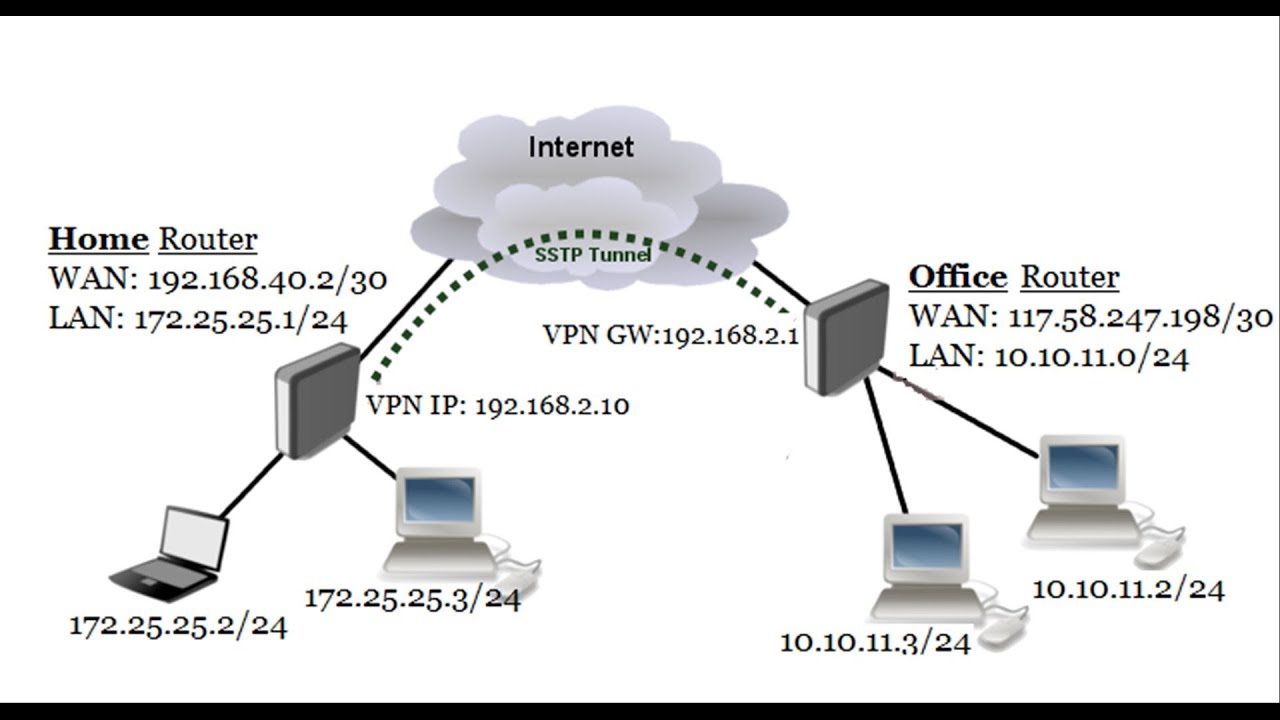
This method allows you to establish a secure VPN connection over the internet between two remote locations. The SSTP VPN connection creates a point-to-point encrypted connection through the internet, which ensures that your data remains secure and protected from prying eyes.
Here are the steps you need to follow to configure the Site-to-Site SSTP VPN between two MikroTik RouterOS devices:
Step 1: Configure the MikroTik RouterOS devices
The first thing you need to do is configure both MikroTik RouterOS devices. You will need to assign IP addresses to both routers, and then configure the SSTP VPN connection.
Here's how to do it:
- Log in to the MikroTik RouterOS web interface.
- Go to the "IP" menu, and then click on "Addresses."
- Click on the "Add New" button to add a new IP address.
- Enter the IP address of the first router, and then click on "Apply" and "OK."
- Repeat these steps to add an IP address for the second router.
- Click on the "PPP" menu, and then click on "SSTP Server."
- Click on the "Add New" button to add a new SSTP server.
- Enter the name of the server, and then select the interface that you want to use for the VPN connection.
- Enter a username and password, and then click on "Apply" and "OK."
- Repeat these steps for the second router.
Step 2: Configure the IPsec settings on the MikroTik RouterOS devices
The next step is to configure the IPsec settings on both MikroTik RouterOS devices. You will need to configure the IPsec policy, proposal, and peer settings.
Here's how to do it:
- Go to the "IP" menu, and then click on "IPsec."
- Click on the "Proposal" tab, and then click on the "Add New" button to add a new proposal.
- Enter a name for the proposal, select the encryption algorithm, and then click on "Apply" and "OK."
- Click on the "Policy" tab, and then click on the "Add New" button to add a new policy.
- Enter a name for the policy, select the IPsec proposal that you just created, and then select the peer IP address of the other router.
- Click on "Apply" and "OK."
- Repeat these steps for the second router.
- Go to the "Interfaces" menu, and then click on the interface that you want to use for the VPN connection.
- Click on the "IPsec" tab, and then select the IPsec policy that you just created.
- Repeat these steps for the second router.
Step 3: Test the Site-to-Site SSTP VPN connection
The final step is to test the Site-to-Site SSTP VPN connection between the two MikroTik RouterOS devices. You can test the connection by trying to ping the IP address of the other router from each router.
If the ping is successful, then the SSTP VPN connection is working correctly.
So, there you have it – a quick and easy way to configure the Site-to-Site SSTP VPN connection between two MikroTik RouterOS devices. With this configuration, you can ensure that your data remains secure and protected, no matter where you are.


Post a Comment for "MikroTik Router Configuration Site-to-Site VPN Setup"