Configuring MikroTik Router As A VPN Server Step-by-Step Guide
What's up, people! Let's talk about MikroTik load balancing over multiple gateways! You know how frustrating it can be to suffer from slow internet and buffering when you're in the middle of streaming a video or watching something on the internet. Well, MikroTik load balancing over multiple gateways is the perfect solution for that!
Before we dive into the details, let's talk about what load balancing really is. Load balancing is the distribution of network traffic across multiple gateways to avoid overloading one particular gateway. In layman terms, it's the practice of using multiple internet connections at the same time to distribute traffic and avoid bottlenecks.
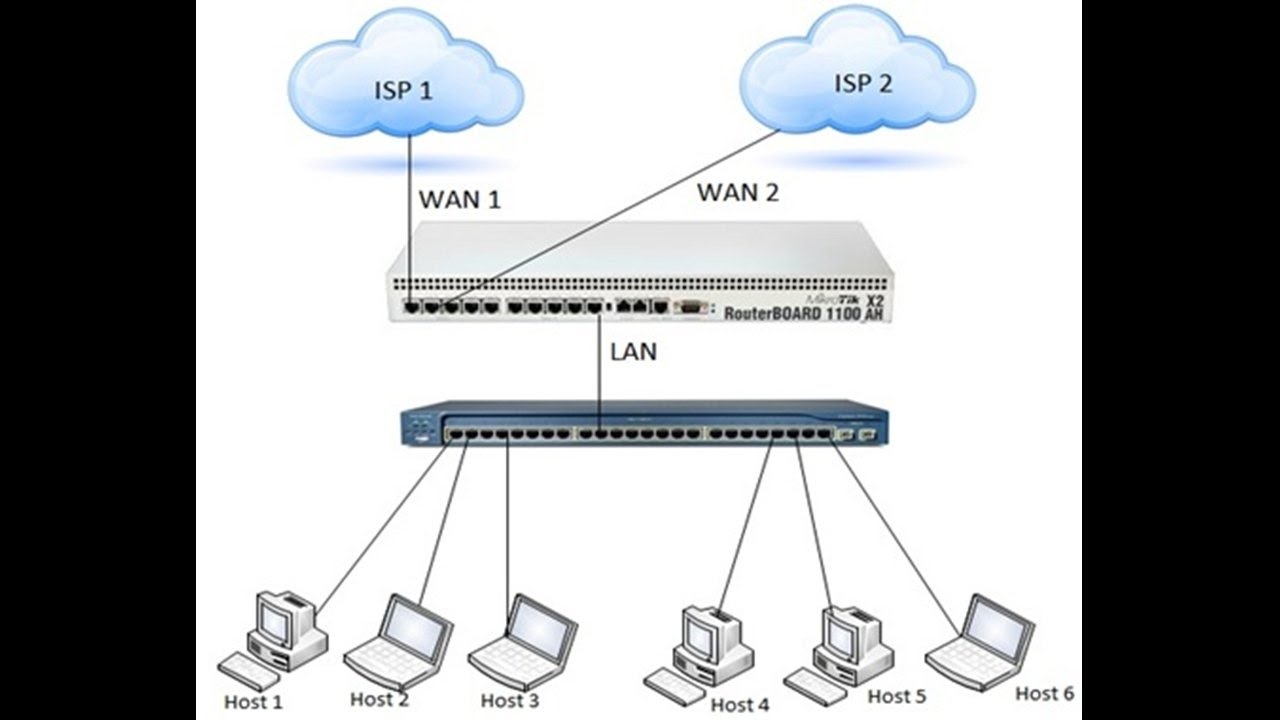
So, how does it work? Well, MikroTik routers have a load balancing feature that enables you to balance traffic over multiple gateways. You can set up two or more WAN connections with your MikroTik router and configure load balancing to distribute your internet traffic and boost your internet speed while avoiding congestion.
There are several advantages of using MikroTik load balancing over multiple gateways, including:
- Improved internet reliability and speed
- Reduced downtime and internet outages
- Increased redundancy and failover protection
- Balanced network load, which can lead to better overall performance
- Better utilization of available bandwidth
Now that we've covered the basics, let's dive into the details.
Details
You'll need a few things before you can set up MikroTik load balancing over multiple gateways. Here's what you'll need:
- A MikroTik router with at least two WAN connections
- An internet connection for each WAN connection
- A computer or device to access your MikroTik router
Once you have everything you need, you can start setting up your load balancing. Here are the steps to follow:
- Open your web browser and log in to your MikroTik router using your login credentials.
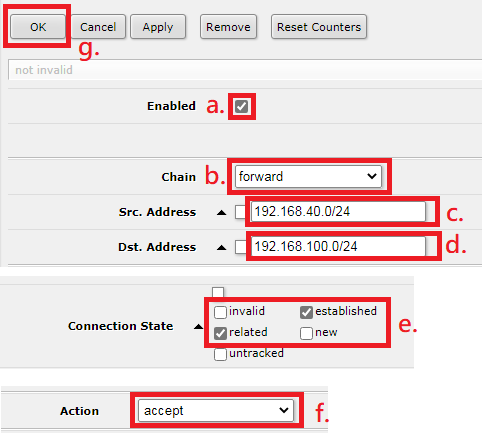
- Go to the "IP" menu and select "Firewall."
- Select the "NAT" tab and click the "+" button to add a new rule.
- Choose "srcnat" for the chain.
- For the "Out. Interface" option, select the first WAN interface you want to use for load balancing.
- In the "Action" tab, choose "masquerade."
- Click the "Advanced" tab and select the other WAN interfaces you want to use for load balancing.
- Click "OK" to save the settings and repeat steps 3-7 for each WAN interface you want to use.
- Go to "IP" > "Routes."
- Add a new route with the following settings:
- "Dst. Address": 0.0.0.0/0
- "Gateway": IP address of the first WAN connection
- "Check Gateway": ping
- "Distance": 1
- "Routing Mark": (leave blank)
- Repeat step 10 for each WAN connection you want to use.
- Go to "IP" > "Routes."
- Add a new route with the following settings:
- "Dst. Address": 0.0.0.0/0
- "Gateway": IP address of the first WAN connection
- "Check Gateway": ping
- "Distance": 1
- "Routing Mark": (leave blank)
- "Gateway": IP address of the second WAN connection
- "Check Gateway": ping
- "Distance": 2
- "Routing Mark": (leave blank)
- Repeat step 13 for each additional WAN connection you want to use.
- You're all set! You should now have load balancing set up on your MikroTik router.
Congratulations!
Tips
Here are a few tips to keep in mind when using MikroTik load balancing over multiple gateways:
- Make sure that the internet connections you're using are stable and fast.
- Check your internet speed regularly to ensure that you're getting the speeds you're paying for.
- Remember to test your load balancing setup by running speed tests and checking for any congestion or bottlenecks.
- Consider setting up automatic failover protection to ensure that your internet connection doesn't go down in the event of an outage.
FAQ
Here are some frequently asked questions about MikroTik load balancing over multiple gateways:
- What's the difference between load balancing and failover?
- Is MikroTik load balancing difficult to set up?
- Do I need a specific type of router to use MikroTik load balancing?
- Is MikroTik load balancing worth the investment?
Load balancing is the practice of distributing traffic across multiple gateways to avoid overloading, while failover is the practice of automatically switching to a backup gateway in the event of a failure.
Not at all! Once you have the hardware and software set up, configuring MikroTik load balancing is quick and easy.
No. As long as your router has at least two WAN connections, you should be able to set up load balancing with MikroTik.
Definitely. MikroTik load balancing can significantly improve your internet speed, reliability, and overall performance.
That's it for now, folks! Hopefully, this post has given you an idea of how you can use MikroTik load balancing over multiple gateways to improve your internet experience. If you have any questions or comments, feel free to leave them below. Thanks for reading!


Post a Comment for "Configuring MikroTik Router As A VPN Server Step-by-Step Guide"