Configuring MikroTik Router As A Proxy Server Step-by-Step Guide
MikroTik Load Balancing over Multiple Gateways

If you have multiple WAN connections, you may want to consider implementing load balancing to distribute traffic across all of your available gateways. This can help you achieve better bandwidth utilization, improved redundancy, and more consistent network performance.
In this tutorial, we will be discussing how to configure MikroTik RouterOS to utilize load balancing over multiple gateways.
Step 1: Set up your WAN connections
The first step in configuring load balancing on your MikroTik RouterOS device is to set up your WAN connections. This may involve configuring a DHCP client or static IP address on each of your external interfaces, as well as configuring routes to ensure traffic can flow through each gateway effectively.
Configuring a DHCP client
If you are using a dynamic IP address from your ISP, you will need to set up a DHCP client on each of your WAN interfaces. To do this, navigate to the IP > DHCP Client menu in your RouterOS configuration interface. You should see a list of all available WAN interfaces.
Select the interface you wish to configure, and enable the DHCP client using the "Enabled" checkbox. If your ISP provides a specific hostname or MAC address to identify your router, you can specify these values using the "Use Peer DNS" and "Use Peer NTP" options respectively.
Once you have enabled the DHCP client, your MikroTik RouterOS device should automatically obtain an IP address from your ISP. You can confirm this by navigating to the IP > Addresses menu and checking that an IP address has been assigned to your WAN interface.
Configuring a static IP address
If you are using a static IP address from your ISP, you will need to configure your WAN interfaces manually. To do this, navigate to the IP > Addresses menu in your RouterOS configuration interface.
Select the interface you wish to configure, and click the "Add" button to add a new IP address assignment.
In the "Address" field, enter the IP address assigned to your WAN interface by your ISP. In the "Netmask" field, enter the subnet mask associated with your IP address. If your ISP provides a default gateway address, enter this in the "Gateway" field.
Repeat this process for each of your WAN interfaces, ensuring that each interface has a unique IP address assignment.
Configuring routing
Once you have configured your WAN interfaces, you will need to configure routes to ensure traffic can flow through each gateway effectively.
To do this, navigate to the IP > Routes menu in your RouterOS configuration interface. You should see a list of all configured routes.
Click the "Add New" button to create a new route. In the "Dst Address" field, enter the destination network address you wish to route traffic for. In the "Gateway" field, select the interface you wish to use as the gateway for this route.
Repeat this process for each destination network address you wish to route traffic for, ensuring that each route is associated with a unique gateway interface.
Step 2: Configure load balancing
With your WAN connections configured and your routing set up, you are ready to configure load balancing on your MikroTik RouterOS device.
Setting up policies
The first step in configuring load balancing is to set up policies that determine which traffic should be balanced across your available gateways.
To do this, navigate to the IP > Firewall > Mangle menu in your RouterOS configuration interface. You should see a list of all configured firewall rules.
Click the "Add New" button to create a new firewall rule. In the "General" tab, set the "Chain" field to "prerouting". In the "Advanced" tab, enable the "Src Address List" option.
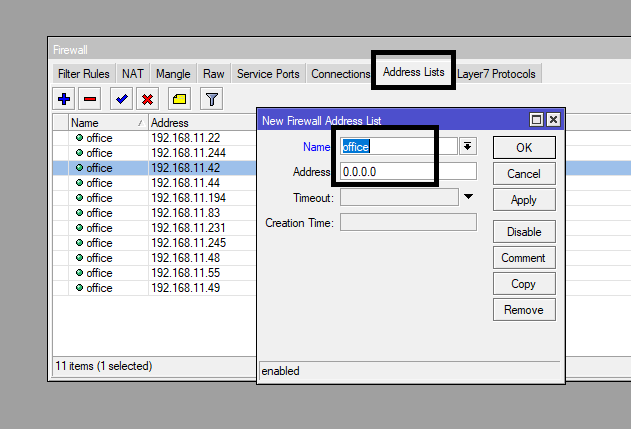
Click the "Src Address List" link to open the source address list configuration window. Click the "Add New" button to add a new source address list.
In the "Name" field, enter a descriptive name for the source address list. For example, you might enter "Load Balanced Traffic". In the "Address" field, enter the network address you wish to balance traffic for. You can enter a specific IP address, subnet, or range of addresses.
Click "OK" to save your source address list configuration, and return to the firewall rule configuration window.
Repeat this process for each network address you wish to balance traffic for, ensuring that each source address list is associated with a unique name.
Configuring load balancing settings
Once you have set up your policies, you are ready to configure load balancing settings.
To do this, navigate to the IP > Routes menu in your RouterOS configuration interface. You should see a list of all configured routes.
Click the "Add New" button to create a new route. In the "Dst Address" field, enter the default IP address you wish to route traffic to. This may be a public DNS server, a specific IP address, or another device on your network.
In the "Gateway" field, select the first WAN interface you wish to use for load balancing. In the "Distance" field, enter "1". This value determines the priority of each gateway - lower values are given higher priority.
Repeat this process for each additional WAN interface you wish to use for load balancing, adjusting the "Distance" field as necessary to ensure the desired gateway priority order.
Step 3: Test your load balancing configuration
With load balancing configured, you are ready to test your configuration.
To do this, you can use a number of different tools and methods. One common method is to use a ping or traceroute utility to determine which gateway is being used for outgoing traffic.
For example, you might use the following command to ping a public DNS server:
ping 8.8.8.8
After running this command, you should see output similar to the following:
Pinging 8.8.8.8 with 32 bytes of data: Reply from 8.8.8.8: bytes=32 time=1ms TTL=119 Reply from 8.8.8.8: bytes=32 time=1ms TTL=119 Reply from 8.8.8.8: bytes=32 time=1ms TTL=119 Reply from 8.8.8.8: bytes=32 time=1ms TTL=119 Ping statistics for 8.8.8.8: Packets: Sent = 4, Received = 4, Lost = 0 (0% loss), Approximate round trip times in milli-seconds: Minimum = 1ms, Maximum = 1ms, Average = 1ms
The "Reply from" lines indicate that your traffic is being routed through the specified gateway. Repeat this process for each configured WAN interface to ensure that load balancing is working as intended.
Conclusion
Load balancing can be a highly effective way to improve the performance, reliability, and scalability of your network. By distributing traffic across multiple gateway connections, you can achieve better bandwidth utilization, more consistent performance, and improved redundancy in the face of network failures.
If you have multiple WAN connections, configuring load balancing on your MikroTik RouterOS device is a relatively straightforward process that can provide significant benefits. By following the steps outlined in this tutorial, you can get started with load balancing quickly and easily.


Post a Comment for "Configuring MikroTik Router As A Proxy Server Step-by-Step Guide"