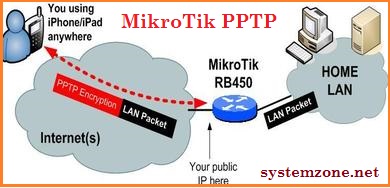
Securing MikroTik Routers With PPTP VPN Connections Step-by-Step
Are you ready to take your internet privacy to the next level? Well, buckle up, because we're about to take you on a wild ride through the world of MikroTik VPN configuration.

First things first, let's talk about what a VPN actually is. Essentially, a VPN (or Virtual Private Network) allows you to connect to the internet through a private, encrypted tunnel. This means that your online activity is safe from prying eyes, such as hackers or your internet service provider.
Now that you know what a VPN is, let's get down to business. Here are our top tips for configuring MikroTik VPN:
1. Set up your PPTP server
The first step in configuring your MikroTik VPN is to set up your PPTP server. PPTP (or Point-to-Point Tunneling Protocol) is a commonly used VPN protocol, and it's supported by MikroTik routers.
To set up your PPTP server, log in to your MikroTik router and navigate to the PPP menu. From there, click on the PPTP Server option and enable it. Next, add a username and password for your VPN connection. Finally, set a range of IP addresses for your VPN clients to use.
2. Configure your VPN client
Once your PPTP server is set up, it's time to configure your VPN client. This will allow you to connect to your VPN server from any device, such as your laptop or smartphone.
To configure your VPN client, you'll first need to download the necessary software. There are plenty of free VPN clients available online, but we recommend using OpenVPN for its security features.
Once you've downloaded your VPN client software, enter the IP address of your MikroTik router as the server address. Next, enter the username and password that you set up earlier. Finally, select the PPTP protocol.
3. Set up firewall rules
To ensure that your VPN connection is secure, you'll want to set up some firewall rules on your MikroTik router. This will prevent any unauthorized access to your network.
To set up firewall rules, navigate to the IP menu on your MikroTik router and select Firewall. From there, add a new rule that allows incoming connections to your PPTP server. You should also add a rule that blocks all other incoming connections.
4. Configure your DNS
One potential issue with using a VPN is that your DNS requests (the process of translating domain names into IP addresses) can still be seen by your internet service provider.
To avoid this, you can configure your MikroTik router to use a different DNS server. We recommend using a public DNS server, such as Google DNS or OpenDNS.
To configure your DNS server, navigate to the IP menu on your MikroTik router and select DNS. From there, add the IP addresses of your preferred DNS server.
5. Test your VPN connection
Once you've configured everything, it's time to test your VPN connection. Connect to your VPN server using your client software, and then visit a website such as WhatIsMyIPAddress.com. This website will show you your public IP address, which should be different from the IP address of your MikroTik router.
If everything looks good, congratulations! You've successfully configured your MikroTik VPN.
Now, sit back, relax, and enjoy the peace of mind that comes with a secure internet connection. Happy browsing!


Post a Comment for "Securing MikroTik Routers With PPTP VPN Connections Step-by-Step"