MikroTik RouterOS A Comprehensive Guide To VPN Setup
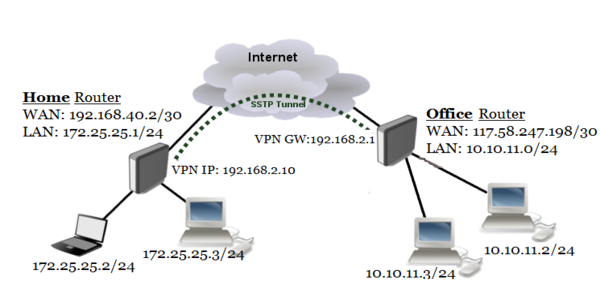
Setting up a Site-to-Site VPN connection can be crucial for many business entities. It allows you to securely connect your networks, easily share resources, and access information remotely. In this article, we will take a look at how you can set up a Site-to-Site SSTP VPN connection using MikroTik's RouterOS Client.

Overview
SSTP, which stands for Secure Socket Tunneling Protocol, is a VPN protocol designed to transport network traffic through an SSL/TLS encrypted channel. As a result, it can provide better security than other VPN protocols like PPTP or L2TP/IPSec, which use weaker encryption methods.
Setting up Site-to-Site VPN with MikroTik RouterOS Client
Before we start, it is essential to have two MikroTik routers with a stable internet connection, and they should be on the same network subnet. We will be using RouterOS version 6.44.1 for this tutorial.
Step 1: Configure IP Addresses for the Routers
You need to ensure that each router has its unique IP address. To do this, open up the MikroTik Router's interface and navigate to the IP section. Select the Addresses setup, and you will see an option to add a new address. Input the desired IP address and netmask for the router. Repeat this process for the other router as well.
Step 2: Configure Firewall Rules
The MikroTik Router's firewall rules come in handy to allow or restrict traffic between the two networks. Open up the Router's interface and navigate to Firewall. Add a new rule for allowing an SSTP connection using the following settings:
- Chain: Input
- Protocol: TCP
- Dst. Port: 443
- Action: Accept
Make sure you save the changes.
Step 3: Configure SSTP Server Settings
In this step, we will work on the SSTP server settings for both routers. Navigate to PPP from the RouterOS's interface and select the SSTP server option. Add a new SSTP server for both routers using the following settings:
- Enabled: Checked
- Certificate: none
- Authentication: mschapv2
- Keepalive Timeout: 60s
- Default Profile: default
Make sure you save the changes.
Step 4: Configure SSTP Client Settings
We will now configure the SSTP client settings for both MikroTik routers. Navigate to PPP from the RouterOS's interface and select the SSTP client option. Add a new SSTP client for both routers using the following settings:
- Connect To: Remote Router IP
- User Name: Your MikroTik Router's Admin Username
- Password: Your MikroTik Router's Admin Password
- Authentication: mschapv2
Make sure you save the changes.
Step 5: Create IP Profiles
IP profiles help in defining the IP address and other network settings for your VPN connection. Navigate to IP from the RouterOS's interface and select the IP Profile option. Add a new IP profile for both routers using the following settings:
- Name: ProfileName
- Local Address: Your Router's IP
- Remote Address: Your Remote Router's IP
- DNS Server: Your DNS Server IP Address
- Netmask: Your Netmask
- Gateway: Your Remote Router's IP
- DNS Server:: Your Remote Router's IP
Make sure you save the changes.
Step 6: Configure the Interface Settings
In this step, we will configure the interface settings of your MikroTik router. Navigate to Interface from the RouterOS's interface and select the Interface option. Edit the SSTP client interface and add the IP profile we created earlier to it. Do this for both routers.
Step 7: Test the Connection
With the setup complete, you can now test the connection between the two networks. If everything is set up correctly, you should be able to ping both routers and connect to the remote network's services.
Conclusion
Setting up a Site-to-Site SSL encrypted VPN connection can be a great solution for businesses that need secure communication between different networks. MikroTik RouterOS Client provides a robust platform to create and manage SSL encrypted VPN connections. Follow the steps described above, and you should be able to set up a Site-to-Site SSTP VPN connection with ease.


Post a Comment for "MikroTik RouterOS A Comprehensive Guide To VPN Setup"