Guest Wi-Fi Networks Setting Up Isolated Access On MikroTik Routers
Guest WiFi networks in businesses and households have become increasingly important for various reasons. They help to keep the primary network secure, allow visitors access to the internet, and also help to prevent congestion on the primary network. One of the best ways to set up a Guest WiFi network is by using a Mikrotik access point. Mikrotik routers are popular among network administrators due to their advanced features, ease of configuration and affordability. In this article, we will explore how to set up a Guest WiFi network in Mikrotik AP using multiple SSIDs.
What is Multiple SSID?
Multiple SSID is an advanced feature that allows a single Mikrotik access point to broadcast multiple wireless networks simultaneously using different names (Service Set Identifiers- SSIDs). It comes in handy when several guests with different network requirements are accessing the network simultaneously. Instead of giving them a single WiFi password, you can assign each SSID a unique password or access level. With multiple SSIDs, each user can log in to the preferred network depending on their need and access level.
Steps to Follow when Configuring Multiple SSIDs in Mikrotik AP
Now, let's get into the details of how to set up a Guest WiFi Network in Mikrotik AP using multiple SSIDs.
Step 1: Preconfiguration
The first step is to access your Mikrotik access point. Open your preferred web browser and type in the IP address of your Mikrotik AP. If you do not know the IP address of your AP, you can find it using the Mikrotik Winbox.
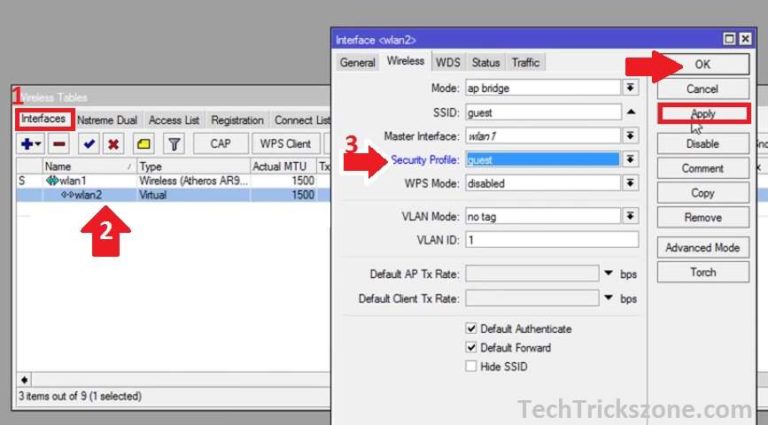
Step 2: Create a new Virtual Access Point
The second step involves creating a new virtual Access Point. Go to the “Wireless” option in the menu and click on “Virtual AP”. Here, you will be prompted to create a new virtual AP. Give the Virtual Access Point a unique name (SSID) to distinguish it from the primary network SSID. You can also configure the data rate and frequency channel, but the default settings will work fine in most cases. Ensure the security type is appropriately configured to ensure the guest network is secure. Finally, click on the “Apply” button to save the settings.
Step 3: Configuration of DHCP Server for the Guest Network
The next step is configuring the DHCP server for the guest network. DHCP (Dynamic Host Configuration Protocol) is responsible for assigning IP addresses to devices on the network dynamically. Therefore, you need to assign a different IP address range for the guest network. This is important as it ensures that devices on the guest network do not interfere with the primary network.
To do so, go to the “IP” option in the menu and click on “DHCP Server”. Here, you will need to configure a new DHCP Server to assign the IP address range for the guest network. Ensure that you provide a different IP address range from the primary network to avoid IP conflicts. Once done, click on the “Apply” button to save the settings.
Step 4: Create Firewall Rules
The next step involves creating firewall rules to further enhance the security of the guest network. In Mikrotik, firewall rules help to regulate network traffic by allowing or blocking traffic based on predefined policies. You need to block any traffic from the Guest network to the Primary network and allow Guest network to access the internet.
Open the “IP” menu and then click on “Firewall”. Here, you can create different firewall rules. Scroll down to the final rule and create 2 rules. 1,) To block traffic coming from the Guest network to the Primary network and 2,) to allow traffic from the Guest network to the internet.
Step 5: Configure the SSID Transmission Power
The next step involves configuring the transmission power of the new virtual access point. You can adjust this to suit your networking environment and requirements. To do so, scroll down to the “Wireless-Frequency” option and then click on the “Advanced” button. Here, you can adjust the transmission power. Once done, click on the “Apply” button to save the settings.
Step 6: Add Security Settings for the Guest Network
The final step in configuring the Guest network is adding security settings. To do so, go back to the “Wireless” option in the menu and select “Security profiles”. Here, you can create a new security profile for the guest network and configure it to suit your security needs. Remember to assign different passwords for the guest network to enhance security further. Once done, click on the “Apply” button.
Conclusion
Configuring a Guest WiFi network in Mikrotik AP using multiple SSIDs is simple, but it requires careful consideration. The steps outlined above should help you to set up a secure and efficient Guest WiFi network on your Mikrotik AP. Remember to keep the security of the Guest network in mind at all times.


Post a Comment for "Guest Wi-Fi Networks Setting Up Isolated Access On MikroTik Routers"