Advanced VPN Tunneling Techniques With MikroTik
If you are looking to set up a Virtual Private Network (VPN) for your organization or specifically between two locations, then you would want to consider using Mikrotik routers as they are one of the best in the industry when it comes to network security and management. With its user-friendly interface and a wide range of features, you can easily configure your routers and establish a secure VPN connection that is not only reliable but also cost-effective. In this tutorial, we will guide you through the process of setting up a Point to Point Tunnel with Mikrotik VPN.
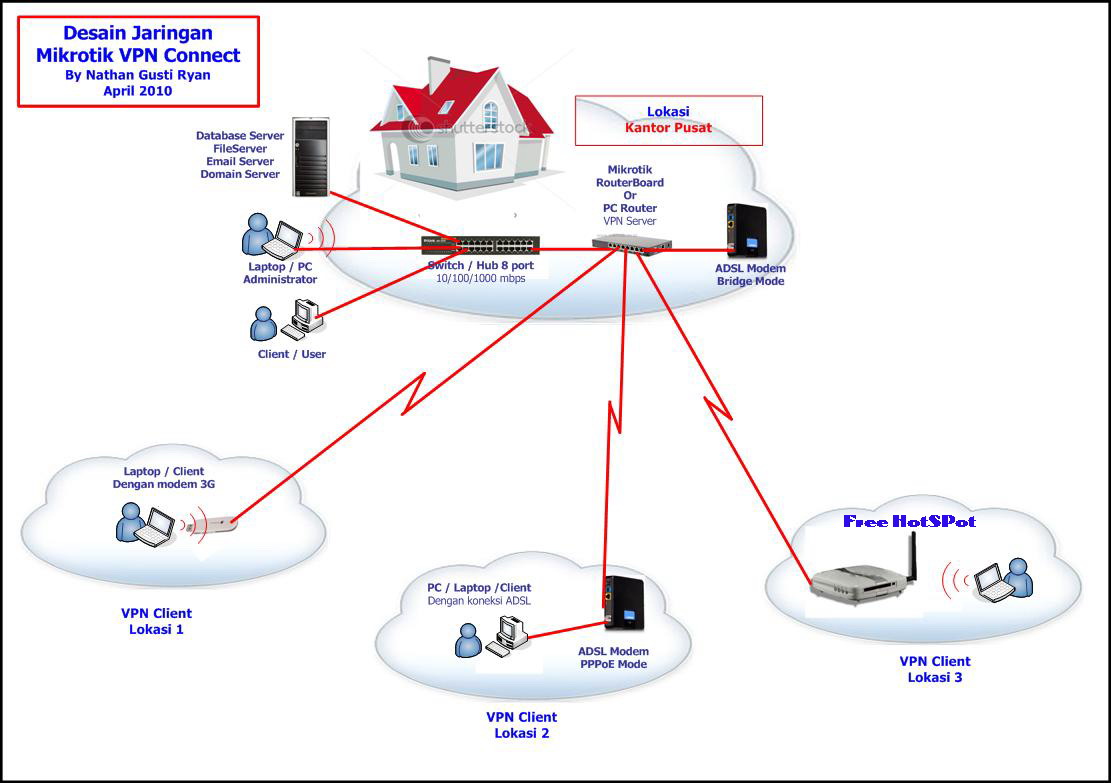
Point to Point Tunnel:
A Point to Point Tunnel is a connection between two locations, in which data is transmitted through a secure tunnel. This tunnel is established through a VPN connection that ensures data confidentiality and integrity. The Point to Point Tunneling Protocol (PPTP) is one of the most commonly used protocols to establish a VPN connection.
Setting up Point to Point Tunnel with Mikrotik Router:
Before we start setting up the VPN connection, it is important to note that you need to have two Mikrotik routers that are configured and connected to the internet.
Step 1: Configure Router 1
Firstly, we need to configure Router 1. We need to configure the IP addresses of each interface, set up a pool of IP addresses to be used by the VPN clients, and configure the PPTP server.
Configure Router 1 IP Addresses:
To configure the IP addresses of Router 1, follow the steps below:
- Step 1: Log in to your router using the Winbox application or via the web interface.
- Step 2: Click on IP and then select Addresses.
- Step 3: Click on the plus sign (+) to add a new address.
- Step 4: In the Address field, enter the IP address and the network mask of the first interface.
- Step 5: In the Interface field, select the appropriate interface.
Set up a Pool of IP Addresses:
To set up a pool of IP addresses for VPN clients, follow the steps below:
- Step 1: Click on IP and then select Pool.
- Step 2: Click on the plus sign (+) to add a new pool.
- Step 3: In the Name field, enter a name for the pool.
- Step 4: In the Address field, enter the range of IP addresses that you want to use for the VPN clients.
- Step 5: Click on OK to save the pool.
Configure the PPTP Server:
To configure the PPTP server on Router 1, follow the steps below:
- Step 1: Click on PPP and then select PPTP Server.
- Step 2: Click on the plus sign (+) to add a new PPTP server.
- Step 3: In the Service field, enter a name for the PPTP server.
- Step 4: In the Authentication field, select MSCHAPv2.
- Step 5: In the Encryption field, select none or required.
- Step 6: In the User field, enter the username that will be used to connect to the VPN.
- Step 7: In the Password field, enter the password that will be used to connect to the VPN.
- Step 8: In the Profile field, select the default PPP profile or create a new one.
- Step 9: Click on OK to save the PPTP server configuration.
Step 2: Configure Router 2
Next, we need to configure Router 2. We need to configure the IP addresses of each interface, set up a PPTP client, and configure the default route.
Configure Router 2 IP Addresses:
To configure the IP addresses of Router 2, follow the steps below:
- Step 1: Log in to your router using the Winbox application or via the web interface.
- Step 2: Click on IP and then select Addresses.
- Step 3: Click on the plus sign (+) to add a new address.
- Step 4: In the Address field, enter the IP address and the network mask of the first interface.
- Step 5: In the Interface field, select the appropriate interface.
Set Up a PPTP Client:
To set up a PPTP client on Router 2, follow the steps below:
- Step 1: Click on PPP and then select PPTP Client.
- Step 2: Click on the plus sign (+) to add a new PPTP client.
- Step 3: In the Name field, enter a name for the VPN connection.
- Step 4: In the Connect To field, enter the IP address of Router 1.
- Step 5: In the User field, enter the username that was configured on Router 1.
- Step 6: In the Password field, enter the password that was configured on Router 1.
- Step 7: Click on OK to save the PPTP client configuration.
Configure the Default Route:
To configure the default route on Router 2, follow the steps below:
- Step 1: Click on IP and then select Routes.
- Step 2: Click on the plus sign (+) to add a new route.
- Step 3: In the Gateway field, enter the IP address of the VPN connection.
- Step 4: In the Distance field, enter 1.
- Step 5: Click on OK to save the route.
Step 3: Test the VPN Connection
Once you have configured both Router 1 and Router 2, you can test the VPN connection to ensure that it is working as expected. Follow the steps below to test the VPN connection.
On Router 2:
- Step 1: Click on New Terminal.
- Step 2: Type ping followed by the IP address of Router 1 and press Enter.
On Router 1:
- Step 1: Click on New Terminal.
- Step 2: Type ping followed by the IP address of Router 2 and press Enter.
If you see a successful ping response from both routers, then the VPN connection is established and working correctly.
Conclusion:
Setting up a VPN connection can be complicated, but with Mikrotik routers, it is much simpler. With the above steps, you can easily set up a Point to Point Tunnel with Mikrotik VPN and establish a secure and reliable connection between two locations. The security of your network is of utmost importance, and we hope this tutorial has been helpful in setting up a VPN connection that ensures your data is secure and protected.


Post a Comment for "Advanced VPN Tunneling Techniques With MikroTik"