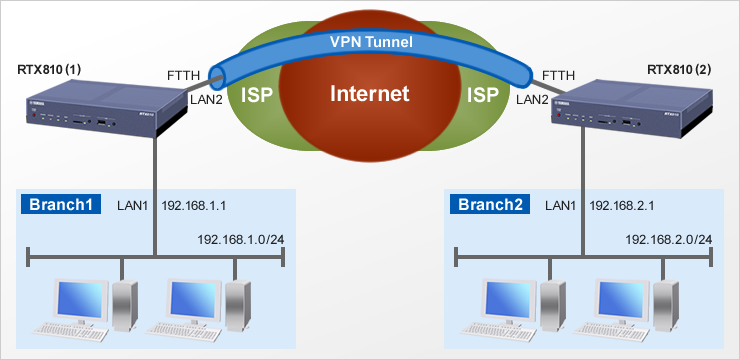
Implementing MikroTik RouterOS IPsec VPN Tunnels
Are you experiencing issues connecting to your Mikrotik IPsec VPN? Well, fear not, because we have the solution for you! Using our step-by-step guide, you will be back online in no time.
First, it's important to understand that IPsec VPN connections require certain ports to be open on your router. Make sure that TCP ports 500, 4500, and 10000 are open. If they are not, you may need to adjust your router's settings.
Next, make sure that your Mikrotik router is running the latest firmware. You can check for firmware updates by logging into your router and navigating to System > Packages. If an update is available, simply click the "Download & Update" button.
Now, let's move on to the actual VPN configuration. Start by creating a new IPsec policy on your Mikrotik router. To do this, log into your router and navigate to IP > IPsec. Then, click on the "Policies" tab and click the "Add New" button.
In the "General" tab of the new policy window, enter a name for the policy. This can be anything you like, but we recommend using something descriptive like "Home VPN" or "Office VPN".
Next, click on the "Proposals" tab and make sure that the "Main" mode is selected. Then, click the "Add New" button and enter the following information:
- Name: myproposal
- Auth. Alg: sha1
- Enc. Alg: aes-256
- Key Size: 256
- SA-Lifetime: 1h
Click the "OK" button to save the proposal. Then, click the "Add New" button again and enter the following information:
- Name: myproposal
- Auth. Alg: sha256
- Enc. Alg: aes-256
- Key Size: 256
- SA-Lifetime: 1h
Click the "OK" button to save the proposal. Your policy should now have two proposals listed under the "Proposals" tab.
Now, click on the "Action" tab of the new policy window. Enter the following information:
- Action: encrypt
- Selectors:
Click the "Add New" button under the "Selectors" section. In the new selector window, enter the following information:
- Src. Address: (your local network address range)
- Dst. Address: (remote network address range)
Click the "OK" button to save the selector. Your new policy should now be complete. Click the "Apply" button to save your changes.
Now, let's move on to configuring the VPN client. Start by downloading the latest version of the Mikrotik VPN client software from the Mikrotik website.
Once the software is installed on your device, open it and click on the "Configuration" tab. Enter the following information:
- Server: (the public IP address of your Mikrotik router)
- Username: (your Mikrotik username)
- Password: (your Mikrotik password)
- Remote ID: (the public IP address of your Mikrotik router)
Click the "OK" button to save your configuration. You should now be able to connect to your Mikrotik VPN without any issues.
And there you have it! By following these simple steps, you can solve your Mikrotik IPsec VPN connection problem. Happy browsing!


Post a Comment for "Implementing MikroTik RouterOS IPsec VPN Tunnels"