MikroTik RouterOS Advanced VPN Deployment Strategies
Hey there, folks! Today, we're going to dive into something really special - MikroTik VPN configuration with PPTP. If you're someone who's looking for a way to connect to a remote client, this tutorial is definitely going to be worth your time. And don't worry if you're not very tech-savvy - we're going to explain everything in detail, so you won't have any trouble following along.

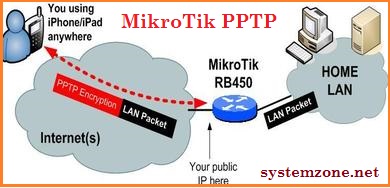
First things first - what is a VPN anyway? Well, VPN stands for virtual private network, and it's a way to create a secure, private connection between two devices over the internet. This can be really useful in a number of scenarios, like if you're working remotely and need access to your company's network, or if you're trying to access content that's only available in a certain location. Essentially, a VPN allows you to connect to a network as though you're physically there, even if you're not.
Now, let's get down to the nitty-gritty of setting up a MikroTik VPN connection using PPTP. Here's what you need to do:
Step 1: Configure the MikroTik Router
The first step in setting up your VPN connection is to configure your MikroTik router. Here's what you need to do:
- Open the MikroTik router's web interface and navigate to the PPP tab.
- Click on the PPTP Server option.
- In the General tab that appears, set a name for your VPN connection in the Name field.
- Under the Authentication tab, set a username and password for the VPN connection.
- In the Encryption tab, select the encryption method you want to use for your VPN connection. We recommend using 128-bit AES.
- Click on the OK button to save your settings.
Once you've configured your MikroTik router, you're ready to move on to the next step.
Step 2: Create a VPN Connection on Your Client Device
The next step is to create a VPN connection on your client device. Here's how you can do that:
- On your Windows PC, go to the Control Panel and click on Network and Sharing Center.
- Click on Set up a new connection or network.
- In the window that appears, select Connect to a workplace and click on Next.
- Select Use my Internet connection (VPN).
- In the Internet address field, enter the IP address of your MikroTik router. You can find this in the Quick Set tab of your router's web interface.
- In the Destination name field, give your VPN connection a name. This can be whatever you want.
- Enter the username and password you set up for your VPN connection.
- Click on Next and then click on Finish.
And that's it - you've now set up a VPN connection on your client device! Now all that's left to do is connect to your VPN and start using it.
Step 3: Connect to Your VPN
Once you've created the VPN connection on your client device, connecting to it is very simple. Here's how to do it:
- Click on the Network icon in the system tray.
- Select your VPN connection from the list of available networks.
- Enter your username and password when prompted.
- You're now connected to your VPN!
And that's it! You've now successfully set up and connected to a MikroTik VPN using PPTP. As you can see, it's not a very complicated process, and once you've done it a few times, it'll be a breeze. We hope this tutorial has been helpful for you, and as always, if you have any questions or comments, feel free to let us know!


Post a Comment for "MikroTik RouterOS Advanced VPN Deployment Strategies"