Optimizing Web Filtering With MikroTik Proxy And VPN
Yo, what's good people! We're back again with another enlightening post. This time, we're talkin' bout somethin' that's critical to any tech enthusiast out there - configuring a web proxy on your MikroTik router.
Now, before we start, let's get some basics out of the way.
What's a Web Proxy?
A web proxy is essentially a server that acts as a middleman between your device and the internet. It intercepts all the requests that your device sends out, and then forwards them to the internet on your behalf. This way, any website that you visit will only see the IP address of the proxy server instead of your actual IP address.
Got it? Good. Now, let's take a look at how we can configure a web proxy on a MikroTik router.
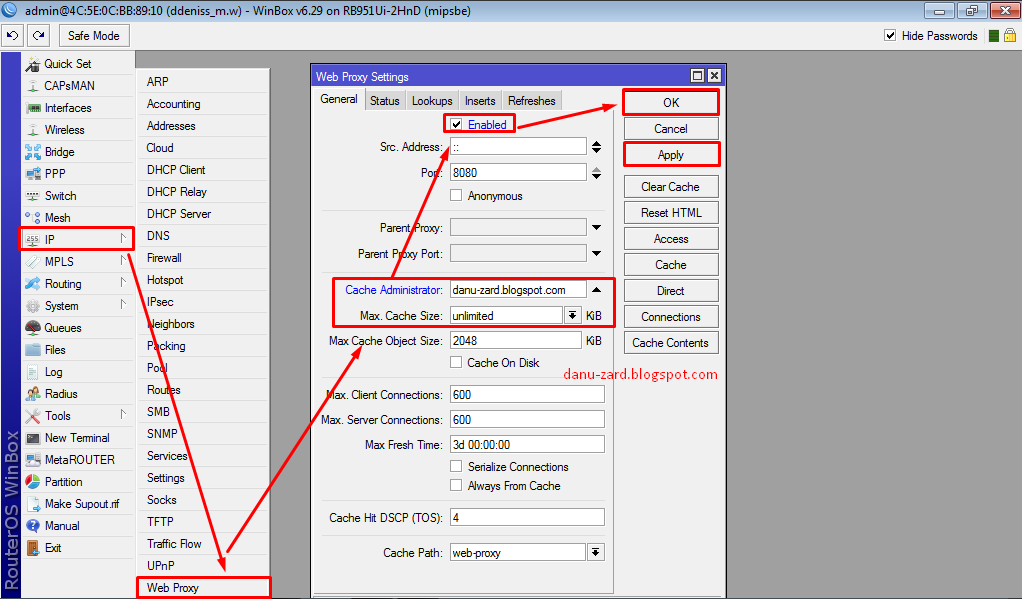
Step 1: Setting Up the Web Proxy
The first thing you need to do is set up the web proxy on your MikroTik router itself. Here's how:
- Log into your MikroTik router's web interface using your admin credentials.
- Go to IP > Web Proxy.
- Click on the "Web Proxy Settings" tab.
- In the "General" section, enable the web proxy by checking the "Enabled" checkbox.
- In the "Port" section, enter "8080" as the web proxy port. (You can use any other port if you prefer, but 8080 is the most commonly used one.)
- Click "Apply" to save the settings.
That's it! Your web proxy is now up and running on your MikroTik router.
Step 2: Configuring Web Proxy Access
Now that your web proxy is set up, you need to configure access to it. Here's how:
- Go to IP > Web Proxy > Access.
- Click on the "Add New" button.
- Under the "Src. Address" field, enter the IP address or range of the devices that you want to allow access to the web proxy. (For example, if you want to allow access from 192.168.1.1 to 192.168.1.10, enter "192.168.1.1-192.168.1.10".)
- Under the "Action" section, select "allow".
- Click "Apply" to save the settings.
And that's it! You've now configured access to your web proxy on your MikroTik router.
Step 3: Configuring Transparent Web Proxy
If you want to configure a transparent web proxy, which doesn't require any special settings on your devices, just follow these steps:
- Go to IP > Firewall.
- Click on the "NAT" tab.
- Click on the "Add New" button.
- Under the "General" section, select "srcnat" as the chain.
- Under the "Action" section, select "redirect".
- Under the "To Ports" field, enter "8080".
- Under the "Dst. Address" field, enter the IP address of your MikroTik router.
- Click "Apply" to save the settings.
And that's it! You've now configured a transparent web proxy on your MikroTik router.
Step 4: Monitoring Web Proxy Access
If you want to monitor access to your web proxy, you can do so by checking the logs. Here's how:
- Go to IP > Web Proxy > Log.
- Select the "Proxy" tab.
- Here, you can view the logs for all the requests that have been processed by your web proxy.
And that's it! You're now all set to use your web proxy on your MikroTik router. Happy browsing, fam!
Well, that's a wrap for this post. We hope you found this guide useful. Don't forget to hit that share button and let us know your thoughts in the comments below!
Post a Comment for "Optimizing Web Filtering With MikroTik Proxy And VPN"