MikroTik RouterOS VPN Secure Communication For Remote Workers
Are you looking for a secure way to establish a network connection between your office branches? Then you should consider Mikrotik, a reliable and affordable networking solution. In this tutorial, we will cover how to set up a Point-to-Point VPN tunnel with Mikrotik.
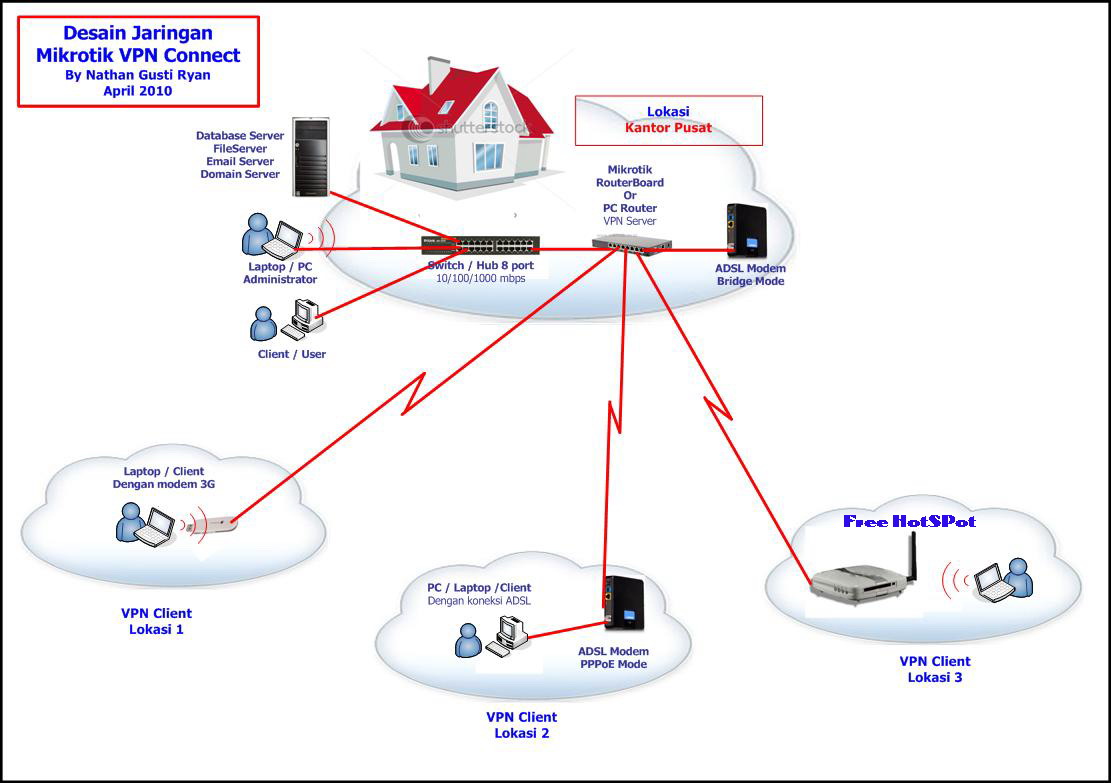
Before we begin, let's first understand what a VPN is and how it works. A Virtual Private Network (VPN) is a technology that creates a secure and private communication channel over the public internet between two or more devices. It enables remote access to a private network through an encrypted connection and ensures that any sensitive data transmitted between the devices remains confidential.
Steps to set up a Point-to-Point VPN on Mikrotik
Now that we have a basic understanding of VPNs let's dive into the steps to set up a Point-to-Point VPN on Mikrotik.
Step 1: Setting up the first Mikrotik router
The first thing we need to do is configure the first Mikrotik Router. Follow these steps:
- Open WinBox, connect to your Mikrotik router and login.
- Create a new user account and password, for added security.
- Assign the router an IP address, subnet mask and default gateway. The IP address will be used as the VPN endpoint IP address.
- Configure the wireless interface, SSID, Frequency and Channel to optimize network performance.
Step 2: Creating an IPsec Peer for the second Router
The next step is to create an IPsec peer for the second router. Follow these steps:
- Go to IP>IPsec>Peers.
- Click on the "+" icon to create a new peer.
- Enter the remote Peer IP address which will be the public IP address of the second router.
- Click on the protocols tab and select the desired security protocol.
- Configure the phase 1 and phase 2 settings.
- Enter the Pre-Shared key that will be used for authentication.
- Click Apply and then OK to save the settings.
Step 3: Creating an IPsec Policy for the VPN Tunnel
Now we need to create an IPsec policy to define the traffic that should be allowed over the VPN tunnel. Follow these steps:
- Go to IP>IPsec>Policies.
- Click on the "+" icon to create a new Policy.
- Enter the appropriate settings for the policy, including the Source and Destination IP addresses, Security Protocols, and the Action to be taken on matching traffic.
- Click Apply and then OK to save the settings.
Step 4: Setting up the Second Mikrotik Router
The last step is to configure the second Mikrotik router. Follow these steps:
- Open WinBox and connect to the router.
- Create a new user account and password.
- Assign the router an IP address, subnet mask and default gateway. The IP address will be used as the VPN endpoint IP address.
- Repeat the same IPsec peer configuration that we created for the first router.
- Create the IPsec policy, similar to the one we configured for the first router.
Congratulations! You have successfully set up a Point-to-Point VPN Tunnel with Mikrotik.
Conclusion
In this tutorial, we have learned about the basics of VPNs, how they work, and how to set up a Point-to-Point VPN Tunnel with Mikrotik. VPNs are an important aspect of modern networking, enabling secure and private communications over the public internet. When configured properly, a VPN can greatly enhance the security and privacy of your network communications.
If you have any questions or concerns, don't hesitate to reach out to the Mikrotik support team for help. They will be more than happy to assist you with any issues you may encounter.


Post a Comment for "MikroTik RouterOS VPN Secure Communication For Remote Workers"