Configuring MikroTik Router As A Reverse Proxy Load Distribution And SSL Offloading
Greetings, fellow internet enthusiasts! Have you ever found yourself frustrated with your internet connection, wondering why it can't just be faster and more reliable? Fear not, my friends, for I have stumbled upon a fantastic solution: MikroTik Load Balancing over Multiple Gateways!
Now, you may be asking yourself, "What the heck is MikroTik Load Balancing and why do I need it?" Allow me to enlighten you with these detailed points:
- MikroTik Load Balancing allows you to utilize multiple internet connections simultaneously, resulting in faster internet speeds and increased reliability.
- This technique is particularly useful for businesses or households with multiple people or devices accessing the internet at the same time.
- By distributing internet traffic evenly across different connections, you can avoid overwhelming a single connection and experiencing slow speeds or disconnections.
- MikroTik Load Balancing is also incredibly customizable, giving you the ability to set up specific rules and priorities for different types of traffic (such as prioritizing video streaming or voice calls over other internet activities).
- The setup process may seem intimidating at first, but the benefits are totally worth it!
So, how do you go about implementing this magical MikroTik Load Balancing? Fear not, my friends, for I have once again done some research and come up with a step-by-step guide:
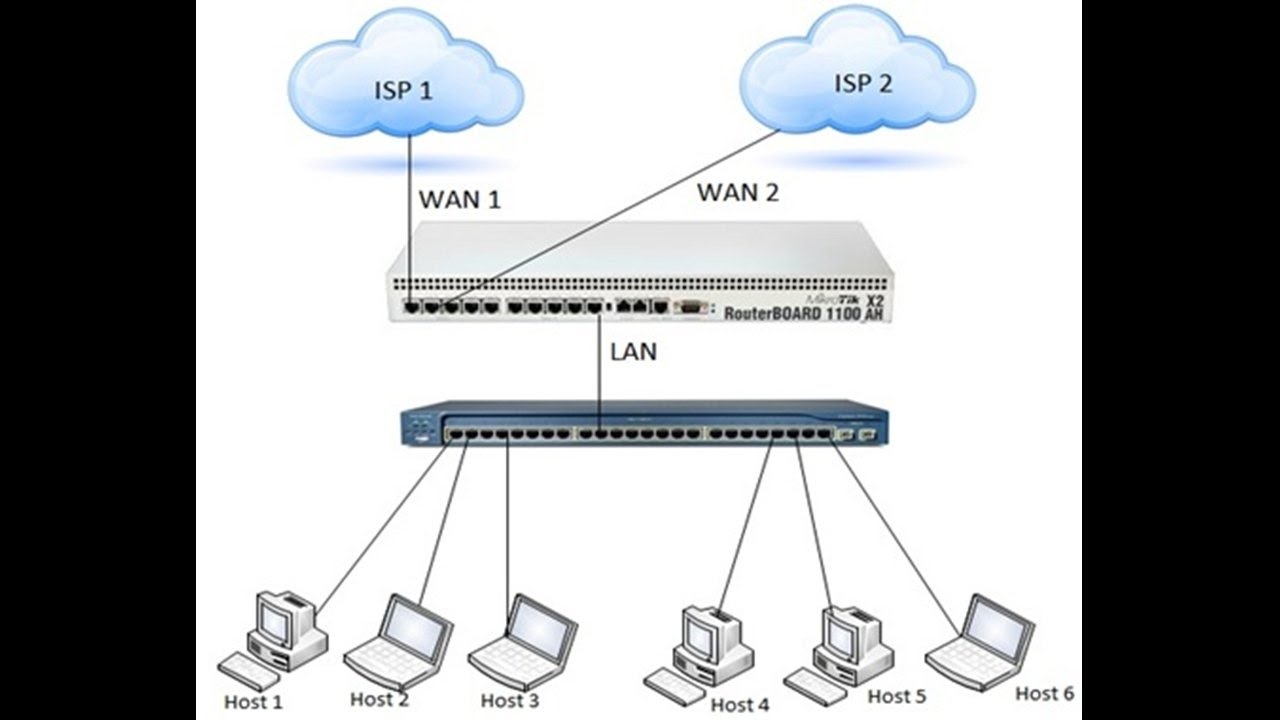
- First and foremost, you'll need a MikroTik router (shocking, I know). You'll also need at least two internet connections with different external IP addresses. If you don't have multiple connections, you can still follow along for the sake of knowledge (and future planning).
- Next, you'll need to access your MikroTik router's web interface and go to the IP > Addresses tab. Here, you'll need to add a new IP address that matches the subnet of your first internet connection.
- After that, go to the IP > Routes tab and add two new routes. The first route should be for the subnet of your second internet connection, with a gateway of that connection's IP address. The second route should be for 0.0.0.0/0 with a gateway matching the IP address of your first internet connection.
- Now comes the fun part: creating a new NAT rule. Go to the IP > Firewall tab and add a new rule with the following settings:
- Action: srcnat
- Chain: srcnat
- Out. Interface: (first internet connection)
- Action: dstnat
- Chain: dstnat
- In. Interface: (second internet connection)
- Now, under the Action tab, select "mark connection" and create a new connection mark with a unique name.
- Save your new NAT rule and pat yourself on the back for a job well done (so far).
- Next, go to the IP > Firewall > Mangle tab and add a new rule with the following settings:
- Action: accept
- Chain: prerouting
- In. Interface: (second internet connection)
- Connection Mark: (the name you created in your NAT rule)
- Lastly, go to the IP > Firewall > Filter Rules tab and add a new rule with the following settings:
- Action: accept
- Chain: forward
- Connection State: (mark both "new" and "related")
- Out. Interface: (first internet connection)
- In. Interface: (any)
- Save and apply your changes, and voila! You now have MikroTik Load Balancing over Multiple Gateways set up and ready to go. Enjoy your newfound faster speeds and increased reliability!
And there you have it, folks. A step-by-step guide to implementing MikroTik Load Balancing over Multiple Gateways. Give it a try and let me know how it works out for you. Trust me, your internet-loving heart will thank you later.
Post a Comment for "Configuring MikroTik Router As A Reverse Proxy Load Distribution And SSL Offloading"