Enhancing Web Privacy With MikroTik Proxy Server
Hey there, folks! Today, we're gonna talk about one of my favorite things - web proxies! Trust me, they're super awesome (and not just 'cause saying the words "web proxies" out loud is really fun). So I stumbled upon this neat little tutorial that'll teach you how to make a web proxy in MikroTik, and let me tell ya, it's so easy, even I can do it.
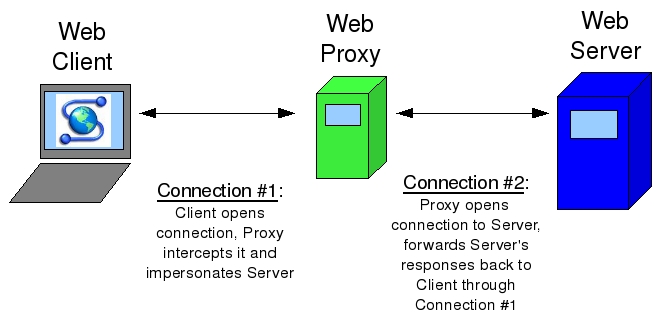
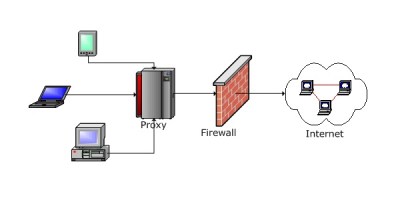
Wait, hold up - maybe I should explain what a web proxy is first, huh? Basically, a web proxy acts as an intermediary between your computer and the internet. It can cache content, filter out certain information, and even act as a sort of firewall.
Okay, now that we've got the basics covered, let's get down to business. Here's how to make a web proxy in MikroTik:
First, you'll need to access your MikroTik router's web interface. If you're not sure how to do that, check out this handy guide on MikroTik's website.
Once you're logged in, head to the "IP" tab and select "Web Proxy".
Click on the "Settings" tab and enter the appropriate configurations for your network. You can set things like cache size, maximum object size, and allowed ranges of IP addresses. If you're not sure what to put here, don't worry - the defaults should be fine for most setups.
Now, click on the "Access" tab. This is where you can set up all sorts of filters to control which websites and content can be accessed through the proxy. You can block specific domains or URLs, restrict access based on certain criteria (like time of day), and even require authentication before allowing access.
Once you've got your settings all sorted out, don't forget to hit "Apply" to save your changes!
Finally, you'll need to set up your web browsers to use the proxy. This will vary depending on what browser you're using - for example, in Chrome, you can head to the "Settings" menu, click on "Advanced," and then find the "Proxy" section. From there, you can enter the IP address of your MikroTik router and the port number you set up for the proxy.
And that's all there is to it! See? Easy-peasy.
Oh, but before you go off and start playing around with your shiny new web proxy, there are a few things you should keep in mind:
Web proxies aren't foolproof - they can be bypassed by savvy users who know what they're doing. Don't rely on a web proxy to provide complete security or protect sensitive information.
A web proxy can slow down your browsing experience, especially if it's heavily filtering or caching a lot of content. Make sure to test it out on a few different sites to see if it's affecting your browsing speed.
Be careful not to accidentally block important websites or services when setting up filters or access rules. It can be a pain to troubleshoot when something essential suddenly stops working!
Finally, make sure to keep your MikroTik firmware up-to-date and properly secured. A vulnerable router could be a much bigger threat than any web proxy could ever be!
Alright, folks, that's all for now. I hope you found this tutorial helpful, and maybe even a little bit entertaining! Now go forth and tinker with your web proxies to your heart's content.


Post a Comment for "Enhancing Web Privacy With MikroTik Proxy Server"