Exploring MikroTik Router VLAN Configuration For VPN
Are you tired of dealing with network congestion and slow internet speeds? With VLAN and Bridge configurations on your MikroTik router, you can improve your network performance and streamline your network management. Here's how to set it up:
What is VLAN?
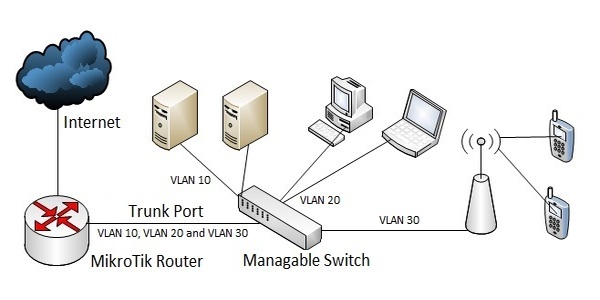
VLAN, or Virtual Local Area Network, is a network management technique that separates physical networks into multiple logical networks. This allows for more efficient use of network resources and can improve network performance by reducing congestion and network collisions.
What is a Bridge?
A bridge is used to connect two or more VLANs together. It allows for communication between different VLANs while keeping them separate from each other. This can be useful in situations where you want to allow different departments or groups within your organization to communicate with each other, but still maintain separate networks for security purposes.
How to Configure VLAN and Bridge on MikroTik
Follow these steps to configure VLAN and Bridge on your MikroTik router:
- Create VLAN Interface: First, create a new VLAN interface by going to Interfaces and clicking on Add New. Select VLAN as the Interface Type and enter a VLAN ID. Make sure that the VLAN ID matches the VLAN ID of your network switch.
- Create VLAN Bridge: Next, create a new VLAN Bridge by going to Bridge and clicking on Add New. Enter a name for the Bridge and select the VLAN interface that you just created as one of the Ports.
- Add Ports to Bridge: Now you need to add your local network interfaces to the Bridge. Go to Interfaces and select the local interface that you want to add. Click on Bridge and select the VLAN Bridge that you created in the previous step as the bridge.
- Create a New Bridge: If you want to connect multiple VLANs together, you can create a new bridge and add the VLAN interfaces to it. Go to Bridge and click on Add New. Enter a name for the Bridge and select the VLAN interfaces that you want to add as the ports.
- Add IP Address: Finally, add an IP Address to your VLAN interface and Bridge. Go to IP and click on Addresses. Select the VLAN interface and the Bridge and click on Add New. Enter an IP Address and Subnet Mask.
Congratulations, you have successfully configured VLAN and Bridge on your MikroTik router! With these configurations in place, you should see an improvement in your network performance and management.
While this may seem like a lot of steps, the benefits are well worth the effort. Taking the time to properly configure your network can save you time and frustration in the long run.
If you need further assistance or have any questions, don't hesitate to reach out to our team of experts for support. We're always here to help you get the most out of your network.
Thank you for choosing MikroTik!


Post a Comment for "Exploring MikroTik Router VLAN Configuration For VPN"