Best Practices For MikroTik Router Firewall Rules
If you're looking to optimize your Mikrotik router for wireless performance, one key way to do this is to disable and enable wireless interfaces on a schedule. This can help reduce interference on your wireless network, as well as improve network efficiency by enabling a more precise control over who has access to your network resources.
In this article, we'll explain how to set up and configure your Mikrotik router to disable and enable an interface on a schedule. We'll go over the steps you need to follow, as well as some tips for troubleshooting any issues that might arise during the process.
Step 1: Log in to Your Mikrotik Router
The first step in setting up an interface schedule on your Mikrotik router is to log in to your router as an administrator. You can do this by opening a web browser and typing in the IP address of your Mikrotik router, followed by the username and password.
Once you've logged in, you should be taken to the main dashboard of your router. From here, you can access the settings and configurations for your router, including the interface scheduling settings we'll be setting up in the next steps.
Step 2: Create a New Firewall Rule
The next step in enabling interface scheduling on your Mikrotik router is to create a new firewall rule. This rule will be used to set up the schedule and enable and disable the wireless interface according to a specific schedule or rules that you set up.
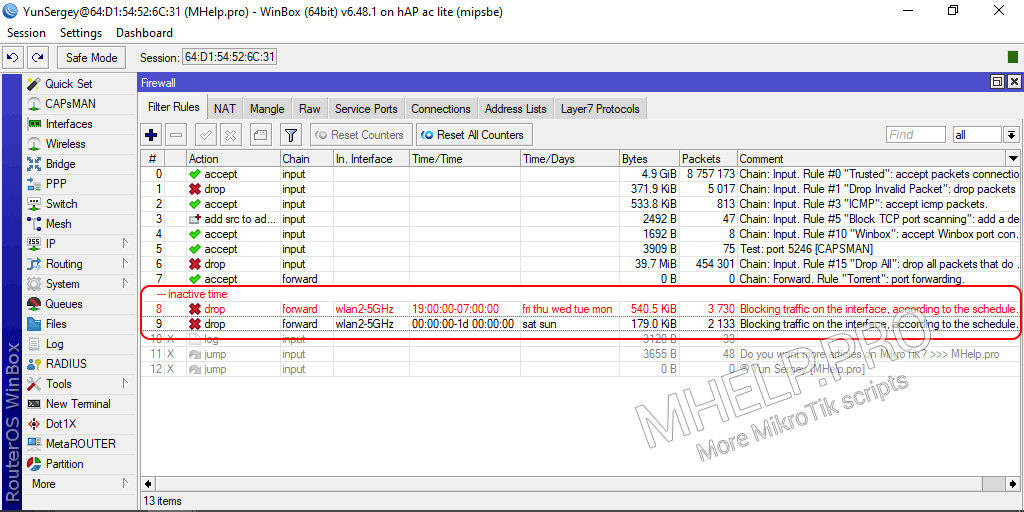
To create a new firewall rule, navigate to the Firewall section of your Mikrotik's control panel and click the '+' button to create a new rule. From here, you'll need to fill out the details of the rule, including the action you want to take, the source and destination addresses, and the protocols you want to allow or block. For this particular rule, you'll want to set the action to 'drop' and the protocol to 'all'.
Step 3: Set Up a Schedule for the Interface
Once you've created the firewall rule, the next step is to set up a schedule for the interface. This schedule will determine when the wireless interface is enabled or disabled and is done through the Scheduler function in your Mikrotik control panel.
To create a new schedule, navigate to the Scheduler section of your Mikrotik's control panel and click the '+' button to add a new schedule. From here, you'll need to fill out the details of the schedule, including the name of the schedule, the start time and duration of the schedule, and the action you want to take when the schedule is active.
For this particular schedule, you'll want to set the start time to the time you want the interface to be disabled, and the duration to the length of time you want the interface to be disabled for. Once you've done this, you can also set an action for when the schedule is active, such as sending an email notification or running a specific script.
Step 4: Apply the Rule and Schedule to the Interface
Once you've created the firewall rule and the schedule for the interface, the final step is to apply these settings to the wireless interface on your Mikrotik router. This is done through the Interface section of your Mikrotik's control panel.
To apply the rule and schedule to the interface, simply navigate to the Interface section and click on the interface you want to schedule. From here, you'll need to enable the 'Use Firewall' option and select the firewall rule you created in Step 2. You'll also need to enable the 'Scheduler' option and select the schedule you created in Step 3.
With these settings in place, your Mikrotik router will now automatically disable and enable the wireless interface according to the schedule and rules you've set up. This can help improve the performance and efficiency of your wireless network, as well as help reduce interference and improve network security.
Troubleshooting Interface Scheduling Issues
If you experience any issues with interface scheduling on your Mikrotik router, there are several steps you can take to troubleshoot and resolve the issue. Some of the most common issues include:
- The interface isn't being disabled or enabled on schedule
- The firewall rule isn't working as expected
- The schedule isn't starting or ending as planned
To troubleshoot these issues, you can try some of the following tips:
- Check that the firewall rule is correctly set up
- Check that the schedule is correctly configured and that the start and end times are correct
- Ensure that the time on your router is correct and synced with the correct time zone
- Check that there are no conflicting firewall rules or schedules in place
- Review the log files on your router for any error messages or issues related to the interface scheduling
By following these steps, you should be able to troubleshoot and resolve any issues you encounter with interface scheduling on your Mikrotik router. With a little bit of patience and persistence, you can optimize the performance and efficiency of your wireless network and ensure that your network resources are only being accessed by authorized users at the times you specify.


Post a Comment for "Best Practices For MikroTik Router Firewall Rules"