Implementing Content Filtering With MikroTik Router Proxy Server
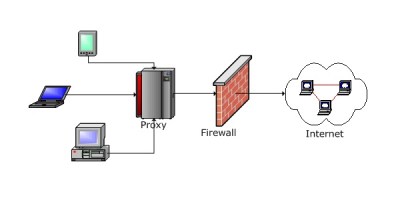
A proxy server is a useful tool that serves as an intermediary between a client computer and the internet. It can be used to speed up internet access by caching frequently visited websites, blocking access to certain sites and keeping a record of internet usage among other things. MikroTik is one popular router that comes with built-in support for proxy servers. In this article, we will explain how to configure the MikroTik Router web proxy.
Step 1: Setting Up the MikroTik Router
The first step in configuring the Mikrotik Router web proxy is to ensure that the router is properly set up. You will need to have access to the router's web interface, which can be accessed using a web browser. Once you have accessed the configuration page, you will need to make sure that the router is properly configured with DNS and DHCP settings.
Step 2: Configuring the Web Proxy
Once the MikroTik Router is properly configured, the next step is to configure the web proxy. This can be done by clicking on the "IP" tab, then selecting "Web Proxy" from the drop-down menu. From here, you can configure the settings for the web proxy, including the port number, cache size, and maximum cache object size.
Step 3: Enabling the Web Proxy
Once the web proxy settings have been configured, you will need to enable the web proxy. This can be done by clicking on the "Web Proxy" tab, and then checking the "Enable" checkbox.
Step 4: Configuring Firewall Rules
After enabling the web proxy, you will need to configure firewall rules to redirect HTTP traffic to the web proxy. This can be done by clicking on the "Firewall" tab, then selecting "NAT" from the drop-down menu. From here, you can create a new rule that redirects HTTP traffic to the IP address of the router and the port number that you specified for the web proxy.
Step 5: Testing the Web Proxy
Once the web proxy has been configured and enabled, it is important to test it to ensure that it is working properly. This can be done by trying to access a website and verifying that it is being cached by the web proxy. You can also check the web proxy logs to see what websites have been accessed and when.
Conclusion
Configuring a web proxy on a MikroTik Router can be a useful way to speed up internet access and improve internet security. By following the steps outlined in this article, you should be able to successfully configure a web proxy on your MikroTik Router.
We hope that you have found this article helpful in understanding how to configure the MikroTik Router web proxy. If you have any questions or comments, please feel free to leave a comment below. We are always happy to hear from our readers.


Post a Comment for "Implementing Content Filtering With MikroTik Router Proxy Server"