Optimizing Network Performance With MikroTik Router Proxy Caching
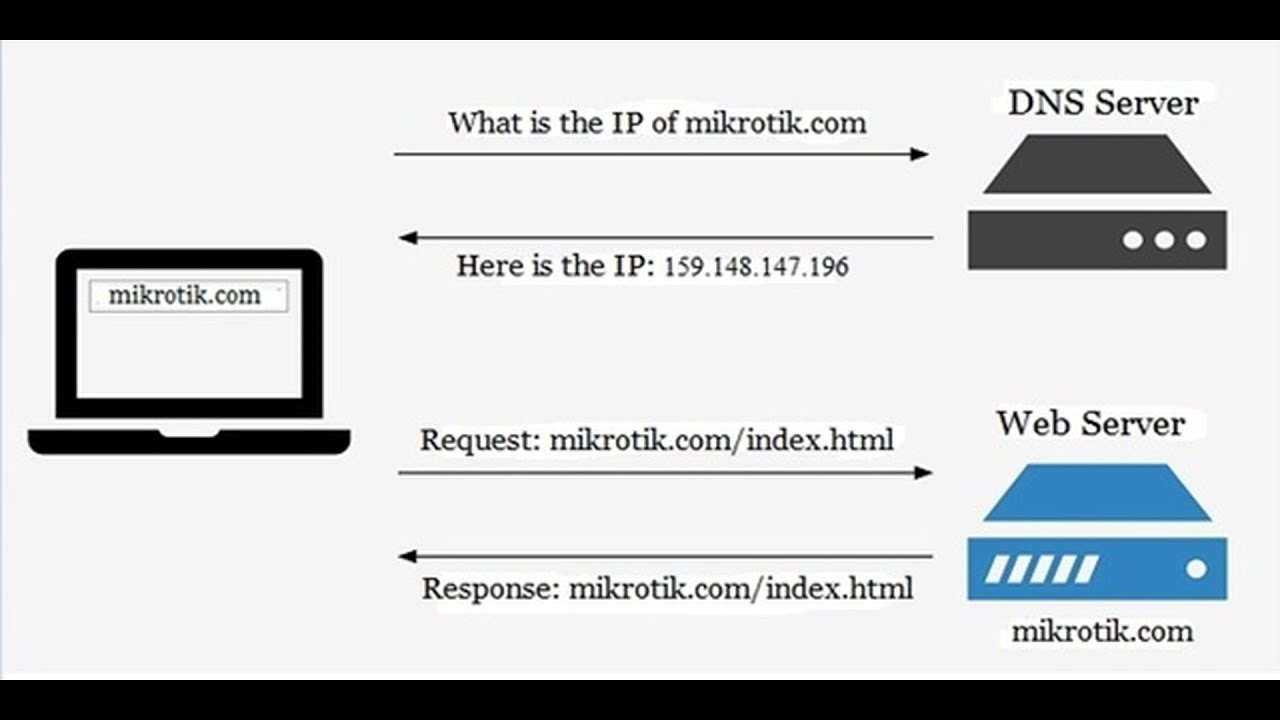
Truly, for the tech-savvy people who want to operate a reliable and efficient network, MikroTik is the answer. One of the essential components of a good network is Domain Name System (DNS) which plays a vital role in directing traffic in and out of the network. It is responsible for translating domain names into IP addresses so that hosts can communicate. MikroTik has a caching DNS server that can be configured to optimize network performance.

Configuring Mikrotik Caching DNS server is easy and straightforward. The following is a step-by-step guide on how to configure the MikroTik Caching DNS Server and optimize network performance.
Step One: Login to the RouterOS Terminal
First, you need to log in to the RouterOS terminal using the IP address of the router. You can use the terminal application provided by MikroTik or use the remote login tool, for example, SSH. Enter your username and password to log in.
Step Two: Configure DHCP Server
To configure the DNS server, a DHCP server is needed to provide IP addresses for clients. Configure the DHCP server by navigating to IP > DHCP Server and click Add to create a new DHCP server.
Step Three: Configure the DNS Server
After configuring the DHCP server, the next step is to configure the DNS server by navigating to IP > DNS and click on Settings. You will edit the DNS settings as follows:
- Allow Remote Requests - Check the “Allow Remote Requests” checkbox.
- Caching Enabled - By default, Caching is enabled.
- Caching Size - Set the caching size to 100,000.
- Max Cache Time - The maximum time that a DNS entry will remain in the cache. Set it to 1D.
- Record: Add the IP addresses of the DNS servers provided by your ISP. Click “+” to add new records.
- Interface - Select your Local WAN interface under “Interface.”
Once you enter all the settings, click apply.
Step Four: Configure Firewall
The DNS server should be configured to allow DNS requests from clients and drop requests from external clients. Firewall applications will help you achieve this. To configure the firewall, navigate to IP Firewall and click Add to create a new rule.
Configuration of the Firewall rules will depend on how you want to set up the network. Ensure that the rules allow inbound connections to the server and block external DNS queries.
Step Five: Test the Caching DNS Server
Finally, after configuring the DNS server, test it to ensure that it is working correctly. Use the ping command to test the DNS server's response time. If DNS resolution is slow, then it is time to troubleshoot.
Final Thoughts
In conclusion, implementing a caching DNS server on a MikroTik router is relatively easy. The above steps will guide you on how to configure the caching DNS server. You will boost the network performance instantly. With the caching DNS server, DNS requests are resolved faster because the router stores DNS query results. Instead of sending DNS queries to external DNS servers repeatedly, the router can retrieve the results from the cache. The overall network performance will improve, which will boost productivity and reduce internet expenses.


Post a Comment for "Optimizing Network Performance With MikroTik Router Proxy Caching"