MikroTik Router VLAN Configuration For VPN Deployment
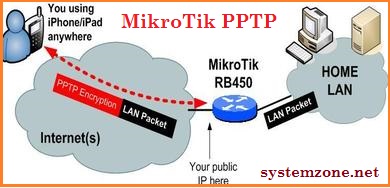
In today's world where online security has become a major concern, the need for secure virtual private networks (VPNs) has become more important than ever. In the world of networking, MikroTik has become a popular choice for many businesses and individuals who want to set up their own VPNs. In this tutorial, we will explain how you can set up your own VPN using MikroTik and the Point-to-Point Tunneling Protocol (PPTP).

What is MikroTik?
MikroTik is a Latvian company that develops routers and other networking equipment. The company was founded in 1996 and has since become a popular choice for businesses and individuals who want affordable networking solutions. MikroTik's routers include hotspot capabilities, bandwidth management, and VPN options, which make them a popular choice for those who need to configure their own VPNs.
What is PPTP?
PPTP stands for Point-to-Point Tunneling Protocol, which is a protocol for implementing virtual private networks. PPTP was developed by Microsoft and is supported by most VPN software clients. PPTP is a relatively simple protocol, and it is one of the most widely used VPN solutions. It offers up to 128-bit encryption and can be used with various operating systems.
Prerequisites
Before we begin, make sure you have the following:
- A MikroTik router
- A computer or mobile device that will connect to the VPN
- The IP address of the MikroTik router
- Access to the MikroTik router's web interface
Configure the MikroTik router
The first step in setting up the VPN is to configure the MikroTik router. To do this, follow these steps:
- Log in to the MikroTik router's web interface by entering the router's IP address in a web browser.
- Go to the "IP" menu and select "Pool."
- Create a new pool, which will be used to assign IP addresses to the VPN clients.
- Go to the "PPP" menu and select "Profiles."
- Create a new profile for the VPN clients. This profile should include the following settings:
- "Use compression" should be set to "yes."
- "MPPC compression" should be set to "yes."
- "IP address" should be set to "pool-MikroTik."
- "Use Encryption" should be set to "required."
- Next, go to the "PPP" menu and select "Secrets."
- Create a new user for the VPN. This user will be used by the client to authenticate with the MikroTik router.
- Finally, go to the "Interfaces" menu and select "PPTP Server."
- Enable the PPTP server and enter the IP address of the MikroTik router in the "Server IP" field.
- Select the "Profile" created earlier from the "Profile" drop-down menu.
- Click "Apply" to save the changes.
Configure the client device
After configuring the MikroTik router, the next step is to configure the client device that will connect to the VPN. To do this, follow these steps:
- Open the network settings on the device that will connect to the VPN.
- Select "Add VPN Configuration."
- Choose "PPTP" as the VPN type.
- Enter the server IP address, username, and password provided in the "PPP Secrets" section on the MikroTik router.
- Save the configuration and connect to the VPN.
Conclusion
In this tutorial, we have shown you how to set up a VPN using MikroTik and PPTP. With this VPN, you can secure your online activities and access restricted content while maintaining your privacy. Setting up a VPN may seem daunting, but it is essential in today's world of online insecurity. We hope this tutorial has been helpful in setting up your VPN, and if you have any questions, please let us know in the comments below.


Post a Comment for "MikroTik Router VLAN Configuration For VPN Deployment"