Hotspot Setup And Configuration MikroTik RouterOS Guide
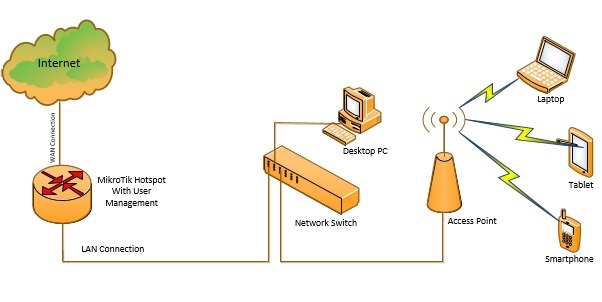
If you are a tech enthusiast, you might be looking for ways to increase your productivity. One way of doing this is by setting up a hotspot on your MikroTik Router. This incredible feature allows you to share your internet connection with other devices, including laptops and smartphones. You won't have to worry about purchasing additional routers or wireless access points. This guide will show you how to easily configure the hotspot feature on your MikroTik Router.
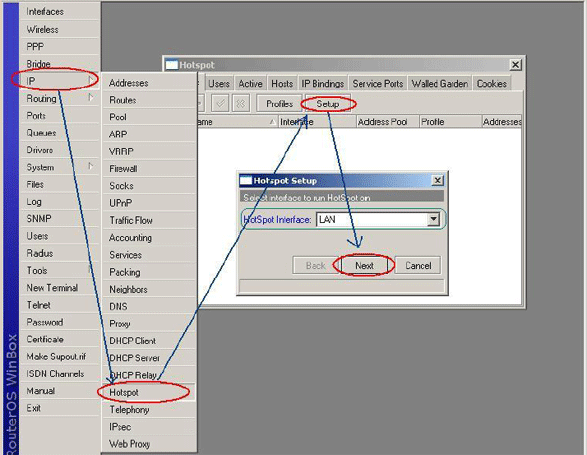
The first step is to access your MikroTik Router's Web Interface. This can be done by typing in the IP address of your router in your browser. Once you are logged in, click on the "IP" menu on the left side of your screen and select "Hotspot". After this, click on the "Hotspot Setup" button located towards the center of the screen. You will be prompted to enter the hotspot's name and network password. Be sure to choose a name that is easy to remember and a strong password. Once you have done this, click on "Next".
Next, configure your hotspot's DHCP network. This is where you will be able to assign IP addresses to connected devices. To do this, click on "IP" and select "DHCP Server". From the DHCP Server page, click on the "Leases" tab to see a list of all the assigned IP addresses. You can add, edit or remove IP addresses by clicking on the "Add", "Edit" or "Remove" buttons respectively.
The next step is to create a hotspot user. This will allow you to control user access to your hotspot. To create a user, navigate to the "IP" menu, select "Hotspot" and click on "User". Here, you can add a new user by clicking on the "Add New" button. You will need to enter a username and password, which will be required for user authentication. You can also set the user's profile, which determines what the user can access when they connect to your hotspot. Once you have created your user, click "OK".
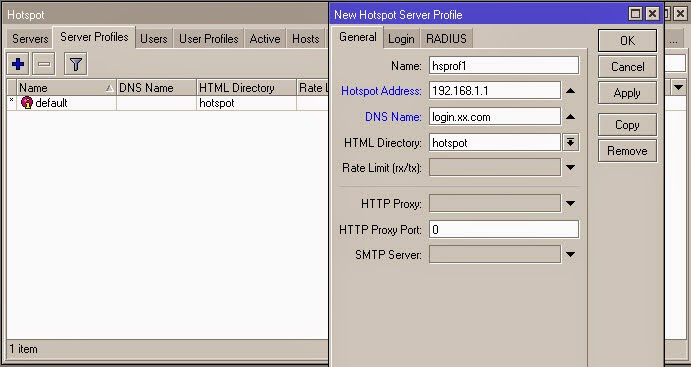
Now it's time to enable the hotspot service. To do this, navigate to the "IP" menu and click on "Services". Find the "Hotspot" service from the list and click on the "Enable" button. You can now configure additional settings for the hotspot service, such as the login page, which can be customized with your own logo and branding. To customize the login page, navigate to the "Files" menu and select "Web". Look for the "Hotspot" folder and click on the "Login.html" file. You can now customize this file with your own branding, such as adding a company logo, motto, or contact information.
The last step is to configure your hotspot's firewall. This will help you control the user's access to the internet and other resources. To configure the firewall, navigate to the "IP" menu and select "Firewall". Now click on the "NAT" tab. Here, you can configure NAT rules that will allow users to connect to the internet. You can also apply filters to block traffic to and from certain IP addresses and domains. Once you are done configuring the firewall, click "OK".
As you can see, configuring the hotspot feature on your MikroTik Router is a simple process that can greatly enhance your internet connectivity. By following these simple steps, you can easily share your internet connection with other devices and maintain control over who accesses your network. With advanced customization options, you can even tailor your hotspot to fit your specific needs and branding. Now that you know how to set up a hotspot on your MikroTik Router, go ahead and take your productivity to the next level!

Post a Comment for "Hotspot Setup And Configuration MikroTik RouterOS Guide"