MikroTik Router Configuration DHCP And IP Address Management
Are you considering configuring DHCP on your MikroTik router, but unsure where to start? Our comprehensive guide will take you step-by-step through the process, so you can easily set up and manage your network's DHCP services.

What is DHCP?
DHCP, or Dynamic Host Configuration Protocol, is a protocol that allows network administrators to assign and manage IP addresses and other network configuration details to devices on a network. Rather than having to manually configure each device on the network, DHCP automates the process, simplifying management and reducing the chance of errors.
Step 1: Access your MikroTik Router
The first step in setting up DHCP on your MikroTik router is accessing the device's management console. To do this, you'll need to establish a connection between your computer and the router. You can do this via Ethernet cable or Wi-Fi, depending on your setup. Once you're connected to the router, open a web browser and enter the router's IP address into the address bar to gain access to the management console.
Step 2: Configure Your Router's DHCP Server
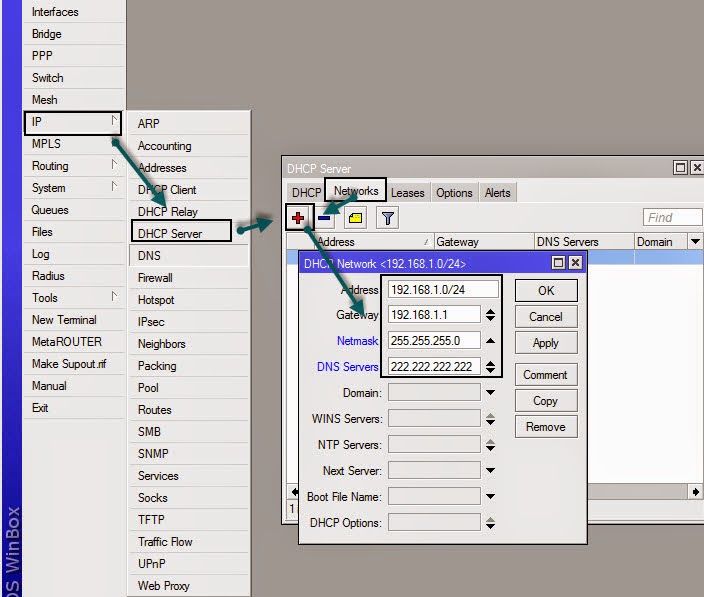
Once you've accessed the management console, the next step is to configure your router's DHCP server. From the main menu, click on the "IP" tab, followed by "DHCP Server." From here, you can configure a range of DHCP settings, including network range, default gateway, DNS servers, and lease time. Be sure to set the "DHCP Server" toggle to "Enabled" to activate the server.
Step 3: Set Up DHCP Client on Your Devices
With your router's DHCP server configured, the next step is to set up DHCP clients on your devices. Most devices will have DHCP clients enabled by default, meaning they will automatically obtain network settings from your router's server. If you encounter any devices that are not receiving network settings automatically, you may need to manually configure the device's DHCP client settings to match your router's server settings.
Step 4: Manage Your DHCP Server
Once your DHCP server is up and running, it's important to periodically check your server's logs to ensure everything is functioning correctly. From the management console, you can view your server's current lease list, which displays all devices that have obtained network settings from the server. You can also set up DHCP reservations, which allow you to manually assign IP addresses to certain devices.
Tips for DHCP Configuration on your MikroTik Router
- Configure your lease time to an appropriate length—long enough to prevent constant renewals, but short enough to allow for an efficient use of IP addresses.
- Set up reserved IPs for servers and other static devices to avoid potential conflicts with other devices on the network.
- Ensure your DHCP server is running on a secure network to avoid unauthorized access and potential security breaches.
By following these tips and the above steps, you can ensure a smooth and efficient configuration of DHCP on your MikroTik router, simplifying network management and ensuring your devices are always connected to the right IP addresses.
That concludes our guide to configuring DHCP on your MikroTik router. If you have any questions or need further assistance, be sure to consult your router's documentation or contact the manufacturer's support team for help.


Post a Comment for "MikroTik Router Configuration DHCP And IP Address Management"