MikroTik Router Configuration Proxy Server Authentication
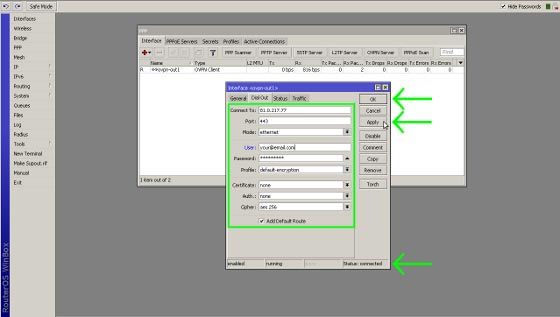
Starting p: Are you tired of slow internet connections and unreliable security when connecting to remote networks? Look no further than Mikrotik Router and its powerful Site-to-Site PPTP VPN Server Configuration. This simple yet effective solution allows you to establish a secure and speedy connection with servers located across the globe. And with our step-by-step guide, you'll be up and running in no time.  The first step in setting up your Site-to-Site PPTP VPN Server Configuration is to ensure that your Mikrotik Router is properly configured. This can be done by accessing the router's web interface and navigating to the "IP" tab. From there, select "Services" and ensure that "pptp" is enabled. This will allow your router to accept incoming VPN connections. Next, you'll need to set up a new user account for your VPN connection. This can be done by selecting the "PPP" tab in the router's web interface and clicking "Secrets." From there, click "Add New" and enter a new username and password for your VPN connection. Be sure to select "pptp" as the service and "1" as the profile. Once your user account is set up, you'll need to configure your remote router to connect to your Mikrotik Router. This can be done by accessing the remote router's web interface and navigating to the "IP" tab. From there, select "PPTP Client" and click "Add New." Enter the IP address of your Mikrotik Router, along with the username and password you created earlier. Be sure to select "pptp" as the protocol and "default-encryption" as the profile. Now that your routers are connected, it's time to configure your network settings. This can be done by accessing the "IP" tab in the Mikrotik Router's web interface and selecting "Pool." From there, click "Add New" and enter the range of IP addresses you want to assign to your VPN clients. You'll also need to configure your firewall settings to allow VPN traffic through. This can be done by selecting the "IP" tab in the Mikrotik Router's web interface and clicking "Firewall." From there, click "NAT" and click "Add New." Enter the following information: Chain: srcnat Out Interface: ether1 (or the interface your internet connection is on) Action: masquerade Finally, you'll need to configure your client settings. This can be done on each individual client device by accessing the VPN settings and entering the IP address of your Mikrotik Router, along with the username and password you created earlier. Be sure to select "pptp" as the protocol and "default-encryption" as the profile. And there you have it! With these simple steps, you can establish a secure, reliable VPN connection between your remote network and your Mikrotik Router. Say goodbye to slow internet speeds and unreliable connections, and hello to seamless, speedy VPN access.
The first step in setting up your Site-to-Site PPTP VPN Server Configuration is to ensure that your Mikrotik Router is properly configured. This can be done by accessing the router's web interface and navigating to the "IP" tab. From there, select "Services" and ensure that "pptp" is enabled. This will allow your router to accept incoming VPN connections. Next, you'll need to set up a new user account for your VPN connection. This can be done by selecting the "PPP" tab in the router's web interface and clicking "Secrets." From there, click "Add New" and enter a new username and password for your VPN connection. Be sure to select "pptp" as the service and "1" as the profile. Once your user account is set up, you'll need to configure your remote router to connect to your Mikrotik Router. This can be done by accessing the remote router's web interface and navigating to the "IP" tab. From there, select "PPTP Client" and click "Add New." Enter the IP address of your Mikrotik Router, along with the username and password you created earlier. Be sure to select "pptp" as the protocol and "default-encryption" as the profile. Now that your routers are connected, it's time to configure your network settings. This can be done by accessing the "IP" tab in the Mikrotik Router's web interface and selecting "Pool." From there, click "Add New" and enter the range of IP addresses you want to assign to your VPN clients. You'll also need to configure your firewall settings to allow VPN traffic through. This can be done by selecting the "IP" tab in the Mikrotik Router's web interface and clicking "Firewall." From there, click "NAT" and click "Add New." Enter the following information: Chain: srcnat Out Interface: ether1 (or the interface your internet connection is on) Action: masquerade Finally, you'll need to configure your client settings. This can be done on each individual client device by accessing the VPN settings and entering the IP address of your Mikrotik Router, along with the username and password you created earlier. Be sure to select "pptp" as the protocol and "default-encryption" as the profile. And there you have it! With these simple steps, you can establish a secure, reliable VPN connection between your remote network and your Mikrotik Router. Say goodbye to slow internet speeds and unreliable connections, and hello to seamless, speedy VPN access. vpn mikrotik router configuration pptp site server


Post a Comment for "MikroTik Router Configuration Proxy Server Authentication"