Implementing MikroTik RouterOS Traffic Shaping For VPN
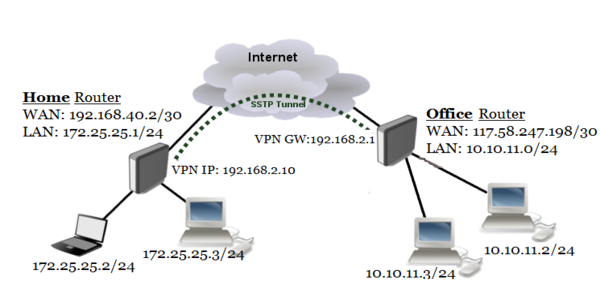
As technology advances, businesses are looking for ways to keep their networks and data secure. One way to do this is by setting up a Site-to-Site VPN. In this post, we will go through how to set up a Site-to-Site VPN using MikroTik RouterOS client and server.

What is a Site-to-Site VPN?
A Site-to-Site VPN, also known as a Router-to-Router VPN, is a VPN connection that enables two or more networks to communicate with each other securely over the internet. In a Site-to-Site VPN, the communication is encrypted and authenticated between two or more VPN gateways. This type of VPN is commonly used to connect two or more office locations together or to connect a branch office to the main office.
Why Use a Site-to-Site VPN?
There are several advantages of using a Site-to-Site VPN:
- Security: Site-to-Site VPNs use encryption to secure the communication between the networks. This ensures that sensitive data is not intercepted or accessed by unauthorized users.
- Cost Effective: A Site-to-Site VPN is a cost-effective way to connect two or more networks together. It eliminates the need for dedicated lines between the networks.
- Productivity: A Site-to-Site VPN enables seamless communication between different networks. This leads to increased productivity and efficiency in the workplace.
Setting Up a Site-to-Site VPN using MikroTik RouterOS Client and Server
In order to set up a Site-to-Site VPN using MikroTik RouterOS client and server, you will need:
- A MikroTik Router with RouterOS
- A public IP address for each MikroTik Router
Once you have the above requirements, follow the steps below to set up a Site-to-Site VPN:
1. Configure the VPN Server on MikroTik Router A
To set up a VPN server on MikroTik Router A:
- Log in to MikroTik Router A
- Go to the "PPP" menu and click on "Interface"
- Click on the "Add new" button to create a new interface
- Select "SSTP client" as the interface type
- Enter a name for the interface, such as "VPN"
- Enter the public IP address of MikroTik Router B in the "Connect To" field
- Enter the username and password for the VPN connection
- Click on the "OK" button to save the configuration
2. Configure the VPN Client on MikroTik Router B
To set up a VPN client on MikroTik Router B:
- Log in to MikroTik Router B
- Go to the "PPP" menu and click on "Interface"
- Click on the "Add new" button to create a new interface
- Select "SSTP client" as the interface type
- Enter a name for the interface, such as "VPN"
- Enter the public IP address of MikroTik Router A in the "Connect To" field
- Enter the username and password for the VPN connection
- Click on the "OK" button to save the configuration
3. Configure Firewall Rules on MikroTik Router A and B
To allow traffic between the two networks, you will need to configure firewall rules on both MikroTik Router A and MikroTik Router B. Follow the steps below:
- Log in to MikroTik Router A and go to the "IP" menu
- Click on "Firewall" and then "Filter Rules"
- Click on the "Add new" button to create a new rule
- Set the chain to "forward"
- Set the protocol to "all"
- Set the source address to the local network on MikroTik Router A
- Set the destination address to the remote network on MikroTik Router B
- Click on the "OK" button to save the configuration
- Repeat the above steps on MikroTik Router B, but set the source and destination addresses to the opposite networks
4. Test the Site-to-Site VPN Connection
Once you have completed the above steps, you can test the Site-to-Site VPN connection by pinging a device on the remote network from the local network. If the ping is successful, then the Site-to-Site VPN connection has been successfully established.
Conclusion
Setting up a Site-to-Site VPN using MikroTik RouterOS client and server is a great way to securely connect two or more networks together. By following the steps outlined above, you can set up a Site-to-Site VPN in no time and ensure that your network and data remain secure.


Post a Comment for "Implementing MikroTik RouterOS Traffic Shaping For VPN"