Securing MikroTik Routers With VPN IPsec Tunnels
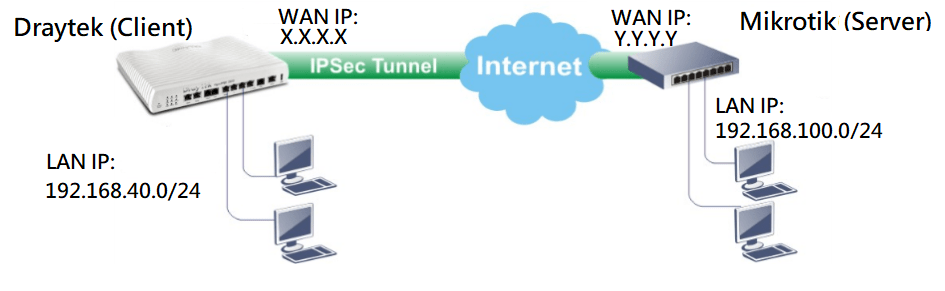
If you're running a Mikrotik router and need to set up a site-to-site IPSec VPN tunnel, then you've come to the right place. This is a crucial component of your network infrastructure as it allows you to securely connect two networks together over the internet as if they were directly connected. This can be used to connect two branch offices together or to connect an office network to a data center. In this tutorial, we will walk you through the process of setting up a site-to-site IPSec VPN tunnel on a Mikrotik router.

What is IPSec VPN Tunnel?
Before we dive into the configuration process, let's quickly take a look at what IPSec VPN tunnel is and how it works. IPSec (Internet Protocol Security) is a protocol suite that provides secure communication between two devices over an unsecured network such as the internet. It creates a virtual tunnel that encrypts and authenticates all data that passes through it.
There are two types of IPSec VPN tunnel: Site-to-Site VPN and Remote Access VPN. Site-to-site VPN is used to connect two networks together, while remote access VPN is used to connect a single device such as a laptop or smartphone to a network. In this tutorial, we will focus on setting up a site-to-site VPN.
Requirements
Before we start the configuration process, let's take a look at what we need:
- Two Mikrotik routers (one for each network)
- Public IP addresses for both routers
- Basic knowledge of Mikrotik RouterOS and IPSec VPN concepts
Configuration Steps
Now that we have everything we need, let's get started with the configuration process.
1. Configure IP Addresses
The first step is to configure IP addresses on both routers. This is necessary because IPSec VPN tunnel requires public IP addresses on both ends. If you don't have a public IP address, you can use a dynamic DNS service such as DynDNS or No-IP to get a dynamic hostname that maps to your router's public IP address.
To configure IP addresses, follow these steps:
- Log in to your Mikrotik router and go to IP > Addresses.
- Click on the plus (+) button to add a new IP address.
- Enter the IP address and subnet mask for your router.
- Set the interface to ether1 or whichever interface is connected to the internet.
- Click on Apply and OK to save the configuration.
Repeat these steps on the second router as well.
2. Configure IPSec Policy
The next step is to configure the IPSec policy on both routers. This policy defines the parameters for the IPSec tunnel such as encryption algorithms, hashing algorithms, and the pre-shared key. To configure the IPSec policy, follow these steps:
- Log in to your Mikrotik router and go to IP > IPSec.
- Click on the plus (+) button to add a new IPSec policy.
- Enter a name for the policy (e.g. site-to-site).
- Set the src. address and dst. address to the IP addresses of the respective routers.
- Set the encryption algorithm to aes-256 or whatever encryption algorithm you prefer.
- Set the hashing algorithm to sha1 or whatever hashing algorithm you prefer.
- Enter a pre-shared key in the field provided. This key should be the same on both routers.
- Click on Apply and OK to save the configuration.
Repeat these steps on the second router as well.
3. Configure IPSec Proposal
The next step is to configure the IPSec proposal on both routers. This proposal defines the actual encryption and hashing algorithms used for the IPSec tunnel. To configure the IPSec proposal, follow these steps:
- Log in to your Mikrotik router and go to IP > IPSec.
- Click on the plus (+) button to add a new IPSec proposal.
- Enter a name for the proposal (e.g. aes-256).
- Set the encryption algorithm to aes-256 or whatever encryption algorithm you prefer.
- Set the hashing algorithm to sha1 or whatever hashing algorithm you prefer.
- Click on Apply and OK to save the configuration.
Repeat these steps on the second router as well.
4. Configure IPSec Peer
The next step is to configure the IPSec peer on both routers. This is where we define the remote IP address and the relevant IPSec policy. To configure the IPSec peer, follow these steps:
- Log in to your Mikrotik router and go to IP > IPSec > Peers.
- Click on the plus (+) button to add a new IPSec peer.
- Enter a name for the peer (e.g. remote-router).
- Set the remote address to the public IP address of the other router.
- Choose the IPSec policy that we created earlier from the Proposal list.
- Click on Apply and OK to save the configuration.
Repeat these steps on the second router as well.
5. Configure IPSec Proposal for Phase 2
The next step is to configure the IPSec proposal for Phase 2 on both routers. This proposal defines the actual encryption and hashing algorithms used for the IPSec tunnel in Phase 2. To configure the IPSec proposal for Phase 2, follow these steps:
- Log in to your Mikrotik router and go to IP > IPSec > Proposals.
- Click on the plus (+) button to add a new IPSec proposal.
- Enter a name for the proposal (e.g. aes-256).
- Set the encryption algorithm to aes-256 or whatever encryption algorithm you prefer.
- Set the hashing algorithm to sha1 or whatever hashing algorithm you prefer.
- Set the PFS group to none.
- Click on Apply and OK to save the configuration.
Repeat these steps on the second router as well.
6. Configure IPSec Policy for Phase 2
The next step is to configure the IPSec policy for Phase 2 on both routers. This policy defines the parameters for the IPSec tunnel in Phase 2 such as the IPSec proposal and the PFS group. To configure the IPSec policy for Phase 2, follow these steps:
- Log in to your Mikrotik router and go to IP > IPSec > Policies.
- Click on the plus (+) button to add a new IPSec policy.
- Enter a name for the policy (e.g. aes-256).
- Set the src. address and dst. address to the IP addresses of the respective routers.
- Choose the IPSec proposal that we created earlier from the Proposal list.
- Set the PFS group to none.
- Click on Apply and OK to save the configuration.
Repeat these steps on the second router as well.
7. Create Firewall Rules for IPSec
The final step is to create firewall rules to allow IPSec traffic through the routers. To create firewall rules, follow these steps:
- Log in to your Mikrotik router and go to IP > Firewall > Filter Rules.
- Click on the plus (+) button to add a new filter rule.
- Enter a name for the rule (e.g. allow-IPSec).
- Set the chain to input.
- Set the protocol to the ESP protocol.
- Set the action to accept.
- Click on Apply and OK to save the configuration.
Repeat these steps on the second router as well.
Conclusion
Setting up a site-to-site IPSec VPN tunnel on a Mikrotik router is an important step in securing your network infrastructure. With this tunnel, you can connect two networks together securely over the internet. Follow the steps outlined in this tutorial to ensure a successful configuration process. As always, if you have any questions or comments, feel free to leave them in the comments section below.


Post a Comment for "Securing MikroTik Routers With VPN IPsec Tunnels"