MikroTik Router Configuration DHCP Server And Client Setup
In today's fast-paced technological world, configuring DHCP on MikroTik has become an essential task for network administrators. DHCP stands for Dynamic Host Configuration Protocol, which is a network protocol used to automatically assign IP addresses to devices on a network. In this post, we will guide you on how to configure DHCP on MikroTik and everything you need to know about DHCP. To begin with, we need to understand the benefits of DHCP. DHCP simplifies network administration by allowing devices to access network resources without any manual intervention. DHCP assigns IP addresses to devices on a network, which makes it easy to manage and maintain network connectivity. Let's delve deeper into how to configure DHCP on MikroTik. First, we need to open the MikroTik RouterOS interface, which can be accessed through the web interface or Terminal application. Once you have opened your terminal application, you will need to log in to your MikroTik router using your login credentials. After logging in, navigate to the DHCP server configuration page. On the DHCP server configuration page, you will find several fields to configure DHCP on MikroTik. The first field is the DHCP server interface, which refers to the interface on which you want to run the DHCP server. The DHCP server interface should be the same as the primary network interface on your router. The next field is the DNS server, which specifies the IP address of your router's DNS server. The DNS server is responsible for resolving domain names to IP addresses, which is necessary for devices to access resources on the network. You can add multiple DNS servers by separating them with a comma. The third field is the Gateway, which is the IP address of your router. The Gateway is responsible for routing network traffic between devices on the network and the internet. You should enter the IP address of the interface that connects to your internet service provider. The fourth field is the DHCP pool, which specifies the range of IP addresses that can be assigned to devices on the network. You should enter the starting IP address and the ending IP address of the pool. The number of IP addresses in the pool should be greater than the number of devices on the network. Apart from these fields, there are several other fields that you can configure on the DHCP server configuration page. For example, you can configure the lease time, which is the amount of time that a device can use the assigned IP address. You can also set up DNS caching, which caches frequently accessed domain names on the router to improve network performance. In addition to configuring DHCP on MikroTik, you should also set up static IP addresses for devices that require a fixed IP address. Static IP addresses are useful for servers or network printers that require a consistent IP address for remote management or access. To set up a static IP address, navigate to the DHCP leases page, which displays a list of devices that have been assigned IP addresses by the DHCP server. Find the device that requires a static IP address and click the Make Static button. This will assign a fixed IP address to the device, which you can modify if necessary. In conclusion, configuring DHCP on MikroTik is a vital task for network administrators to ensure smooth network operation. Understanding the different fields and options on the DHCP server configuration page can help you set up DHCP effectively on MikroTik. Additionally, configuring static IP addresses for devices that require a fixed IP address can improve network management and performance. We hope this post has helped you understand how to configure DHCP on MikroTik. 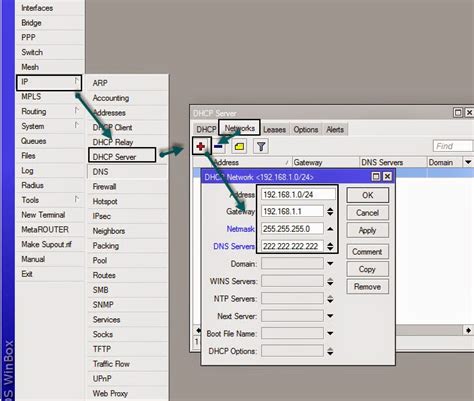
dhcp mikrotik configure server option ip


Post a Comment for "MikroTik Router Configuration DHCP Server And Client Setup"