Mastering MikroTik RouterOS Advanced VPN Configuration Techniques
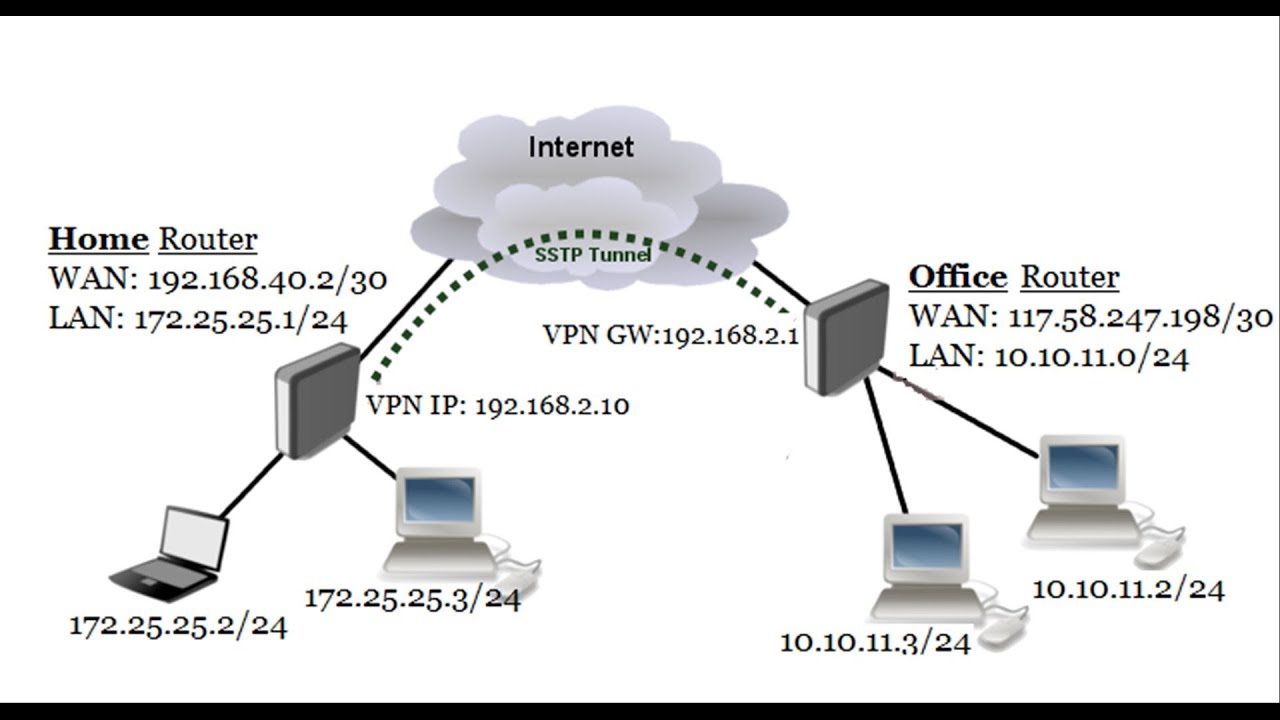
MikroTik is a trusted name when it comes to routers and network management. One of the most important features of a Mikrotik router is the ability to set up a VPN (Virtual Private Network) server. A VPN allows you to establish a secure connection to your company network, access your home network when you are away, and keep your internet traffic safe and private. In this article, we will guide you through the process of setting up a Mikrotik VPN server with PPTP (Point-to-Point Tunneling Protocol) to connect a remote client.

Step 1: Configure the Mikrotik Router
The first step is to configure your Mikrotik router to support PPTP VPN protocols. To do this, you need to access your router's web interface using a web browser.
- Open your web browser and enter your router's IP address in the address bar. The default IP address is 192.168.88.1.
- Enter your username and password to log in to your router. The default username is "admin" and the default password is blank.
- Go to the "PPP" tab and click on the "PPTP Server" option.
- Enable the PPTP server by checking the "Enabled" checkbox.
- Set the "Service Port" to 1723.
- Set the "Encryption" to "auto" or "mschap2".
- Set the "Authentication" to "mschap2".
- Set the "User" and "Password" to the username and password you want to use to connect to the VPN server.
- Click the "Apply" button to save the settings.
Step 2: Configure the Remote Client
Once you have configured your Mikrotik router, the next step is to configure the remote client that will be connecting to the VPN server. This requires you to have access to a computer, smartphone, or tablet that will be using the VPN server.
- On your remote client, go to the "Network and Internet Settings" and click on the "VPN" tab.
- Click the "Add a VPN connection" button.
- In the "VPN Provider" dropdown, select "Windows (built-in)".
- In the "Connection Name" field, enter a name for your VPN connection.
- Under "Server Name or Address", enter the IP address of your Mikrotik router.
- Under "VPN Type", select "Point to Point Tunneling Protocol (PPTP)".
- Enter the username and password you set up on the Mikrotik router in the "Username" and "Password" fields.
- Click the "Save" button to save the settings.
Step 3: Connect to the VPN Server
Now that you have configured both your Mikrotik router and your remote client, you can connect to the VPN server.
- On your remote client, go to the "Network and Internet Settings" and click on the "VPN" tab.
- Select the VPN connection you just created and click the "Connect" button.
- Wait for the connection to establish. You will see a message indicating that you are connected to the VPN server.
- You can now access your company network or your home network as if you were on the same local network.
Conclusion
Setting up a Mikrotik VPN server with PPTP is a straightforward process that allows you to enjoy the benefits of a secure and private connection. By configuring your Mikrotik router and your remote client, you can establish a VPN connection and access your company network or home network safely from anywhere.


Post a Comment for "Mastering MikroTik RouterOS Advanced VPN Configuration Techniques"