MikroTik Router VPN Site-to-Site Connectivity Explained
So, I stumbled upon something that made my nerdy heart flutter with happiness. It's about setting up site-to-site SSTP VPN configuration between two MikroTik RouterOS. I know, I know. It sounds boring, but trust me on this - it's pretty cool!
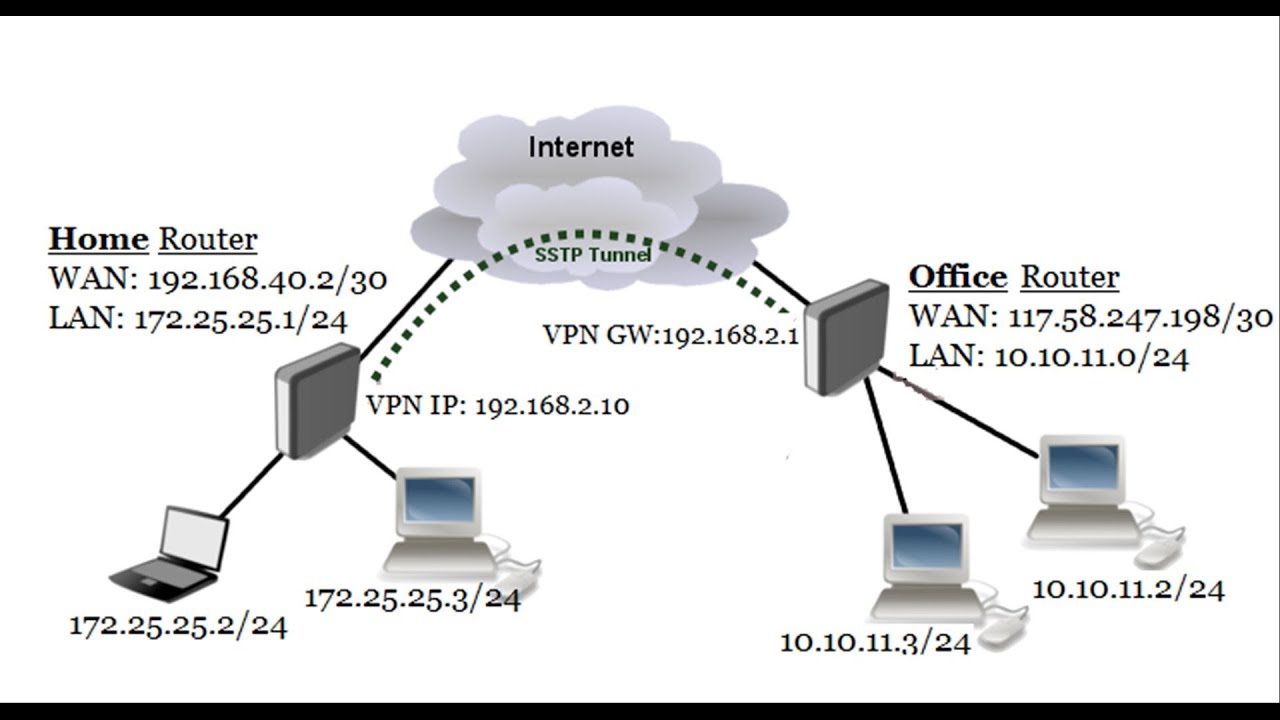
First things first, let me explain what an SSTP VPN is. Basically, it's a type of VPN (Virtual Private Network) protocol that allows you to connect two networks securely over the internet. In other words, it enables you to securely connect one network to another network in a remote location.
Now, onto the nitty-gritty of setting up site-to-site SSTP VPN configuration between two MikroTik RouterOS:
Step 1: Set up the IP addresses
The first step is to set up the IP addresses of both the MikroTik routers. You need to assign a unique IP address to each router. For example, you can assign 192.168.1.1 to Router 1 and 192.168.2.1 to Router 2.
Step 2: Configure the SSTP VPN server on Router 1
Next, you need to configure the SSTP VPN server on Router 1. To do this, follow the steps below:
- Open the Winbox utility on your computer.
- Connect to Router 1 by entering its IP address.
- Click on the "PPP" tab on the left-hand side of the screen.
- Click on the "+" icon to add a new PPP profile.
- Give the profile a name (e.g., SSTP).
- Select "SSTP" as the protocol.
- Enter a password for the SSTP VPN connection.
- Click on the "OK" button to save the profile.
Step 3: Configure the SSTP VPN client on Router 2
Now, you need to configure the SSTP VPN client on Router 2. To do this, follow the steps below:
- Open the Winbox utility on your computer.
- Connect to Router 2 by entering its IP address.
- Click on the "PPP" tab on the left-hand side of the screen.
- Click on the "+" icon to add a new PPP profile.
- Give the profile a name (e.g., SSTP).
- Select "SSTP" as the protocol.
- Enter the IP address of Router 1 in the "Remote Address" field.
- Enter the username and password for the SSTP VPN connection.
- Click on the "OK" button to save the profile.
Step 4: Set up the IPsec policy on Router 1
The next step is to set up the IPsec policy on Router 1. To do this, follow the steps below:
- Open the Winbox utility on your computer.
- Connect to Router 1 by entering its IP address.
- Click on the "IP" tab on the left-hand side of the screen.
- Click on the "IPsec" tab.
- Click on the "+" icon to add a new IPsec policy.
- Enter the following details:
- Policy name: sstp
- Src. Address: 192.168.1.0/24
- Dst. Address: 192.168.2.0/24
- Tunnel: sstp
- SAs: auto
- Proposal: default
- Click on the "OK" button to save the policy.
Step 5: Set up the IPsec policy on Router 2
The final step is to set up the IPsec policy on Router 2. To do this, follow the steps below:
- Open the Winbox utility on your computer.
- Connect to Router 2 by entering its IP address.
- Click on the "IP" tab on the left-hand side of the screen.
- Click on the "IPsec" tab.
- Click on the "+" icon to add a new IPsec policy.
- Enter the following details:
- Policy name: sstp
- Src. Address: 192.168.2.0/24
- Dst. Address: 192.168.1.0/24
- Tunnel: sstp
- SAs: auto
- Proposal: default
- Click on the "OK" button to save the policy.
And there you have it! You have successfully set up site-to-site SSTP VPN configuration between two MikroTik RouterOS. Now you can securely connect one network to another network in a remote location. How cool is that?
If you're still scratching your head and struggling with the configuration, don't worry. Just take a deep breath and try again. Remember, practice makes perfect. Alternatively, you can always seek help from the MikroTik RouterOS community. They're a friendly and helpful bunch of people who are always willing to lend a hand.
So, go forth and conquer the world of VPN configurations! And if you happen to stumble upon something even cooler, be sure to share it with me. I'm always up for learning new things.


Post a Comment for "MikroTik Router VPN Site-to-Site Connectivity Explained"