Advanced VPN Setup IPsec Tunnels On MikroTik
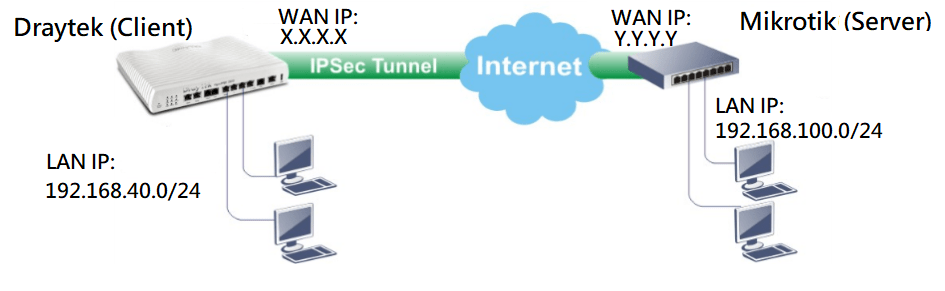
Have you ever wanted to connect two different locations together in a secure manner without compromising your sensitive data? Well, look no further than MikrotikRouter's Site-to-site IPSec VPN Tunnel Configuration. This amazing feature allows you to link two remote locations via your MikrotikRouter and create a secure tunnel for data transmission.

The configuration may seem daunting at first, but don't worry, we've got you covered. Here's a breakdown of the step-by-step process:
Step 1: Setting Up DHCP Server
The first step is to set up a DHCP server on the MikrotikRouter that will assign a private IP address to the remote device that is attempting to connect. This can be done by navigating to IP > DHCP Server:
- Click on "+" to create a new DHCP server.
- Fill in the required fields such as the interface that will be used to assign the IP, IP pool, and DNS server.
- Make sure the lease time is set to a reasonable amount of time.
- Click "OK" to save the configuration.
Step 2: Setting Up IPSec Peer
Now that the DHCP server is set up, the next step is to create an IPSec peer. This can be done by navigating to IP > IPSec > Peers:
- Click on "+" to create a new peer.
- Fill in the required fields such as the name of the peer, its IP address, the authentication method, and the secret that the two devices will share to encrypt the data.
- Make sure the policy is set to encrypt the traffic.
- Click "OK" to save the configuration.
Step 3: Setting Up IPSec Proposal
Now that the IPSec peer is set up, the next step is to create an IPSec proposal. This can be done by navigating to IP > IPSec > Proposals:
- Click on "+" to create a new proposal.
- Fill in the required fields such as the name of the proposal, the authentication method, the encryption method, and the lifetime.
- Click "OK" to save the configuration.
Step 4: Setting Up IPSec Policy
Now that the IPSec proposal is set up, the next step is to create an IPSec policy. This can be done by navigating to IP > IPSec > Policies:
- Click on "+" to create a new policy.
- Fill in the required fields such as the source and destination IP addresses, the protocol that will be used, and the IPSec proposal that was created in the previous step.
- Click "OK" to save the configuration.
Step 5: Setting Up NAT Rule
Now that the IPSec policy is set up, the next step is to create a NAT rule to allow traffic to flow through the tunnel. This can be done by navigating to IP > Firewall > NAT:
- Click on "+" to create a new NAT rule.
- Fill in the required fields such as the chain that will be used, the source and destination IP addresses, the action (which should be masquerade), and the out-interface that will be used.
- Click "OK" to save the configuration.
Step 6: Setting Up Routes
Now that the NAT rule is set up, the next step is to create routes that will allow traffic to flow through the tunnel. This can be done by navigating to IP > Routes:
- Click on "+" to create a new route.
- Fill in the required fields such as the gateway that will be used, the destination network that the remote device is on, and the distance (which should be set to a lower value than the default).
- Click "OK" to save the configuration.
Step 7: Setting Up Firewall Rule
Finally, the last step is to create a firewall rule that will allow traffic to flow through the tunnel. This can be done by navigating to IP > Firewall > Filter:
- Click on "+" to create a new firewall rule.
- Fill in the required fields such as the chain that will be used, the source and destination IP addresses, the protocol that will be used, and the action (which should be accept).
- Click "OK" to save the configuration.
And there you have it! By following these simple steps, you can easily configure a secure Site-to-site IPSec VPN Tunnel using your MikrotikRouter. You can now securely transmit data between two remote locations without worrying about hackers or snoopers compromising your sensitive information.


Post a Comment for "Advanced VPN Setup IPsec Tunnels On MikroTik"