Understanding MikroTik Router Proxy Load Balancing Techniques
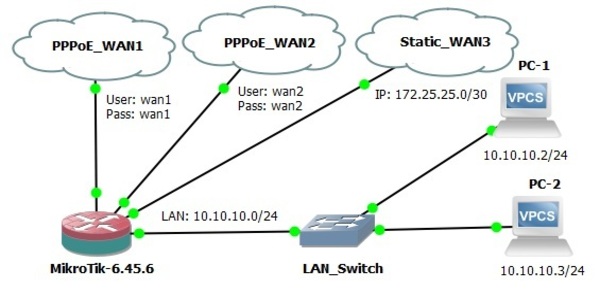
When it comes to managing multiple internet connections, Mikrotik Load Balancing with 2 PPPoE and 1 Static WAN using ECMP is a great option to ensure maximum efficiency and reliability. This approach utilizes a simple load balancing algorithm through the Equal-Cost Multi-Path (ECMP) protocol to distribute network traffic across two or more internet service providers. With this setup, you can enjoy faster download and upload speeds, reduced latency, and improved overall network performance.
How does Mikrotik Load Balancing work?
Mikrotik Load Balancing is a technique that allows the distribution of network traffic across two or more internet service providers by using a router. The router is connected to multiple Internet Service Providers (ISPs) via Ethernet ports, modems, or routers. The Mikrotik router uses a load balancing algorithm to decide which ISP link to use for different packets or sessions. The algorithm takes into accounts the bandwidth capacity of each ISP link to distribute traffic evenly and efficiently.
What are the benefits of using Mikrotik Load Balancing?
Here are some of the advantages of using Mikrotik Load Balancing for your network:
- Redundancy: By using multiple Internet Service Providers, you can ensure that your network stays up even if one or more ISPs go down. This ensures that your network remains operational and there is no disruption in your business or operations.
- Improved Network Performance: With Mikrotik Load Balancing, you can ensure maximum performance and faster download and upload speeds. This is because the load balancing algorithm distributes traffic equally across multiple ISP links, ensuring that no single link is overburdened.
- Reduced Latency: By using multiple ISPs, you can reduce latency and improve overall network performance. This is because one ISP may have congestion and delays while others are running smoothly, so multiple ISP links can decrease the overall latency of the network.
- Cost Savings: Mikrotik Load Balancing allows you to use multiple ISPs, which can save you money on internet charges, especially if you choose providers with competitive pricing.
How to configure Mikrotik Load Balancing with 2 PPPoE and 1 Static WAN using ECMP
Now let's get into the details of how you can set up Mikrotik Load Balancing with 2 PPPoE and 1 Static WAN using ECMP. Here are the steps:
Step 1: Set up your Mikrotik Router
The first step is to set up your Mikrotik router and ensure that it is working properly. You can do this by following the instructions given in the Mikrotik router manual. Once you have done this, connect your router to your ISPs using Ethernet cables or modems.
Step 2: Configure the Gateway IP
Next, you need to configure the Gateway IP of each of your ISPs. This is important because the router needs to know which IP address to use for traffic. To do this, follow these steps:
- Go to IP -> Addresses.
- Click on the + sign to add a new address.
- Select the interface for the first ISP.
- Enter the IP address assigned by the ISP in the 'Address' field. This will be your Gateway IP.
- Set the 'Netmask' field to the corresponding value for your network.
- Repeat the process for the second ISP.
Step 3: Configure PPPoE Connection
The next step is to configure your PPPoE connection on your Mikrotik router. PPPoE is a protocol that is used to establish a connection to your ISP. To configure PPPoE, follow these steps:
- Go to PPP -> PPPoE.
- Click on the + sign to add a new PPPoE connection.
- Enter your username and password supplied by your ISP in the 'User' and 'Password' fields respectively.
- Select the first Ethernet port of your router in the 'Interface' field.
- Click 'OK' to save the configuration.
- Repeat the process for the second PPPoE connection.
Step 4: Configure Static IP
The last step is to configure your static IP address. A static IP is an IP address that is assigned to your network by your ISP. To configure your static IP, follow these steps:
- Go to IP -> Addresses.
- Click on the + sign to add a new address.
- Select the second Ethernet port of your router in the 'Interface' field.
- Enter the static IP address supplied by your ISP in the 'Address' field.
- Set the 'Netmask' field to the corresponding value for your network.
- Click 'OK' to save the configuration.
Conclusion
Mikrotik Load Balancing with 2 PPPoE and 1 Static WAN using ECMP is a great way to manage multiple internet connections. With this technique, you can enjoy faster download and upload speeds, reduced latency and improved overall network performance. By following the steps above, you can quickly and easily configure your Mikrotik router for load balancing. If you have any questions or need help with the configuration, feel free to contact us.


Post a Comment for "Understanding MikroTik Router Proxy Load Balancing Techniques"