Configuring MikroTik RouterOS VPN Profiles

Are you struggling to configure Mikrotik IPSEC L2TP VPN after performing a RouterOS update? Do not worry, as we have got you covered. The recent RouterOS update has brought some changes in the configuration process of Mikrotik IPSEC L2TP VPN. This post will guide you through the step-by-step process of configuring your VPN.
What is Mikrotik IPSEC L2TP VPN?
Mikrotik IPSEC L2TP VPN is a secure and encrypted connection between two networks or devices over the internet. It uses the IPsec protocol to encrypt the data and L2TP protocol to create the VPN tunnel.
Details:
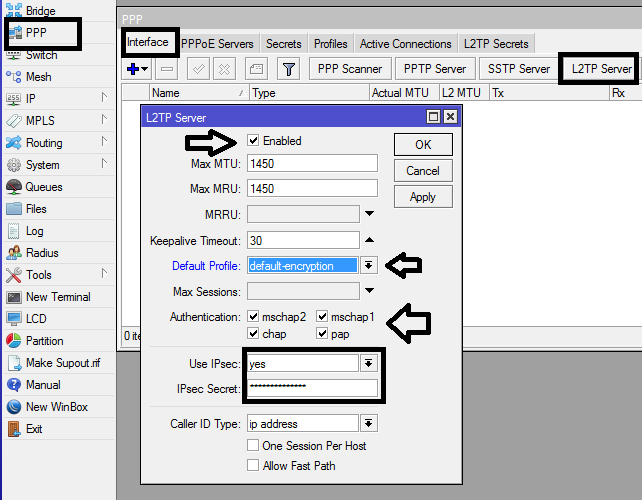
The recent RouterOS update has replaced the previous “l2tp-secret” feature with the new “ipsec-secret” feature. This means that the configuration process for Mikrotik IPSEC L2TP VPN has changed. However, the new process is quite simple and straightforward.
Tips:
To configure Mikrotik IPSEC L2TP VPN on your RouterOS device, follow the steps below:
- Log in to your RouterOS device using the Winbox tool or web browser.
- Click on “PPP” from the sidebar and select “Interface” from the dropdown menu.
- Click on the “+” button to add a new interface.
- Select “L2TP Client” from the “New Interface” window and fill in the necessary details such as name, server address, username, and password.
- Click on the “IPSec Settings” tab and select “ipsec-esp” for the “Proposal” field. Enter the “ipsec-secret” that you have set up for the connection.
- Click on the “Dial Out” tab and select the interface that you want to connect to the VPN.
- Click on “OK” to save the changes.
- Test the connection by pinging the remote device or network.
You have now successfully configured your Mikrotik IPSEC L2TP VPN. If you face any issues during the configuration process, you can refer to the FAQ section below.
FAQ:
Q: What if I can’t connect to my VPN?
A: Ensure that you have entered the correct server address, username, and password. Also, check if your device has an active internet connection.
Q: What should I do if my VPN connection is unstable?
A: Try changing the “Proposal” field under the “IPSec Settings” tab to “ipsec-3des” or “ipsec-sha256”. You can also try unchecking the “Add Default Route” box under the “Dial Out” tab.
Q: How can I troubleshoot VPN connection issues?
A: You can check the logs under the “Log” tab in the PPP window for any error messages. You can also try disabling the firewall or changing the MTU size.
Q: Can I connect to multiple VPNs on the same device?
A: Yes, you can create multiple VPN interfaces on the same device and connect to different VPNs.
Conclusion:
Mikrotik IPSEC L2TP VPN is a reliable and secure way to connect to remote networks or devices over the internet. With the recent RouterOS update, the configuration process has changed, but the new process is simpler and easier to follow. By following the steps outlined above, you can easily configure your VPN and enjoy a secure and encrypted connection.


Post a Comment for "Configuring MikroTik RouterOS VPN Profiles"