Web Filtering And Safe Browsing With MikroTik Router Proxy Explained
If you're looking to secure your online activities and protect your privacy, configuring a web proxy could be a great solution. Here, we'll explore how to set up the MikroTik Router Web Proxy Configuration, which can provide an added layer of security and enhanced browsing experience.
What is a web proxy?
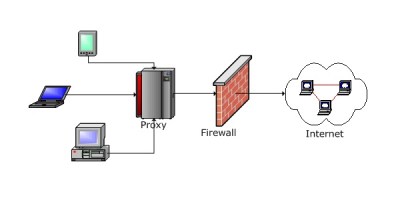
A web proxy is an intermediary server between the user's device and the internet. It acts as a mediator, routing web requests between the device and the internet. This way, the original IP address of the user is concealed, which provides a degree of privacy, anonymity and security against online threats such as hackers, identity thieves, and malicious actors. Furthermore, web proxies can cache web pages and content, which reduces page loading times - an added bonus for users.
Why use a web proxy?
There are several reasons why one may choose to use a web proxy:
- Privacy and anonymity: A web proxy can conceal the IP address of the user, thus keeping their online activities private and anonymous.
- Access to geo-restricted content: Some websites may not be accessible due to geographical restrictions, but by using a proxy, the user's location can appear to be different, which can allow access to that content.
- Protection against online threats: Web proxies can deliver an extra layer of protection against hacking, identity theft, and other malicious activities. This is possible because the proxy acts as a barrier between the user and the internet.
- Speed and performance: Web proxies can cache web pages and content, which can lead to faster page loading times and smoother browsing experience.
How to configure the MikroTik Router Web Proxy
Configuring the MikroTik Router Web Proxy requires a few steps:
- 1. Access the router configuration panel using a web browser. Default IP address is 192.168.88.1.
- 2. Click IP, then Web Proxy. This will bring up the Web Proxy configuration page.
- 3. In the Web Proxy configuration page, enable the cache and specify the cache size and cache on-disk options.
- 4. In the Access tab, specify the source address range, which is the IP range of the devices that will be using the proxy.
- 5. Set up the Port configuration in the Port tab.
- 6. In the Miscellaneous tab, enable the option to retain DNS information and specify the DNS servers to use.
- 7. Finally, click apply.
Conclusion
The MikroTik Router Web Proxy Configuration is an excellent solution for anyone looking to add an extra layer of security, enhanced browsing experience, and privacy protection against online threats. The configuration process is straightforward, and once set up, the proxy can provide a seamless experience for all devices within the specified IP range.
Whether it's accessing geo-restricted content, protecting against online threats, improving speed and performance, or keeping your online activities private and anonymous, the MikroTik Router Web Proxy Configuration is an ideal setup that can deliver a range of benefits.


Post a Comment for "Web Filtering And Safe Browsing With MikroTik Router Proxy Explained"