Exploring MikroTik Router VLAN Configuration For Proxy Services
If you're looking to configure VLAN and Bridge on your MikroTik router, you've come to the right place. This post will guide you through the process step-by-step, so you can get the most out of your network. But first, let's define what VLAN and Bridge are.
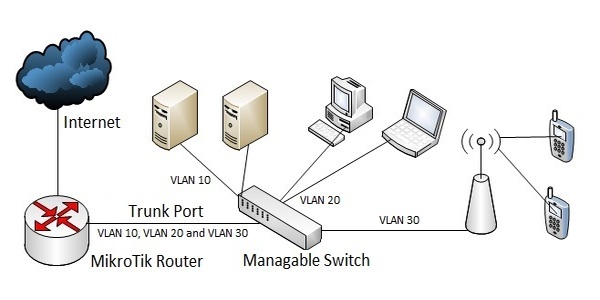
VLAN stands for Virtual Local Area Network, which enables multiple networks to coexist on the same physical network. VLANs use tagging to differentiate between different networks, so that traffic is kept separate and secure. A Bridge, on the other hand, is used to connect two or more separate networks, so that they can communicate with each other. It works by forwarding packets between the networks, without modifying them.
Configuring VLAN on MikroTik
Now that we have a basic understanding of VLAN and Bridge, let's proceed with the configuration:
- Login to your MikroTik router and navigate to the Bridge menu on the left-hand side.
- Click on the + button to add a new bridge.
- Enter a name for the new bridge and click on OK.
- Next, go to the VLAN menu and click on the + button to add a new VLAN.
- Enter a name for the new VLAN and choose the bridge you just created as the interface.
- Enter a VLAN ID and click on OK.
- Now, go to the Interfaces menu and click on the + button to add a new interface.
- Choose VLAN from the list of interface types and select the VLAN you just created.
- Enter a name for the new interface and click on OK.
- Your VLAN configuration is now complete.
By default, all VLANs have access to each other. If you want to restrict access between VLANs, you can use firewall rules to do so. You can also assign IP addresses to each VLAN, so that they can communicate with each other.
Configuring Bridge on MikroTik
Now, let's move on to configuring Bridge on your MikroTik router:
- Login to your MikroTik router and navigate to the Bridge menu on the left-hand side.
- Click on the + button to add a new bridge.
- Enter a name for the new bridge and click on OK.
- Next, go to the Interfaces menu and click on the + button to add a new interface.
- Choose Ether from the list of interface types and select the physical interface you want to bridge.
- Enter a name for the new interface and click on OK.
- Now, go back to the Bridge menu and click on the bridge you just created.
- Click on the Ports tab and add the interface you just created to the bridge.
- Your Bridge configuration is now complete.
By default, all networks connected to the bridge will be in the same broadcast domain and will be able to communicate with each other. If you want to separate the networks, you can create VLANs on the bridge and assign different IP addresses to each VLAN.
Conclusion
Configuring VLAN and Bridge on your MikroTik router can seem daunting at first, but with these step-by-step instructions, you should be up and running in no time. Remember to test your configuration thoroughly before deploying it in a production environment, to ensure that it works as intended. If you have any questions or run into any issues, don't hesitate to consult the MikroTik documentation, or contact a qualified IT professional for assistance.


Post a Comment for "Exploring MikroTik Router VLAN Configuration For Proxy Services"