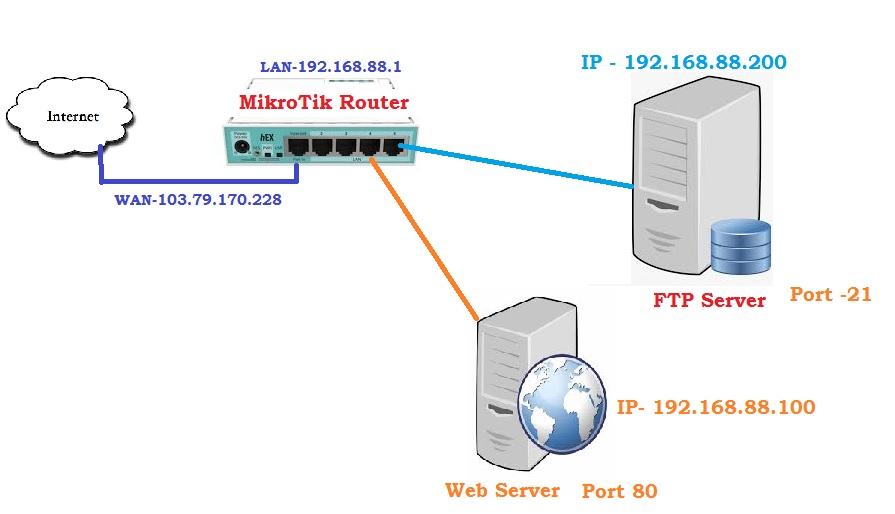
MikroTik Router Configuration NAT And Port Forwarding
If you're running a Mikrotik router, it's important to know how to enable port forwarding. This can help you to remotely access devices on your network, as well as improve performance for gaming and other bandwidth-intensive activities. Here's how you can configure port forwarding on a Mikrotik router using the Winbox interface.
Step 1: Access the Winbox Interface
The first step is to launch the Winbox interface on your computer. This is a powerful tool that allows you to configure a wide range of settings on your Mikrotik router. You can download Winbox from the Mikrotik website, and once it's installed, you can launch it from your desktop or start menu.
Step 2: Navigate to IP > Firewall
Once you've accessed the Winbox interface, you'll need to navigate to the Firewall section. This can be found under the IP menu item in the left-hand sidebar. Here you'll see a list of all the firewall rules that are currently configured on your router.
Step 3: Add a New Firewall Rule
To enable port forwarding, you'll need to add a new firewall rule. This can be done by clicking on the Add New button, which will open up a dialog box where you can specify the details of the rule. Here are the settings you'll need to configure:
- Chain: Choose the chain that you want to apply the rule to. In most cases, this will be the input or forward chains.
- Action: Select the action that should be taken when the rule is matched. In this case, we want to accept connections to our port forwarding rule.
- Protocol: Choose the protocol that the rule should apply to. This will typically be either TCP or UDP.
- Dst. Port: Enter the destination port that you want to forward traffic to. This will typically be a port number that's used by a specific application, such as 80 for HTTP traffic or 443 for HTTPS.
- In. Interface: Choose the interface that the traffic should be received on. For example, if you want to forward traffic from the internet to a device on your home network, you'll need to select the WAN interface here.
Step 4: Add a New NAT Rule
In addition to creating a new firewall rule, you'll also need to configure a NAT rule. This is necessary because it allows incoming traffic to be properly redirected to the correct device on your network. To create a new NAT rule, follow these steps:
- Click on the NAT menu item in the left-hand sidebar of the Winbox interface.
- Click on the Add New button to create a new NAT rule.
- Select the chain that the rule should apply to. In most cases, this will be the dstnat chain.
- Select the protocol that the rule should apply to. This will typically be either TCP or UDP.
- Enter the port number that you want to forward traffic to in the Dst. Port field.
- Enter the IP address of the device that should receive the forwarded traffic in the To Addresses field.
Step 5: Save Your Changes
Once you've configured your firewall and NAT rules, you'll need to save your changes before they take effect. To do this, click on the Apply button in the top-right corner of the Winbox interface. You should now be able to access devices on your network using the port forwarding rule that you've configured.
Conclusion
Enabling port forwarding on a Mikrotik router is a simple process that can be done using the Winbox interface. By following the steps outlined in this guide, you should be able to configure your router to forward traffic to devices on your network, improving performance and enabling remote access. If you're having trouble with port forwarding, be sure to check your firewall and NAT rules to ensure that they're configured correctly.


Post a Comment for "MikroTik Router Configuration NAT And Port Forwarding"