Enhancing Web Browsing Privacy With MikroTik Router Proxy
Hey there folks, have you ever heard of a Mikrotik external proxy? Sounds complicated right? Don't worry, your favorite funny person is here to explain it in detail!
First things first, what exactly is an external proxy in the context of Mikrotik? Well, simply put, it's a way to redirect traffic from your network to an external proxy server that you have set up. But why would you want to do this? Let's explore the reasons:
- Improved internet speeds: By routing all your network traffic through a dedicated proxy server, you can potentially see faster connection speeds as the server can cache frequently accessed web pages.
- Control over access: If you have strict rules over which websites can be accessed by users on your network, setting up an external proxy allows you to enforce those rules by blocking traffic to specific websites.
- Reduced bandwidth usage: By caching frequently accessed web pages, an external proxy server can help reduce your overall bandwidth usage. This can be especially useful if you have a limited internet connection.
Now that we know the benefits, let's get into the nitty-gritty of setting up a Mikrotik external proxy:
- Setting up the external proxy server: First things first, you'll need to set up the external proxy server that your network traffic will be routed through. There are several open-source proxy servers available that you can use for this purpose. Once you've set up the server, note down the IP address and port number.
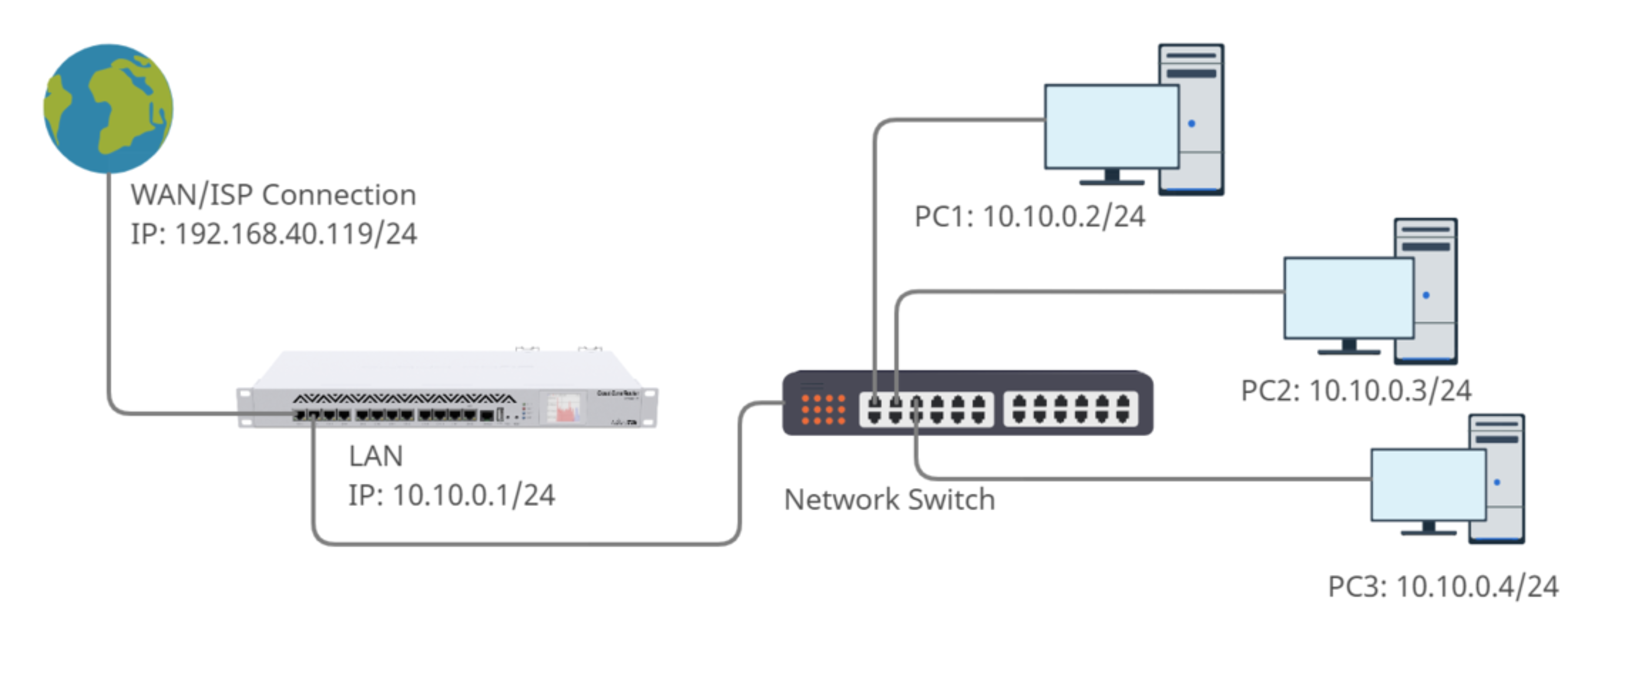
- Configuring the Mikrotik router: Now that we have the external proxy server set up, we need to configure our Mikrotik router to route traffic through it. To do this, log in to your router's web interface and go to IP > Web Proxy. Here, enable the web proxy and enter the IP address and port number of the external proxy server.
- Configuring firewall rules: Next, we need to configure the firewall rules on the Mikrotik router to route traffic through the external proxy server. This can be done by creating a new firewall rule that redirects all outgoing traffic to the proxy server. To do this, go to IP > Firewall and create a new rule with the following settings:
- Chain: srcnat
- Action: redirect
- To Ports: 8080 (or whatever port your proxy server is using)
- Testing the setup: Finally, we need to test the setup to make sure everything is working correctly. To do this, open a web browser on a device connected to your network and try accessing a website. If everything has been set up correctly, you should see that the web page is being accessed through the external proxy server.
Phew, that was a lot of information to take in! But fear not, with a little bit of patience and effort, you too can set up a Mikrotik external proxy and enjoy all the benefits that come with it. Happy networking!
web proxy mikrotik using website block websites access error redirect another blocked option fill just
mikrotik
browsing enhancing
mikrotik proxy web routeros mode transparent enable howto shown below learn settings ram tricks tips
.jpg)

Post a Comment for "Enhancing Web Browsing Privacy With MikroTik Router Proxy"