Load Balancing With MikroTik Router Maximizing Bandwidth
Hey there, my tech-savvy fam!
Have you ever had the nightmare of slow internet connection or being cut off from the internet completely? It's a terrible feeling, especially when we rely on the internet for work, entertainment, and keeping up with our loved ones. But don't worry, because there's a solution to prevent this from happening - MikroTik Load Balancing with Failover using Policy Based Routing.
Now, I know this sounds a bit intimidating, but stick with me because I'm going to break it down for you in simple and easy-to-understand terms.
What is MikroTik Load Balancing with Failover using Policy Based Routing?
In a nutshell, MikroTik Load Balancing with Failover using Policy Based Routing is a way to ensure that your internet connection is always stable and fast, especially when multiple devices are connecting to the internet at the same time.
Here's how it works:
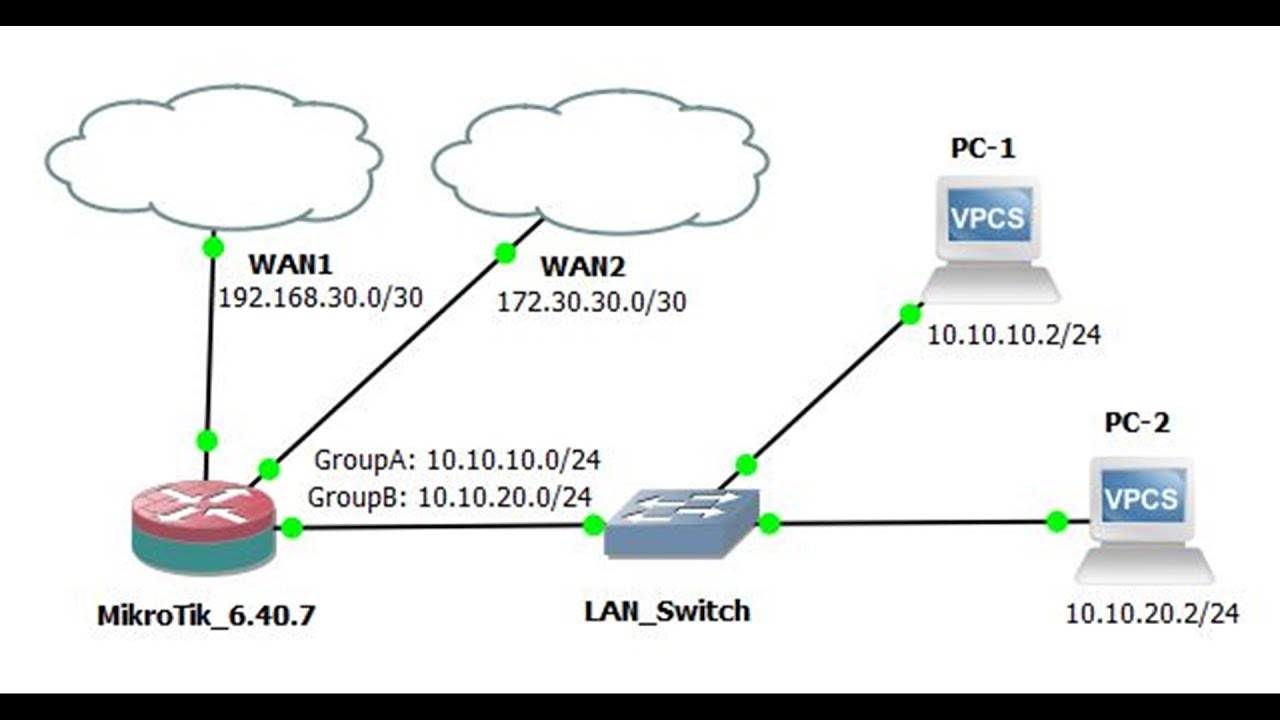
- MikroTik Load Balancing: This distributes the internet traffic across multiple internet connections, so each device can access the internet through a different path. This helps to reduce congestion and prevent slow internet speed.
- Failover: This ensures that if one internet connection fails, the other connection automatically takes over, so you never lose internet connection entirely.
- Policy Based Routing: This selects the best internet connection based on criteria such as speed and cost, so you always get the best internet connection for your needs.
Now, I hope that clears up what MikroTik Load Balancing with Failover using Policy Based Routing is all about. But how can you set this up for your own internet network? Let's dive in.
How to Set Up MikroTik Load Balancing with Failover using Policy Based Routing
Before we dive into the setup process, here's what you'll need:
- A MikroTik router
- Two or more internet connections
- A basic understanding of networking concepts
Assuming you meet these requirements, let's get started!
1. Set up your MikroTik router
The first step is to set up your MikroTik router. Connect your router to your modem, and then connect it to your computer using an Ethernet cable.
Next, you'll need to configure the router. Open up your web browser and type in the IP address of your MikroTik router (usually 192.168.88.1). This will take you to the router's login page. Enter your username and password to log in.
Once you're logged in, you'll need to configure the MikroTik router to recognize your internet connections. To do this, go to "IP" > "Addresses". Click on the "Add New" button to add a new IP address. Enter the IP address of your internet connection, and then click "Apply" to save the changes.
2. Configure your internet connections
Now that your MikroTik router is connected to your internet connections, you'll need to configure them. Go to "IP" > "Routes" and click on the "Add New" button to add a new route.
Enter the IP address of your internet connection, and then click "OK" to save the changes.
Repeat this process for all of your internet connections.
3. Set up MikroTik Load Balancing
Once your internet connections are configured, it's time to set up MikroTik Load Balancing. Go to "IP" > "Firewall" and click on the "Add New" button to add a new rule.
Enter the following information:
- Chain:
prerouting - Action:
mark-routing - New Routing Mark:
to_wan1 - Connection State:
new, untracked - In Interface:
Local - Out Interface:
WAN1
Click "OK" to save the rule.
Repeat this process for all of your internet connections. Make sure you change the "New Routing Mark" to match each internet connection.
4. Set up Failover
The next step is to set up Failover. Go to "IP" > "Routes" and click on the "Add New" button to add a new route.
Enter the following information:
- Gateway:
IP address of WAN2 - Distance:
1 - Scope:
30
Click "OK" to save the route.
Repeat this process for all of your internet connections, changing the "Gateway" to match each internet connection.
5. Set up Policy Based Routing
The final step is to set up Policy Based Routing. Go to "IP" > "Firewall" and click on the "Add New" button to add a new rule.
Enter the following information:
- Chain:
prerouting - Action:
accept - Routing Mark:
to_wan1 - In Interface:
Local - Connection State:
new, untracked
Click "OK" to save the rule.
Repeat this process for all of your internet connections, changing the "Routing Mark" to match each internet connection.
And there you have it!
You've just set up MikroTik Load Balancing with Failover using Policy Based Routing. Now you can enjoy a stable and fast internet connection, even when multiple devices are connected at the same time.
Remember, a stable and fast internet connection is important in today's world, where we rely so much on the internet for work, entertainment, and keeping up with our loved ones. So why not invest a little time and effort into setting up MikroTik Load Balancing with Failover using Policy Based Routing?
I hope this guide has been helpful. If you have any questions or comments, feel free to leave them below.
Until next time, stay tech-savvy!


Post a Comment for "Load Balancing With MikroTik Router Maximizing Bandwidth"