Advanced VPN Configurations For MikroTik Routers
Do you want to set up a L2TP VPN on a MikroTik Router? Well, it's your lucky day because we've got all the information you need to get started. In this article, we will explain everything in detail, from the basics of VPN to the installation process on your MikroTik Router. So, let's get started!
What is VPN?
VPN stands for Virtual Private Network, and it allows you to connect to the internet securely and privately. The primary purpose of VPN is to protect your online privacy by creating an encrypted connection between your device and a VPN server. This connection safeguards your online activities from snoopers, hackers, and cybercriminals. Additionally, VPNs allow you to bypass internet censorship and access restricted content.
How does VPN work?
VPN works by encrypting your internet traffic and routing it through a VPN server. When you connect to a VPN server, your device sends encrypted data to the server through an encrypted tunnel. The VPN server then decrypts the data and routes it to the internet. All the internet traffic that goes through this tunnel is encrypted and invisible to anyone who tries to intercept it.
Some VPN protocols, such as L2TP (Layer 2 Tunneling Protocol), require the use of a VPN client. The client creates the encrypted tunnel and communicates with the VPN server to ensure that all the data is encrypted and secure.
Setting up L2TP VPN on a MikroTik Router
MikroTik RouterOS is an operating system for routers. It allows you to configure and manage your network, including VPNs. Here's how to set up an L2TP VPN on your MikroTik Router:
Step 1: Configure DNS Settings
The first step is to configure the DNS (Domain Name System) settings on your MikroTik Router. This allows your router to resolve domain names to IP addresses. To configure DNS settings, follow these steps:
- Log in to your MikroTik RouterOS
- Go to IP > DNS
- Enter your DNS server IP addresses in the Primary and Secondary DNS fields
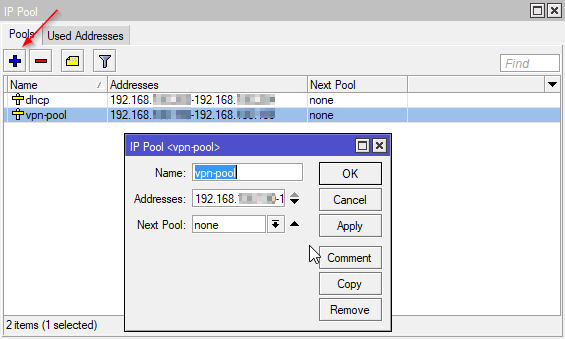
Step 2: Create a Pool of IP Addresses
You need to create a pool of IP addresses that your VPN clients will use. Follow these steps to create a pool of IP addresses:
- Go to IP > DHCP Server > Networks
- Click on the plus icon to add a new network
- Enter a name for the network in the Name field
- Enter the IP range in the Address field
- Enter the subnet mask in the Netmask field
- Enter the gateway in the Gateway field
- Enter a DNS server IP address in the DNS Servers field
- Click on the Apply button and then click on the OK button
Step 3: Set up a PPP Profile
PPP (Point-to-Point Protocol) is a protocol used to establish a connection over a serial interface. You need to create a PPP profile for your L2TP VPN. Follow these steps to create a PPP profile:
- Go to PPP > Profiles
- Click on the plus icon to add a new profile
- Enter a name for the profile in the Name field
- Set the Local Address and Remote Address to the IP range you created in Step 2
- Set the DNS Server to the IP address of your DNS server
- Enable compression
- Enable encryption and set the encryption method to AES-256
- Click on the Apply button and then click on the OK button
Step 4: Configure L2TP Server
Now it's time to configure the L2TP server on your MikroTik Router. Follow these steps:
- Go to PPP > L2TP Server
- Click on the plus icon to add a new server
- Enter a name for the server in the Name field
- Set the IPsec Secret to a strong password
- Select the PPP Profile you created in Step 3
- Set the Authentication to mschap2
- Set the Keepalive Timeout to 60
- Set the Default Profile to the PPP Profile you created in Step 3
- Click on the Apply button and then click on the OK button
Step 5: Configure Firewall Rules
You need to configure firewall rules to allow L2TP traffic to pass through your router. Follow these steps:
- Go to IP > Firewall > Filter Rules
- Click on the plus icon to add a new filter rule
- Set the Chain to input
- Set the Protocol to udp
- Set the Dst. Port to l2tp
- Click on the Apply button and then click on the OK button
- Click on the plus icon to add another filter rule
- Set the Chain to forward
- Set the Protocol to udp
- Set the Dst. Port to l2tp
- Click on the Apply button and then click on the OK button
Step 6: Configure L2TP Client
Finally, you need to configure the L2TP client on your device. Here's how:
- Open the Network and Sharing Center on Windows or the Network Preferences on Mac
- Click on the plus icon to add a new network interface
- Select VPN as the interface type
- Enter a name for the interface in the Service Name field
- Select L2TP over IPSec as the VPN Type
- Enter the IP address of your MikroTik Router in the Server Address field
- Enter the same IPsec Secret you used in Step 4 in the Shared Secret field
- Enter your MikroTik Router username and password in the Username and Password fields
- Click on the Apply button and then click on the Connect button
That's it! You have successfully set up an L2TP VPN on your MikroTik Router. Now you can connect securely to the internet and access restricted content.
Conclusion
L2TP VPN is an excellent way to secure your internet connection and protect your privacy online. By following the steps outlined in this article, you can easily set up an L2TP VPN on your MikroTik Router. Remember to use a strong password and keep your VPN client updated to ensure maximum security. Happy browsing!


Post a Comment for "Advanced VPN Configurations For MikroTik Routers"