Advanced VPN Configuration On MikroTik Routers Tips And Tricks
So, you want to set up a MikroTik SSTP VPN Server Configuration with Windows 10, eh? Well, aren't you just a fancy pants! Don't worry, I won't judge you too hard for it. In fact, I'll give you all the deets you need to get that bad boy up and running.
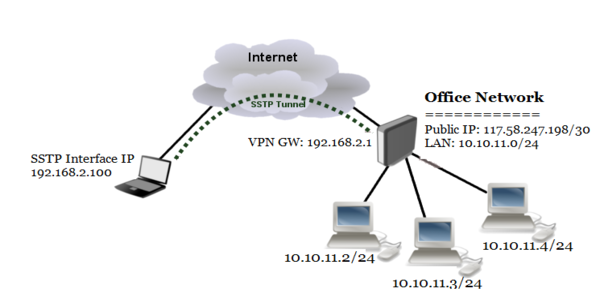
First things first, let's talk about what the heck SSTP even is. In technical terms, it stands for Secure Socket Tunneling Protocol. In layman's terms, it's a way to securely connect your computer to a remote network. Why would you want to do this, you ask? Well, let me tell you:
- You can access restricted websites that are blocked in your country (Netflix, anyone?)
- You can connect to your work's network from home
- You can keep your internet browsing private from prying eyes (like that nosy neighbor of yours)
Now that you're convinced, let's get started. Here's what you'll need:
- A MikroTik router (duh)
- A Windows 10 computer
- An SSTP capable VPN client (like the one built into Windows 10)
Got all that? Good. Now, onto the steps:
Step 1: Configure the MikroTik Router
First, we need to configure the MikroTik router to act as an SSTP VPN server. Here's how:
- Open up the WinBox application on your computer and connect to your MikroTik router
- Navigate to the PPP menu and click on the SSTP Server tab
- Click the + button to add a new SSTP interface
- Set the Name to something descriptive (like "VPN")
- Set the Authentication to mschap2
- Set the Certificate to none
- Set the Max mtu to 1400 (or lower if you're experiencing packet loss)
- Set the Comment to something witty
- Click the Apply button to save your changes
Congratulations, your MikroTik router is now configured to act as an SSTP VPN server! Wasn't that easy?
Step 2: Configure the Windows 10 Client
Next, we need to configure the Windows 10 computer to connect to the SSTP VPN server. Here's how:
- Click on the Start menu and type "VPN"
- Click on the Add a VPN Connection option
- Enter a descriptive name for the VPN (like "Work VPN")
- Set the Server name or address to the public IP address of your MikroTik router
- Set the VPN type to SSTP (duh)
- Set the Authentication to Use my Windows credentials
- Click the Save button to save your changes
That's it! Your Windows 10 computer is now configured to connect to the SSTP VPN server.
Step 3: Test the Connection
Of course, we can't just assume everything is working perfectly. We need to test the connection to make sure it's all good. Here's how:
- Connect your Windows 10 computer to the internet (duh)
- Click on the Start menu and type "VPN"
- Click on your newly created VPN connection and click the Connect button
- Enter your Windows login credentials if prompted
- Wait for the connection to establish (shouldn't take more than a few seconds)
- Open up your favorite web browser and go to https://ipchicken.com/
- Confirm that your public IP address is now the same as your MikroTik router's public IP address
Voila! You're now connected to the SSTP VPN server. Go ahead, access all those restricted websites to your heart's content. I won't tell anyone.
Conclusion
And there you have it, folks! You can now impress all your friends with your MikroTik SSTP VPN Server Configuration skills. Who knew something so technical could be so easy?
But seriously, VPNs are an incredibly important tool for privacy and security on the internet. Whether you're accessing sensitive work data or just browsing the web, a VPN can help keep your information safe from prying eyes. So go forth, my friends, and enjoy the internet with the peace of mind that comes from knowing your connection is secure.


Post a Comment for "Advanced VPN Configuration On MikroTik Routers Tips And Tricks"