Implementing Content Filtering With MikroTik Router Proxy
If you're considering modifying or changing your WiFi router settings, you're in the right place! Routers are essential for establishing a wireless connection between devices at home or in the office. But at times, you may want to tweak the settings to optimize performance, tighten security, or add features to your router. Here's everything that you need to know to modify or change your WiFi Router settings.
1. Access your router settings
The first thing you need to do to modify or change your router settings is to access the router's web-based interface. This interface allows you to view and customize the router's settings, such as the wireless network name (SSID), security settings, and more.
To access your router's settings, follow these steps:
- Connect your computer or mobile device to the router via Ethernet cable or Wi-Fi.
- Open a web browser and enter the IP address of your router in the address bar. The IP address is usually printed on the router label, and it's typically something like 192.168.0.1 or 192.168.1.1.
- Enter the router login credentials when prompted. If you haven't changed them, the default login details are usually admin/admin or admin/password.
- Once you log in, you'll be directed to the router's web interface, where you can view and modify the router's settings.
2. Change the SSID and password
By default, routers come with generic SSID names and passwords to enable quick and easy setup. However, these default values make it easy for hackers and cybercriminals to identify and exploit your network. Therefore, it's essential to change both the SSID and password to keep your network secure.
To change the SSID and password, follow these steps:
- Open your router's settings interface and select the wireless settings section.
- Change the SSID name to something unique that doesn't reveal any personal information.
- Create a strong and secure password that's at least eight characters long and includes a mix of uppercase and lowercase letters, numbers, and symbols.
- Click "Save" to apply the changes.
3. Enable Network Encryption
The next step in securing your router and network is to enable network encryption. Network encryption scrambles your data to make it unreadable by anyone who might intercept your network traffic. There are two types of network encryption you can choose: WEP and WPA2.
WEP is the older and less secure of the two encryption types, and it's easily hacked. Therefore, it's recommended to use WPA2 encryption to secure your network. To enable WPA2 encryption, follow these steps:
- Open your router's settings interface and select the wireless settings section.
- Select WPA2 encryption from the security options.
- Enter a strong passphrase that's at least ten characters long and contains a mix of uppercase and lowercase letters, numbers, and symbols.
- Click "Save" to apply the changes.
4. Block Access to Adult Content
If you have children in your home or office, you'll want to block access to adult content to protect them from inappropriate material. Most modern routers feature parental control settings that enable you to block access to inappropriate websites based on their content ratings.
To block access to adult content, follow these steps:
- Open your router's settings interface and select the parental controls section.
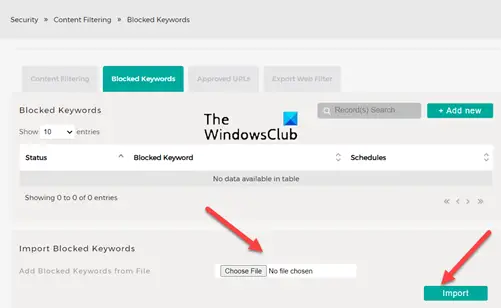
- Select the content filter option and enable the filter to block pornographic, violent, or other inappropriate content types.
- Add websites or keywords to the blocked list to prevent access to those sites.
- Save and apply the changes.
5. Prioritize Network Traffic
If you're experiencing slow internet speeds or buffering issues, you may want to prioritize network traffic to ensure smooth streaming and download speeds. Most modern routers come with Quality of Service (QoS) settings that allow you to prioritize different types of traffic, such as video and gaming, over others.
To prioritize network traffic, follow these steps:
- Open your router's settings interface and select the QoS section.
- Enable the QoS feature and choose the device or application you want to prioritize.
- Choose the priority level for the applications or devices you selected, such as high, medium, or low.
- Save and apply the changes.
6. Enable Guest Network Access
If you have guests in your home or office, you'll want to enable guest network access to enable them to use the internet without sharing your main network's password. Most modern routers feature a guest network option that sets up a separate Wi-Fi network with a new SSID and password.
To enable guest network access, follow these steps:
- Open your router's settings interface and select the guest network section.
- Enable the guest network feature and set up a new SSID and password for the network.
- Save and apply the changes.
Conclusion
Modifying or changing your WiFi router settings can be a bit overwhelming, but it's essential to optimize your network's performance and security. We hope that our guide has provided you with useful insights to help you modify or change your router's settings, whether at home or in the office.
By following these simple steps, you can improve your network's performance, tighten security, and add features to your router. If you have any questions or need further assistance, please don't hesitate to contact your router's manufacturer's customer support.


Post a Comment for "Implementing Content Filtering With MikroTik Router Proxy"