Advanced VPN Configuration With MikroTik RouterOS
If you're looking to set up a Site-to-Site VPN connection using MikroTik RouterOS client, then you're in the right place. Here at System Zone, we've got the expertise you need to make this process smooth and painless. Read on to learn more!
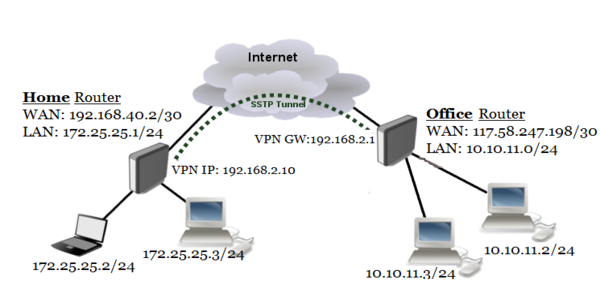
What Is a Site-to-Site VPN?
In a Site-to-Site VPN, two or more networks are connected using a VPN tunnel. This allows users from multiple sites to access resources on a central network, without the need for physical connectivity between the networks.
Why Use MikroTik RouterOS Client for Site-to-Site VPN?
MikroTik RouterOS Client is an excellent choice for setting up Site-to-Site VPN connections, for a few reasons:
- MikroTik RouterOS Client is a highly scalable solution.
- MikroTik RouterOS Client is easy to configure, even for non-experts.
- MikroTik RouterOS Client is highly secure, ensuring that your connection remains private and secure.
How to Set Up MikroTik Site to Site SSTP VPN
Now that you know why MikroTik RouterOS Client is such a great option for Site-to-Site VPN connections, let's dive into how to set it up:
Step 1: Create Certificates for MikroTik VPN
The first thing you'll need to do is create the certificates for your MikroTik VPN. Here's how:
- Log in to your MikroTik Router.
- Go to System > Certificates.
- Click on the Create Certificate button.
- Enter a name for your certificate.
- Choose the type of certificate you want to create (in this case, we'll choose Certificate Authority Certificate).
- Configure the settings for your certificate, including Key Size, Validity, Country, State, and more.
- Click on the Create Certificate button to create your new certificate.
Step 2: Set Up VPN Server on MikroTik Router
Next, you'll need to set up the VPN server on your MikroTik Router. Here's how:
- Log in to your MikroTik Router.
- Go to PPP > SSTP Server.
- Click on the Add button to create a new SSTP Server.
- Configure the settings for your new SSTP Server, including Certificates, Authentication, User Authentication, Cert. Request, and more.
- Click on Save to save your changes.
Step 3: Set Up VPN Client on MikroTik Router
Now that your VPN server is set up, it's time to configure your VPN client on your MikroTik Router. Here's how:
- Log in to your MikroTik Router.
- Go to PPP > SSTP Client.
- Click on the Add button to create a new SSTP Client.
- Configure the settings for your new SSTP Client, including Name, Server Address, Certificate, Authentication, User Authentication, and more.
- Click on Save to save your changes.
Step 4: Configure Firewall Rules for MikroTik VPN
Finally, you'll need to configure your firewall rules to allow traffic from your VPN connection. Here's how:
- Log in to your MikroTik Router.
- Go to IP > Firewall.
- Click on the Add button to create a new Firewall Rule.
- Configure the settings for your new Firewall Rule, including Chain, Protocol, Action, Src. Address, Dst. Address, and more.
- Click on Save to save your changes.
Conclusion
There you have it - a step-by-step guide to setting up a Site-to-Site VPN connection using MikroTik RouterOS Client. By following these simple steps, you'll be up and running in no time, enjoying all the benefits of a private and secure connection between multiple networks. If you have any questions or need any help along the way, feel free to reach out to us at System Zone - we're always here to help!


Post a Comment for "Advanced VPN Configuration With MikroTik RouterOS"