Understanding VPN Encryption On MikroTik
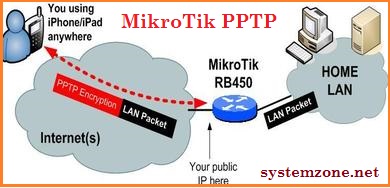
As more and more businesses are expanding globally, there is always a need for secure communication between offices located in different parts of the world. One way to achieve this is by setting up a virtual private network (VPN). VPNs allow remote clients to establish a secure connection to a private network over the internet. In this post, we will explain in detail how to configure a VPN server on Mikrotik router using Point-to-Point Tunneling Protocol (PPTP).

Steps to Configure Mikrotik VPN
Step 1: Create a VPN user account
The first step in configuring a VPN server on Mikrotik router is to create a user account for remote clients who will be connecting to the network. To create a user, open up the Mikrotik router's web interface and navigate to the System > Users section. Here, click on the plus sign (+) to create a new user.
In the new user window, enter a name for the user and a strong password. Make sure to select the group "vpn" from the drop-down menu under the "Group" section. Click on the "OK" button to create the user account.
Step 2: Configure the PPTP server
After creating a user account, the next step is to configure the PPTP server on the Mikrotik router. To do this, navigate to IP > Pools section in the router's web interface, and create a new pool. Enter a name for the pool, specify the range of IP addresses to be assigned to remote clients, and make sure to select the protocol "pptp" from the drop-down menu under the "Name" section.
Next, navigate to the PPP > Profiles section and create a new profile. In the new profile window, enter a name for the profile, and make sure to select the protocol "pptp" from the drop-down menu under the "Protocol" section. Click on the "OK" button to create the profile.
Now, navigate to the PPP > Secrets section to configure the user account for PPTP authentication. Click on the plus sign (+) to create a new secret. In the new secret window, select the user account for which the secret is being created from the drop-down menu under the "Name" section.
Enter the password for the user account and make sure to select the profile created in the earlier step from the drop-down menu under the "Profile" section. Click on the "OK" button to create the secret.
Step 3: Configure firewall rules
In order to allow traffic from the remote client to the private network, firewall rules need to be created on the Mikrotik router. To do this, navigate to IP > Firewall section in the router's web interface, and add a new NAT rule.
In the new NAT rule window, select the chain "srcnat" from the drop-down menu under the "Chain" section. In the "Out. Interface" field, select the public interface through which remote clients will be connecting to the internet.
Under the "Action" section, select "masquerade" from the drop-down menu. In the "Src. Address" field, enter the range of IP addresses assigned to the remote client pool created earlier.
Click on the "OK" button to create the new NAT rule. Next, create a new firewall filter rule by navigating to IP > Firewall > Filter section in the router's web interface. In the new filter rule window, select the chain "input" from the drop-down menu under the "Chain" section.
Under the "In. Interface" field, select the public interface through which remote clients will be connecting to the internet. Under the "Action" section, select "accept" from the drop-down menu. Make sure to save the changes.
Step 4: Configure the client device
After configuring the VPN server and firewall rules on the Mikrotik router, the next step is to configure the client device for VPN connectivity. To do this on a Windows device, open the "Control Panel" and navigate to the "Network and Sharing Center" section.
Click on the "Set up a new connection or network" option and select the "Connect to a workplace" option. Follow the on-screen instructions and enter the IP address of the Mikrotik router in the "Internet address" field.
Enter the user account name created earlier and the password in the "Username" and "Password" fields respectively. Click on the "Connect" button to establish the VPN connection.
Conclusion
Configuring a VPN server using PPTP protocol on a Mikrotik router is a straightforward process that allows remote clients to connect to a private network over the internet in a secure manner. By following the steps outlined in this blog post, you can create your own VPN server on a Mikrotik router and configure your client devices for VPN connectivity.


Post a Comment for "Understanding VPN Encryption On MikroTik"