MikroTik RouterOS Hotspot Configuration An In-depth Guide
If you're looking to set up a reliable and secure Wi-Fi hotspot, a Mikrotik router is a great option to consider. With its robust and flexible features, you can create a network that's fast and efficient, and yet customizable and manageable according to your needs. Whether you're using it for personal or business purposes, you can be sure that your hotspot is ready to deliver a high-quality user experience.
In this guide, we'll explore how you can configure your Mikrotik router to set up a hotspot that delivers a reliable and secure Wi-Fi connection. Below are some of the steps that you need to follow:
Step 1: Setting up the Router
The first thing you need to do is to set up your Mikrotik router. This involves configuring the WAN interface, IP address, and DNS settings. Once you've set up your router, you need to connect it to the internet so that it can start providing Wi-Fi signals.
In order to set up your router, you'll need to log in to your device via the browser-based console. Enter your router's IP address into the address bar, followed by your username and password. Once you've logged in, you can configure your router settings by navigating through the control panel.
Step 2: Configuring Your Hotspot
Once you've set up your router, you can start configuring your hotspot. This involves creating a hotspot profile, setting up a DHCP server, and configuring your Wi-Fi network. Below are some of the things you need to do:
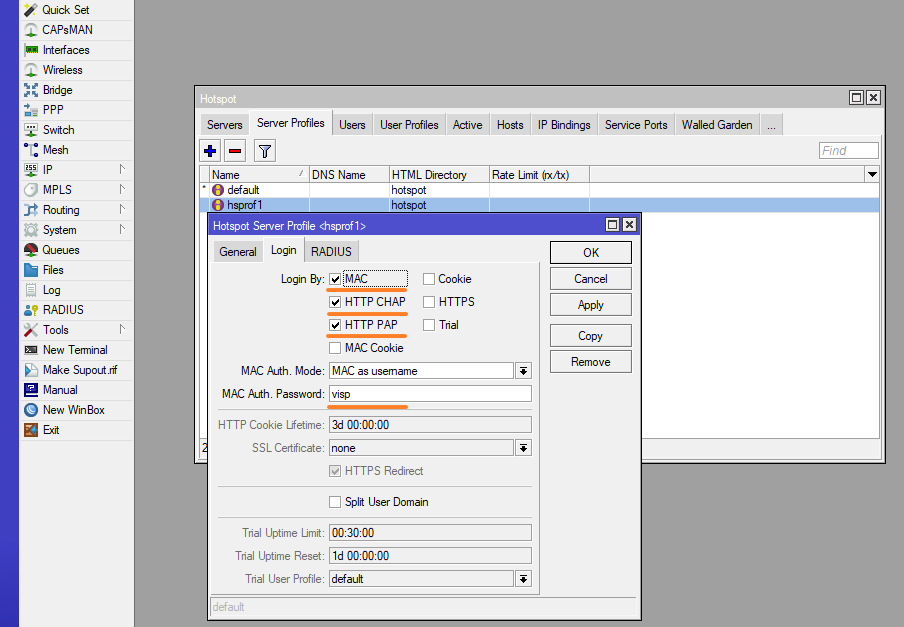
Create a Hotspot Profile
The first step is to create a hotspot profile. This is where you'll configure the parameters of your Wi-Fi network, including the hotspot name, authentication method, and encryption type. To do this, you need to go to the "IP" tab, click on "Hotspot," and then select "Profiles." Once you're in the hotspot profile page, click on the "+" icon to create a new profile.
Enter the name of your hotspot and configure the other settings according to your preferences. Make sure to set the authentication method and encryption type to WPA2, which is currently the most secure option available.
Set Up a DHCP Server
The next step is to set up a DHCP server. This will allow your hotspot to assign IP addresses to devices that connect to it. To do this, go to the "IP" tab, click on "DHCP Server," and then click on the "+" icon to add a new server.
Enter the necessary details, including the IP address range, DNS servers, and gateway address. Make sure to select the correct interface for your hotspot. The DHCP server should be enabled by default, so you don't need to do anything else to activate it.
Configure Your Wi-Fi Network
The final step is to configure your Wi-Fi network. To do this, go to the "Wireless" tab, click on "Interfaces," and then select your Wi-Fi interface. Click on the "Wireless" tab again, and then click on the "Security Profiles" tab.
Select the hotspot profile that you created earlier, and then configure the other settings as required. Make sure that your SSID is unique and that you're using the correct frequency and channel for your area.
Step 3: Set Up User Accounts
Now that you've set up your hotspot, you need to set up user accounts. This will allow you to control who can access your Wi-Fi network and prevent unauthorized access. To do this, go to the "Hotspot" tab, click on "Users," and then click on the "+" icon to add a new user.
Enter the user's name, password, and other details as required. You can also set a traffic limit and an expiration date for each user account. This will help you to manage your resources more effectively and prevent over-usage.
Step 4: Monitor and Manage Your Hotspot
Finally, you need to monitor and manage your hotspot to ensure that it's performing optimally and that your users are getting the best possible experience. To do this, you can use the tools and features available in your Mikrotik router. Below are some of the things you can do:
Monitor User Activity
Mikrotik provides several tools that allow you to monitor user activity and network traffic. These include the "Active Connections" page, the "Firewall Connections" page, and the "Traffic Monitor" page. To access these pages, go to the "Tools" tab in your Mikrotik console.
Here, you can see who's connected to your network, which websites and services they're accessing, and how much bandwidth they're using. This can help you to identify potential issues and optimize your network performance.
Set Up Bandwidth Management
If you want to control and manage the bandwidth usage on your network, you can use Mikrotik's built-in bandwidth management tools. These allow you to set up quality of service (QoS) rules that prioritize certain types of traffic over others.
For example, you could prioritize video streaming and VoIP traffic, while limiting the bandwidth available for downloads and file transfers. This can help you to balance the traffic on your network and ensure that your users have a consistent and reliable experience.
Configure Firewall Rules
To protect your hotspot against malicious attacks and unauthorized access, you can set up firewall rules in your Mikrotik router. These rules allow you to control the traffic that's allowed or blocked on your network.
For example, you could block incoming traffic from specific IP addresses or countries, or you could allow traffic only from specific ports and protocols. Configuring firewall rules can help you to secure your network and prevent potential threats from compromising your data.
Conclusion
Configuring a Mikrotik hotspot might seem intimidating at first, but it's actually a straightforward process if you follow the above steps. By setting up your router correctly, configuring your hotspot, setting up user accounts, and monitoring and managing your network, you can create a reliable and secure Wi-Fi experience that your users will appreciate.
If you're still unsure how to set up your Mikrotik hotspot or if you need more help, you can always refer to the Mikrotik user manual or seek assistance from a certified Mikrotik professional. With the right setup and support, you can get the most out of your Mikrotik hotspot and ensure that your Wi-Fi network is always up and running.


Post a Comment for "MikroTik RouterOS Hotspot Configuration An In-depth Guide"