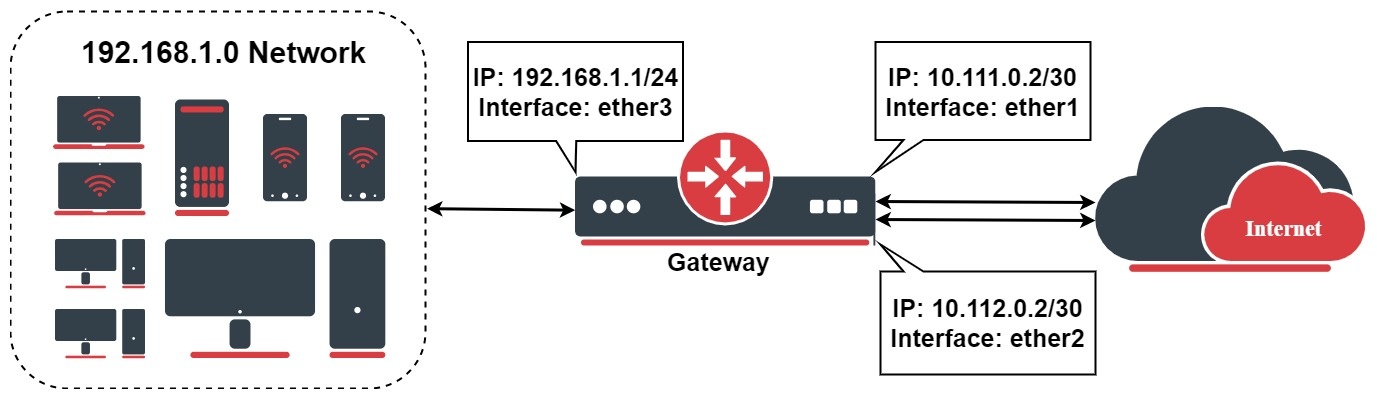
MikroTik Router Configuration For Multi-WAN Failover
In today's digital age, having reliable and secure network connectivity is crucial for individuals and businesses alike. That's where Mikrotik routers come in - they offer advanced features and customizable configurations to ensure smooth network operations. In this post, we'll take a closer look at how to configure a Mikrotik router.

Step 1: Accessing the Router's Interface
The first step in configuring your Mikrotik router is accessing its interface. To do this, you will need to have the router's IP address, username, and password handy. Once you have the login credentials, follow these steps:
- Open a web browser on your computer and type the router's IP address in the address bar. The default IP address for Mikrotik routers is 192.168.88.1, but this may vary depending on your network configuration.
- Enter the username and password when prompted. The default username is "admin," and there is no default password - you will need to set one up the first time you log in.
- Once you're logged in, you'll be taken to the Mikrotik interface.
Step 2: Basic Configuration
After accessing the interface, the next step is to configure the basic settings for your router. This includes setting up the WAN and LAN IP addresses, as well as configuring the router's hostname and time zone.
- Click on the "IP" menu on the left-hand side of the interface and select "Addresses."
- Click the "Add New" button and enter the WAN IP address, subnet mask, and gateway provided by your ISP.
- Repeat the above step for the LAN IP address, subnet mask, and gateway.
- Next, click on the "System" menu and select "Identity." Enter a hostname for the router.
- Finally, click on the "System" menu again and select "Clock." Set the time zone for your location and apply the changes.
Step 3: Setting Up DHCP
DHCP, or Dynamic Host Configuration Protocol, is a network protocol that automatically assigns IP addresses to devices on a network. Mikrotik routers have a built-in DHCP server, making it easy to set up and manage IP addresses for your devices.
- Click on the "IP" menu and select "DHCP Server."
- Click the "Add New" button and specify the address range and lease time for the DHCP server.
- Enable the DHCP server by clicking the "Enabled" box and applying the changes.
Step 4: Configuring Firewall Rules
A firewall is a network security system that monitors and controls incoming and outgoing network traffic. Mikrotik routers have a powerful firewall that allows for granular control over network traffic and protocols.
- Click on the "IP" menu and select "Firewall."
- Click the "Add New" button and select the protocol you wish to filter (e.g. TCP or UDP).
- Set the source and destination addresses and ports for the rule.
- Select the action to be taken (e.g. accept or drop) and apply the changes.
Step 5: Enabling Remote Access
If you need to access your Mikrotik router from a remote location, you can set up remote access. This will allow you to log in to the router's interface from any internet connection with the proper credentials.
- Click on the "IP" menu and select "Services."
- Find the "www" service and click the "Edit" button.
- Set the port number to something other than 80 (e.g. 8080) to avoid conflicts with other web services.
- Click "Apply" and then click the "Add New" button to create a new rule.
- Select "Dst. Port" for the rule property and enter the port number you just specified.
- Select the action you wish to take (e.g. accept or drop) and apply the changes.
Conclusion
Configuring a Mikrotik router may seem daunting at first, but with the proper guidance and a bit of patience, it can be a straightforward process. By following the steps outlined in this post, you can ensure that your Mikrotik router is set up properly and running smoothly.
If you encounter any issues or have further questions, be sure to consult the Mikrotik documentation or reach out to customer support for assistance.

Post a Comment for "MikroTik Router Configuration For Multi-WAN Failover"