Exploring MikroTik Router Proxy Load Balancing Techniques
In today's world, having reliable internet connectivity is essential for individuals and organizations alike. However, internet outages are bound to happen from time to time, causing inconvenience and hindrances in daily operations. To mitigate such situations, load balancing over multiple ISPs can be a viable solution.
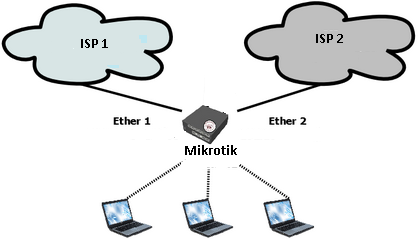
Load balancing is the technique of distributing network traffic across multiple internet service providers (ISPs) to avoid excessive load on any one of them. Further, it increases throughput, reliability, and redundancy of the network by utilizing available bandwidth from both ISPs. In this post, we will learn how to set up load balancing over two ISPs using a Mikrotik router.
Prerequisites
- A Mikrotik router with firmware version 6.0 or later installed.
- Two internet connections from different ISPs with their respective IP addresses and authentication details.
- Basic knowledge of networking concepts and the Mikrotik router.
Step 1: Configure Interfaces
The first step to setting up load balancing is to configure interfaces for each ISP connection. To do so, follow the steps below:
- Open the Mikrotik router WebFig interface and log in using your credentials.
- Go to the Interfaces tab and create two new VLAN interfaces for the two ISP connections.
- Go to the IP tab and assign a static IP address to each VLAN interface with the corresponding subnet mask and gateway IP from the respective ISP.
Step 2: Set Up Load Balancing
Load balancing can be set up in various ways using different techniques. However, in this post, we will use the PCC (Per Connection Classifier) method, which ensures that each connection uses a single ISP to maintain maximum connectivity. Follow the steps below:
- Go to the IP tab and choose the Firewall sub-menu.
- Create a new rule and set the chain to the "input" and the action to the "accept."
- Set the connection-state property to the "established, related" value.
- Go to the New Terminal and type the following command to set the mark for each interface.
- Create a new routing rule by navigating to the IP tab and choosing the Routes sub-menu.
- Set the Gateway value to the "main," and the distance value to a higher number than the default of 1.
- Click on the Advanced tab and set the "check gateway" and "add default route" properties to the "no" value.
- Go to the New Terminal and type the following command to enable NAT:
ip firewall mangle add action=mark-connection chain=prerouting in-interface=VLAN1 new-connection-mark=WAN1 passthrough=yes
ip firewall mangle add action=mark-connection chain=prerouting in-interface=VLAN2 new-connection-mark=WAN2 passthrough=yes
ip firewall nat add chain=srcnat action=masquerade out-interface-list=WAN
Step 3: Configure Firewall and NAT Rules
The NAT and Firewall rules need to be set up to establish connectivity and avoid traffic collisions between the two ISPs. Follow the steps below:
- Go to the IP tab and choose the Firewall/Keeper sub-menu.
- Create a new rule and set the Chain value to the "input," the In-Interface value to the VLAN1/WAN1 interface, and the Action value to the "accept."
- Create a new rule with the Chain value set to the "input," In-Interface value to the VLAN2/WAN2 interface, and the Action value to the "accept."
- Set a default rule value to allow or block traffic.
- Go to the NAT sub-menu and create two rules to masquerade traffic over the two WAN interfaces.
- Go to the IP tab and choose the DNS sub-menu.
- Specify the DNS servers provided by both ISPs, prioritizing the primary DNS server for each ISP.
- Test the connectivity by pinging various web addresses and confirming that the network is balanced across both ISPs.
Conclusion
In conclusion, load balancing over multiple ISPs can help increase network redundancy, reliability, and throughput by optimizing available bandwidth. In this post, we learned how to set up load balancing over two ISPs using a Mikrotik router. By following the practical steps mentioned above, you can ensure that your network is balanced and optimized for maximum connectivity.
If you require any further assistance, please contact your local network support team.


Post a Comment for "Exploring MikroTik Router Proxy Load Balancing Techniques"