Enhancing Network Security With MikroTik VPN Solutions
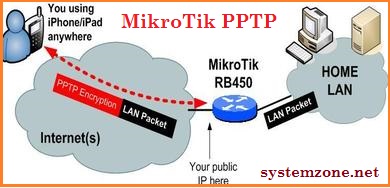
Are you someone who loves working remotely but struggles with setting up a secure VPN? Look no further! The MikroTik VPN Configuration with PPTP is here to help!

VPNs or Virtual Private Networks are a necessity in today’s world where we are always connected to the internet. They help us to secure our remote connections, encrypt data, and provide anonymity while browsing. VPNs are extensively used by businesses, governments, and individuals for secure communication. However, setting up a VPN can be quite a daunting task.
Mikrotik is a Latvian company that has made a name for itself in the routers and networking industry. MikroTik routers are widely used in homes, offices, and industries due to their low cost and reliability. Setting up a VPN through MikroTik PPTP is easy and can be completed in a few simple steps.
How to Set Up a VPN using MikroTik PPTP
Here are the steps you need to follow to configure your MikroTik router for PPTP VPN:
Step 1: Configure Your MikroTik Router
Before you begin with the configuration process, ensure that your router has the latest firmware update. Log in to your router with admin credentials and go to the IP>ADDRESS menu. Here you can find the IP address allocated to your router.
Step 2: Configure the PPTP Server
After logging in to your router, navigate to the PPP>Profiles menu. Here, click on the Add New button and create a new profile. Enter a name for the profile and select PPTP Server as the protocol. Make sure that the Use Encryption option is checked for added security.
Step 3: Add Users to the PPTP Server
You need to create a username and password combination to access the PPTP server. Navigate to the PPP>secrets menu and click the Add new button. Here, enter the username and password combination you wish to use. Set the service to PPTP.
Step 4: Configure the Firewall
The next step is to configure the firewall. You need to make sure that the firewall allows traffic to pass through the VPN. Navigate to the IP>Firewall>Filter Rules menu and click the Add new button. Here, select the following Chain: Forward, Protocol: TCP, Action: Accept, and set the destination port to 1723 (the default port for PPTP).
Step 5: Configure the NAT
The final step is to configure the Network Address Translation (NAT). NAT is used to map public IP addresses to private IP addresses, which is used in your Local Area Network (LAN). Navigate to the IP>Firewall>NAT menu. Click the Add new button and enter the following:
- Chain: srcnat
- Out Interface: WAN
- Action: masquerade
Your MikroTik PPTP server is now configured and you can connect to it using your username and password. You can now enjoy secure connections on your remote devices.
Conclusion
Setting up a VPN through MikroTik PPTP is a simple process that requires a few basic configurations. The added benefit of using MikroTik routers is that they are affordable, reliable, and low-maintenance. This hassle-free setup ensures that you can enjoy secure and anonymous internet browsing with ease. So, the next time you are remote working, use MikroTik PPTP to connect to your VPN and stay secure!


Post a Comment for "Enhancing Network Security With MikroTik VPN Solutions"