Configuring MikroTik Router For DHCP And VPN
VPN is a crucial tool for anyone concerned about their online privacy and security. But setting it up on each device can be a cumbersome task. That's where configuring VPN on your router comes into play. In this article, we'll take you through the step-by-step process of setting up VPN on your router to ensure comprehensive online protection for every device connected to it.

Why Configure VPN on Your Router?
The first question that comes to mind is "why should I bother setting up VPN on my router when I can configure it individually on each device?" There are several reasons why configuring VPN on your router is a better option:
- Covers All Devices: By configuring VPN on your router, you don't have to worry about individually configuring your devices, which can be cumbersome and time-consuming. Your router becomes the central hub of connectivity for all your devices, ensuring that they are all protected by the VPN connection automatically.
- Cost-Effective: Configuring VPN on your router is a cost-effective option as it eliminates the need to buy a VPN subscription for each device. Instead, you can sign up for a single VPN subscription and protect all your devices simultaneously.
- Uninterrupted Connectivity: By setting up VPN on your router, you can ensure uninterrupted internet connectivity, as all devices connected to the network are automatically protected by the VPN connection.
- Easy to Manage: Configuring VPN on your router simplifies the management of your network as there's only one point of configuration rather than multiple devices.
Router Setup Requirements
Before we proceed with the configuration process, there are a few prerequisites that you need to meet:
- A VPN Subscription: You need to have an active VPN subscription account to proceed with the configuration. If you don't have one, you can sign up for one from any reputable VPN provider.
- A Router That Supports VPN: You need to have a router that supports VPN to proceed with this configuration. Not all routers support VPN, so ensure that your router supports it.
- Access to Router Settings: You need access to your router settings to configure VPN on it. Usually, router settings are accessed through a web browser.
- Basic Technical Knowledge: You need to have basic technical knowledge to proceed with the configuration. Don't worry; we'll guide you through the process step by step.
Step-by-Step Configuration Process
Now that you have met the prerequisites, let's proceed with the configuration process.
Step 1: Accessing Router Settings
The first step in configuring VPN on your router is accessing your router settings. Router settings are usually accessed through a web browser. Here are the steps to access your router settings:
- Connect your computer or device to your router using an Ethernet cable or through a Wi-Fi network.
- Open your web browser and type in your router's IP address. To find your router's IP address, check the documentation that came with your router, or you can search for it online using your router's model number and brand.
- Once you've entered the router's IP address in the browser, a login screen will appear. Enter the login details to access the router's settings. If you haven't created a login, the default login is usually "admin" for both the username and password. However, note that the login details vary depending on the router brand and model. Refer to your router's documentation for the correct login details.
- After logging in, you'll be directed to the router's settings page. This is where you'll configure VPN on your router.
Step 2: Configuring VPN on Your Router
Now, let's proceed with configuring VPN on your router:
- Go to the VPN section of the router's settings page. This might be listed under "Security," "Advanced," or "VPN."
- From the VPN section, select the protocol you want to use. There are several VPN protocols, including PPTP, L2TP/IPSec, OpenVPN, and IKEv2. Each protocol has its advantages and disadvantages. Refer to your VPN provider's website for guidance on the best protocol to use.
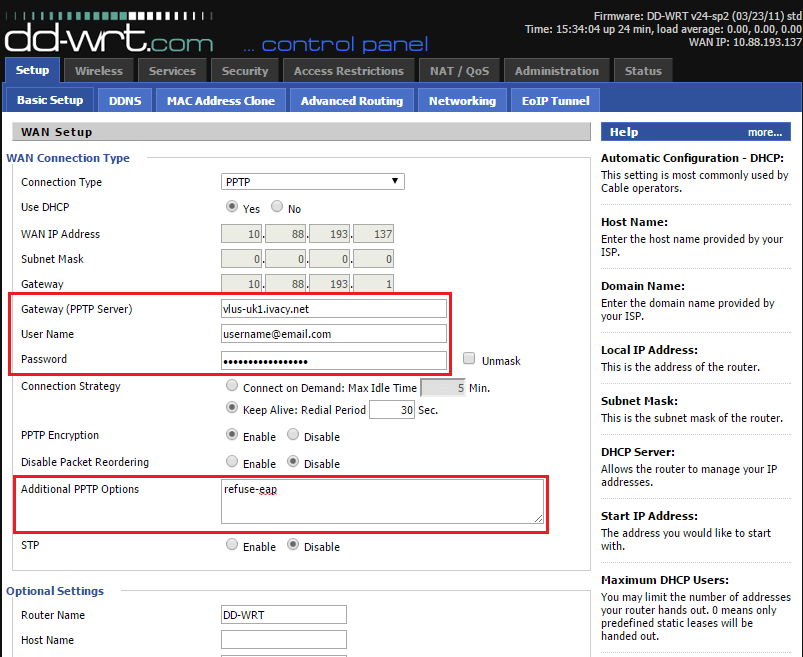
- Enter the VPN settings provided by your VPN provider. These settings include the server addresses, account credentials, and the encryption method. Fill in the details as per the instructions provided by your VPN provider. Note that the settings might vary depending on the VPN protocol you select.
- Save the settings and exit the router's settings page.
Step 3: Testing Your VPN Connection
Now that you've configured VPN on your router let's test whether it's working:
- Ensure that your router is connected to the internet.
- Connect any device to the router's Wi-Fi network or via Ethernet cable.
- Visit a website that displays your IP address to check whether you're connected to the VPN. There are several websites that can display your IP address, such as whatismyipaddress.com or whatismyip.com.
- If the IP displayed on the website is different from your actual IP address, your VPN connection is working. Congratulations, you've successfully configured VPN on your router!
Conclusion
Configuring VPN on your router provides comprehensive online protection for all devices connected to your network. By following the above step-by-step process, you can easily set up VPN on your router and enjoy uninterrupted and secure internet connectivity.


Post a Comment for "Configuring MikroTik Router For DHCP And VPN"