Building A Secure VPN Network Using MikroTik Routers
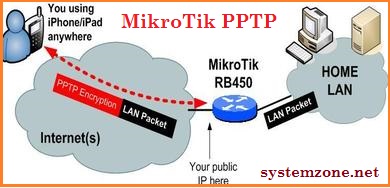
If you are looking for a way to create a PPTP VPN server using your MikroTik router, you have come to the right place! In this article, we will guide you through the step-by-step process of setting up a PPTP VPN server, complete with an image to help you visualize what needs to be done.

Why Use a PPTP VPN Server?
Firstly, let's talk about why you might want to use a PPTP VPN server. Essentially, a VPN (Virtual Private Network) allows you to connect to the internet securely and privately, using a different IP address. This can be useful for a variety of reasons, including:
- Accessing websites or content that may be blocked in your region
- Preventing others from viewing your online activity or personal information
- Bypassing internet censorship or government surveillance
Using a PPTP VPN server with your MikroTik router can be a convenient and cost-effective way of achieving these benefits, as you do not need to pay for a third-party VPN service.
Setting Up a PPTP VPN Server with MikroTik
Now, let's get into the nitty-gritty of setting up your PPTP VPN server using your MikroTik router.
Step 1: Configuring your MikroTik router
The first thing you will need to do is configure your MikroTik router to allow PPTP connections. To do this, follow these steps:
- Log in to your MikroTik router's web interface
- Navigate to the "PPP" section and click on "PPTP Server"
- Click on "Enabled" to allow PPTP connections
- Enter a range of IP addresses that can be assigned to clients, such as 192.168.1.10-192.168.1.20
- Click on "Apply" to save your changes
Step 2: Creating a PPTP user profile
Next, you will need to create a user profile for PPTP connections. To do this, follow these steps:
- Navigate to the "PPP" section and click on "Profiles"
- Click on the "+" button to create a new profile
- Enter a name for your profile, such as "PPTP Profile"
- Select "PPTP" as the protocol
- Enter the maximum number of active sessions you want to allow, such as 3
- Click on "Apply" to save your changes
Step 3: Creating a PPTP user account
Now, you need to create a user account for PPTP connections. To do this, follow these steps:
- Navigate to the "PPP" section and click on "Secrets"
- Click on the "+" button to create a new user account
- Enter a username that you want to use for PPTP connections
- Enter a password for the user account
- Enter "PPTP Profile" as the profile name
- Click on "Apply" to save your changes
Step 4: Configuring your client device
Finally, you need to configure your client device to connect to your PPTP VPN server. To do this, follow these steps:
- On your client device, navigate to the "VPN" settings
- Select "PPTP" as the VPN type
- Enter the IP address of your MikroTik router as the server address
- Enter the username and password that you created in Step 3
- Click on "Connect" to establish your VPN connection
Conclusion
And that's it! By following these simple steps, you can create your own PPTP VPN server using your MikroTik router. This can be a great way to secure your internet activity, access content that may be blocked in your region, and bypass internet censorship or government surveillance. Happy surfing!


Post a Comment for "Building A Secure VPN Network Using MikroTik Routers"