Advanced Routing Techniques For VPN Traffic On MikroTik Routers
Are you looking for a better way to manage your virtual routing and forwarding? Look no further than the MikroTik Wiki! We've found an incredibly helpful diagram that can help you understand how to implement a simple layer 3 VPN.
What is a layer 3 VPN?
Before we dive into the diagram, let's go over what a layer 3 VPN is and why you might want to use it. A layer 3 VPN is a type of virtual private network that allows you to securely connect multiple remote sites over the internet. Unlike a layer 2 VPN, which only supports Ethernet frames, a layer 3 VPN can support multiple protocols and can be used to connect different types of networks, such as IP and MPLS.
For businesses with multiple remote sites, a layer 3 VPN can be a cost-effective and reliable way to connect these sites and provide them with access to shared resources. Additionally, layer 3 VPNs can be used to provide remote workers with secure access to the company's internal network.
Understanding the diagram
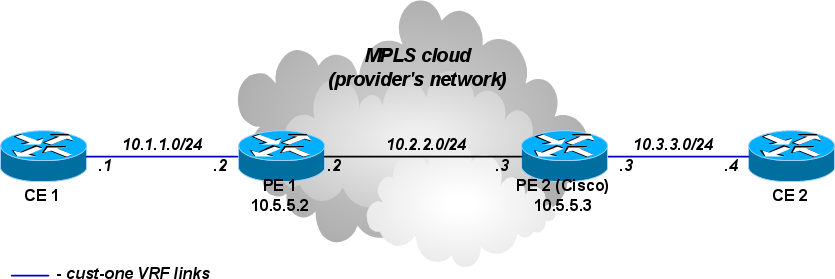
Now that we've covered the basics, let's take a closer look at the diagram. The diagram shows a simple layer 3 VPN with two site locations, Site A and Site B. Each site has its own subnet and a router that is connected to the internet. The VPN is set up using two tunnels, one for each site, and the tunnels are connected using the internet.
The diagram also shows two virtual routers, one at each site. These routers are used to route traffic between the subnets at each site and to forward traffic over the VPN. Each virtual router is connected to its corresponding site router and to the VPN tunnel.
Step-by-step guide to implementing a layer 3 VPN
Now that you understand the basics of a layer 3 VPN and the diagram, let's go through the steps to implement a layer 3 VPN using MikroTik RouterOS.
Step 1: Set up the site routers
The first step is to set up the routers at each site. This involves configuring the routers with the appropriate IP addresses, subnet masks, and gateway addresses. Ensure that the routers are connected to the internet and can access each other using their public IP addresses.
Step 2: Configure the virtual routers
Next, you will need to configure the virtual routers. This involves creating two virtual routers, one at each site, and configuring them with the appropriate IP addresses and routing tables. Each virtual router should be connected to its corresponding site router and to the VPN tunnel.
Step 3: Set up the VPN tunnels
The third step is to set up the VPN tunnels. This involves configuring two tunnels, one for each site, and configuring them with the appropriate IP addresses and encryption settings. Ensure that each tunnel is connected to its corresponding virtual router and that the tunnels are configured to route traffic over the internet.
Step 4: Configure the firewall rules
The fourth step is to configure the firewall rules. This involves creating rules that allow traffic to pass between the subnets at each site and that allow traffic to pass over the VPN tunnels. Ensure that the firewall rules are configured correctly to prevent unauthorized access to the network.
Step 5: Test the VPN
The final step is to test the VPN to ensure that it is working correctly. This involves testing the connectivity between the subnets at each site and testing the connectivity between the virtual routers. If there are any issues, troubleshoot the configuration and firewall rules until the VPN is working correctly.
Conclusion
In conclusion, the MikroTik Wiki is an excellent resource for anyone looking to implement a layer 3 VPN. The diagram we've discussed in this post provides a clear and concise overview of how to set up a simple layer 3 VPN using MikroTik RouterOS. By following the steps outlined in this post, you can set up your own layer 3 VPN and enjoy the benefits of secure, reliable, and cost-effective network connectivity between your remote sites.


Post a Comment for "Advanced Routing Techniques For VPN Traffic On MikroTik Routers"