Maximizing Web Performance With MikroTik Proxy Cache Optimization
Hey there my beautiful people, today we are gonna talk about setting up a proxy server using MikroTik. This is a very useful tool that will help improve your internet speed and security, especially if you are on a shared network. So buckle up and get ready to learn everything you need to know about configuring MikroTik for external proxy.
Firstly, let's understand what a proxy server is. A proxy server acts as a mediator between your computer and the internet. All your internet requests are first sent to the proxy server and then the proxy server forwards them to the internet. When the internet responds with the requested data, the proxy server receives it first and then forwards it to your computer. This way, your computer's IP address remains hidden and secure.
So, let's get started with setting up the proxy server using MikroTik. We will need to follow these steps:
Step 1: Setting Up the Network Topology
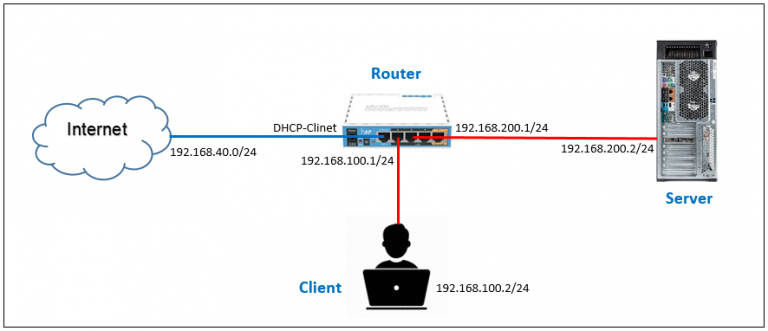
The first step in setting up the proxy server is to configure the network topology. We will need to create a DMZ (demilitarized zone) network, which will be a separate network that will act as a buffer zone between the internet and your internal network. The DMZ network will contain the proxy server and any other externally accessible services. To set up the DMZ network, we need to create a sub-interface on the MikroTik router and assign a new IP address range.
To create a sub-interface, go to the MikroTik Winbox and click on the "Interfaces" menu on the left-hand side. Then click on the "+" button to create a new interface and select "Ether" from the list. Enter the name of the sub-interface, e.g. DMZ, and set the "Master Port" to the interface that connects to the internet. Set the "Slave Interface" to "none" and click on the "Apply" button.
Now, we need to assign a new IP address range to the DMZ sub-interface. To do this, click on the "IP" menu on the left-hand side and select "Addresses". Click on the "+" button and enter the new IP address range for the DMZ network, e.g. 192.168.100.0/24. Set the Interface to the DMZ sub-interface that we just created and click on the "Apply" button.
Step 2: Configuring the NAT Rules
The next step is to configure the NAT (Network Address Translation) rules for the DMZ network. NAT rules are used to translate the IP addresses in the packets that are sent between the internet and your internal network. We need to configure NAT rules for both incoming and outgoing traffic on the DMZ sub-interface.
To configure the NAT rules, go to the "IP" menu on the left-hand side and select "Firewall". Click on the "NAT" tab and then click on the "+" button to add a new rule. Set the "Chain" to "srcnat" and the "Out. Interface" to the DMZ sub-interface. In the "Action" tab, select "masquerade". Finally, click on the "Apply" button to save the new NAT rule.
For incoming traffic, we need to add another NAT rule that will forward all incoming traffic to the proxy server. To do this, go to the "IP" menu on the left-hand side and select "Firewall" again. Click on the "NAT" tab and then click on the "+" button to add a new rule. Set the "Chain" to "dstnat" and the "In. Interface" to the interface that connects to the internet. In the "Action" tab, select "dst-nat" and enter the IP address of the proxy server in the "To Addresses" field. Click on the "Apply" button to save the new NAT rule.
Step 3: Setting Up the Proxy Server
Now, we need to set up the proxy server itself. The proxy server we will be using is called Squid, which is a free and open-source proxy server software. To install Squid on MikroTik, we need to SSH into the router and run the following commands:
sudo apt-get update
sudo apt-get install squid
Once Squid is installed, we need to configure it using the following commands:
sudo nano /etc/squid/squid.conf
This will open the Squid configuration file in the nano editor. We need to add the following lines to the file:
http_port 3128
acl allowed_clients src 192.168.100.0/24
http_access allow allowed_clients
cache_dir ufs /var/spool/squid 100 16 256
This will configure Squid to listen on port 3128 and allow access from the DMZ network. Finally, save the configuration file and restart Squid using the following command:
sudo service squid restart
Step 4: Testing the Proxy Server
Now that we have set up the proxy server, we need to test it to make sure it is working correctly. To do this, we can use a web browser to access a website from a computer on the DMZ network. When we access the website, we should see the IP address of the proxy server instead of the computer's IP address.
To configure your web browser to use the proxy server, go to the browser settings and enter the IP address of the proxy server (which is the IP address of the MikroTik router's DMZ sub-interface) and port 3128 in the proxy settings.
Conclusion
And that's it my beautiful people, we have successfully set up a proxy server using MikroTik. We have learned how a proxy server works, how to configure the network topology, NAT rules, and how to set up the Squid proxy server. I hope you found this article informative and helpful. If you have any questions or suggestions, please leave them in the comments section below. Stay safe and stay connected!


Post a Comment for "Maximizing Web Performance With MikroTik Proxy Cache Optimization"