MikroTik VPN Configuration Site-to-Site And Remote Access Setup
Are you looking for a secure way to connect to your remote network from outside? Look no further than MikroTik VPN with PPTP configuration! With this step-by-step guide, you can easily set up a VPN server on your MikroTik router and connect remotely with ease.

What is MikroTik VPN?
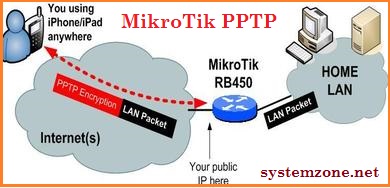
MikroTik VPN is a secure way to connect to your remote network from outside the network. It is a Virtual Private Network (VPN) that uses Point-to-Point Tunneling Protocol (PPTP) to create a secure and encrypted connection between the remote client and the MikroTik router.
Why Use MikroTik VPN?
Using MikroTik VPN with PPTP provides many benefits, such as:
- Increased security
- Remote access to network resources
- Ability to connect to your home or office network from anywhere
How to Configure MikroTik VPN with PPTP?
Now that you understand the benefits of MikroTik VPN, it’s time to set it up. Follow these simple steps to configure MikroTik VPN with PPTP:
- Open Winbox and connect to your MikroTik router.
- Click on IP > Pools.
- Click on the “+” button to add a new pool.
- Enter a name for the pool and set the addresses that you want to use for the pool (e.g., 192.168.1.201-192.168.1.229).
- Click on IP > PPTP Server.
- Click on the “+” button to add a new PPTP server configuration.
- Enter a name for the server and set the authentication type to “MSCHAP2”.
- Select the pool that you created in step 4 from the “Addresses” drop-down menu.
- Set the encryption to “yes”.
- Click on the “OK” button to save the configuration.
How to Connect to MikroTik VPN with PPTP?
Now that you have configured MikroTik VPN with PPTP, it’s time to connect to it. Follow these simple steps to connect to MikroTik VPN with PPTP:
- Open the “Network and Sharing Center” on your remote client (Windows).
- Click on the “Set up a new connection or network” link.
- Select “Connect to a workplace” and click on the “Next” button.
- Select “Use my Internet connection (VPN)”.
- Enter the IP address of your MikroTik router in the “Internet address” field.
- Enter a name for the connection in the “Destination name” field.
- Check the “Don’t connect now; just set it up so I can connect later” checkbox.
- Click on the “Next” button.
- Enter the username and password that you set up in the MikroTik PPTP server configuration.
- Click on the “Create” button.
- Click on the “Close” button.
- Open the “Network and Sharing Center” again.
- Click on the “Connect” button next to your newly created connection.
- Enter your username and password again.
- Click on the “Connect” button.
In Conclusion
MikroTik VPN with PPTP is an easy and secure way to connect to your remote network from outside. By following the steps in this guide, you can quickly configure and connect to your VPN server with ease. So why wait? Start enjoying the benefits of MikroTik VPN today!


Post a Comment for "MikroTik VPN Configuration Site-to-Site And Remote Access Setup"