MikroTik RouterOS VPN Troubleshooting Tips For Connection And Performance Issues
Virtual Private Networks (VPNs) have recently become popular for businesses and individuals looking to maintain privacy and increase security online. A VPN essentially establishes a secure and encrypted connection between two devices, allowing data to be transmitted securely over the internet. One popular tool for setting up VPNs is Mikrotik, a powerful routerOS software that includes a built-in VPN functionality. In this tutorial, we will be discussing how to set up a point-to-point VPN tunnel using Mikrotik.
What is a Point-to-Point VPN Tunnel?
Before diving into the specifics of configuring a point-to-point VPN tunnel, it is important to first understand what exactly a point-to-point VPN tunnel is. As the name suggests, a point-to-point VPN tunnel is a type of VPN connection that establishes a secure and encrypted connection between two devices. In a point-to-point VPN tunnel, data is transmitted between the two devices over the internet with the added security of encryption, making it difficult for any third party to intercept and view the transmitted data.
How to Set Up a Point-to-Point VPN Tunnel using Mikrotik
Now that we know what a point-to-point VPN tunnel is, let's move on to configuring one using Mikrotik. Here are the steps:
1. Set Up the Router
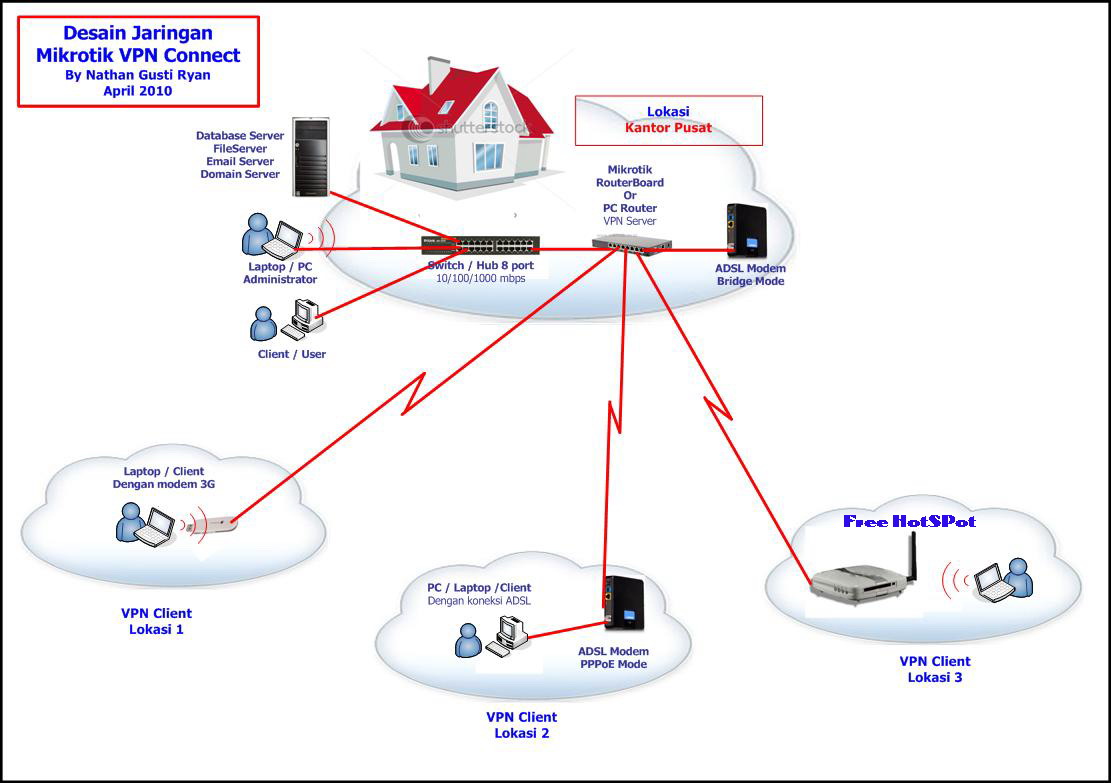
The first step in setting up a point-to-point VPN tunnel using Mikrotik is to configure the routers on both ends of the connection. This involves configuring the IP addresses, gateway, and subnet mask for each router, as well as configuring any necessary firewall rules or NAT (Network Address Translation) policies. Once the routers have been configured, they should be able to communicate with each other over the internet using their respective IP addresses.
2. Configure the VPN Tunnel
Once the routers have been configured, the next step is to configure the VPN tunnel itself. This involves configuring the necessary encryption settings, as well as configuring the IP addresses and subnets that will be used for the VPN connection. By default, Mikrotik uses the L2TP (Layer 2 Tunneling Protocol) for VPN connections, but it also supports other VPN protocols such as PPTP (Point-to-Point Tunneling Protocol) and OpenVPN.
3. Add Users
After the VPN tunnel has been configured, the next step is to add users who will be able to connect to the VPN. This involves creating user accounts that will be used to authenticate the VPN connection, as well as configuring any necessary access policies or authorization settings. Mikrotik supports a variety of authentication methods, including username and password, certificates, and RADIUS authentication.
4. Test the Connection
Once the VPN tunnel and user accounts have been configured, the final step is to test the connection to ensure that everything is working properly. This involves connecting to the VPN from a remote device and verifying that data can be transmitted securely and encrypted over the VPN connection. If everything is working properly, the remote device should be able to access resources on the local network as if it were physically located on that network.
Conclusion
Setting up a point-to-point VPN tunnel using Mikrotik can be a highly effective way to increase security and privacy online. By encrypting data transmissions and establishing a secure and encrypted connection between two devices, a point-to-point VPN tunnel can help protect sensitive data from prying eyes and ensure that data is transmitted securely over the internet. By following the steps outlined in this tutorial, you can easily configure a point-to-point VPN tunnel using Mikrotik and enjoy the added security and privacy benefits that it provides.


Post a Comment for "MikroTik RouterOS VPN Troubleshooting Tips For Connection And Performance Issues"